E-commerce Microservices
Keploy Integration testing
Introduction
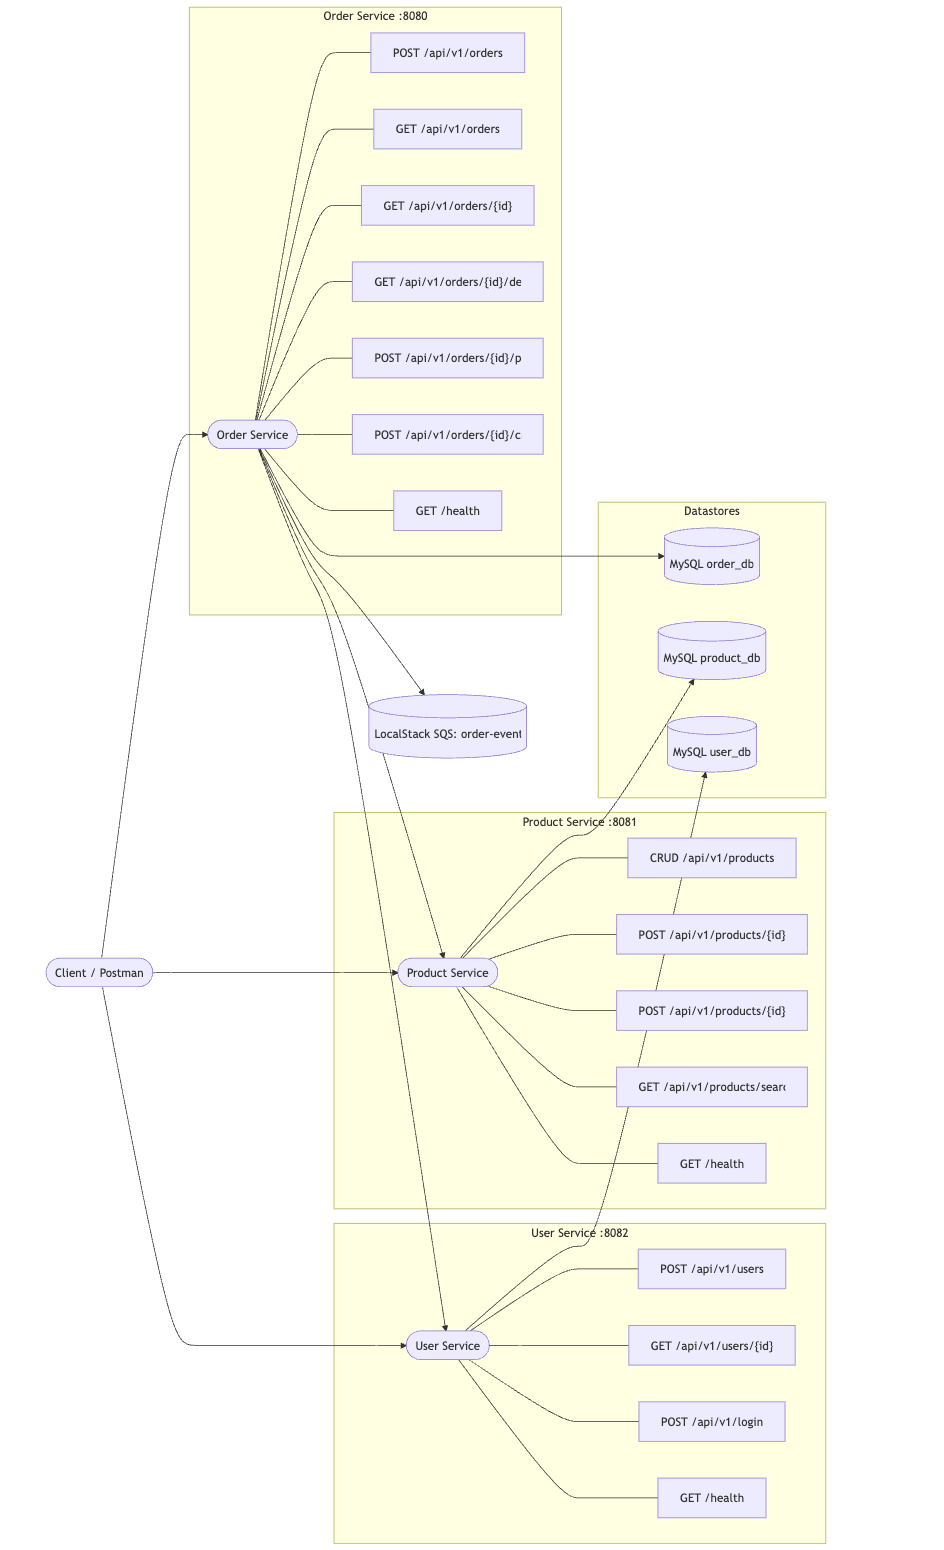
This guide will walk you through testing an E-commerce microservices application with Keploy. The app contains three microservices:
- User Service
- Product Service
- Order Service
Each service uses its own MySQL database, and LocalStack SQS is used for messaging. Keploy will help you automatically generate test cases and mocks for these services.
Don’t have Keploy Enterprise installed yet?
Before running this sample, make sure Keploy Enterprise version is installed on your system.
👉 Go to Installation GuideClone the Sample Application
First, clone the repository that contains the sample app:
git clone https://github.com/keploy/ecommerce_sample_app.git
cd ecommerce_sample_app
Note: You can view the architecture diagram of the application
Start the Microservices
The app is set up with Docker Compose, making it easy to start all services together. Let’s begin with the Order Service.
Capture Test Cases with Keploy
To start capturing API test cases, use the following command:
keploy record -c "docker compose up" --container-name="order_service" --build-delay 40 --path="./order_service" --config-path="./order_service"

Now the question arises how to make an API call? We’ve made it simple! You can just import the Postman collection and try sending an API call.
You can download the Postman collection from this URL and import it into Postman:
https://github.com/keploy/ecommerce_sample_app/tree/main/postman
(or)
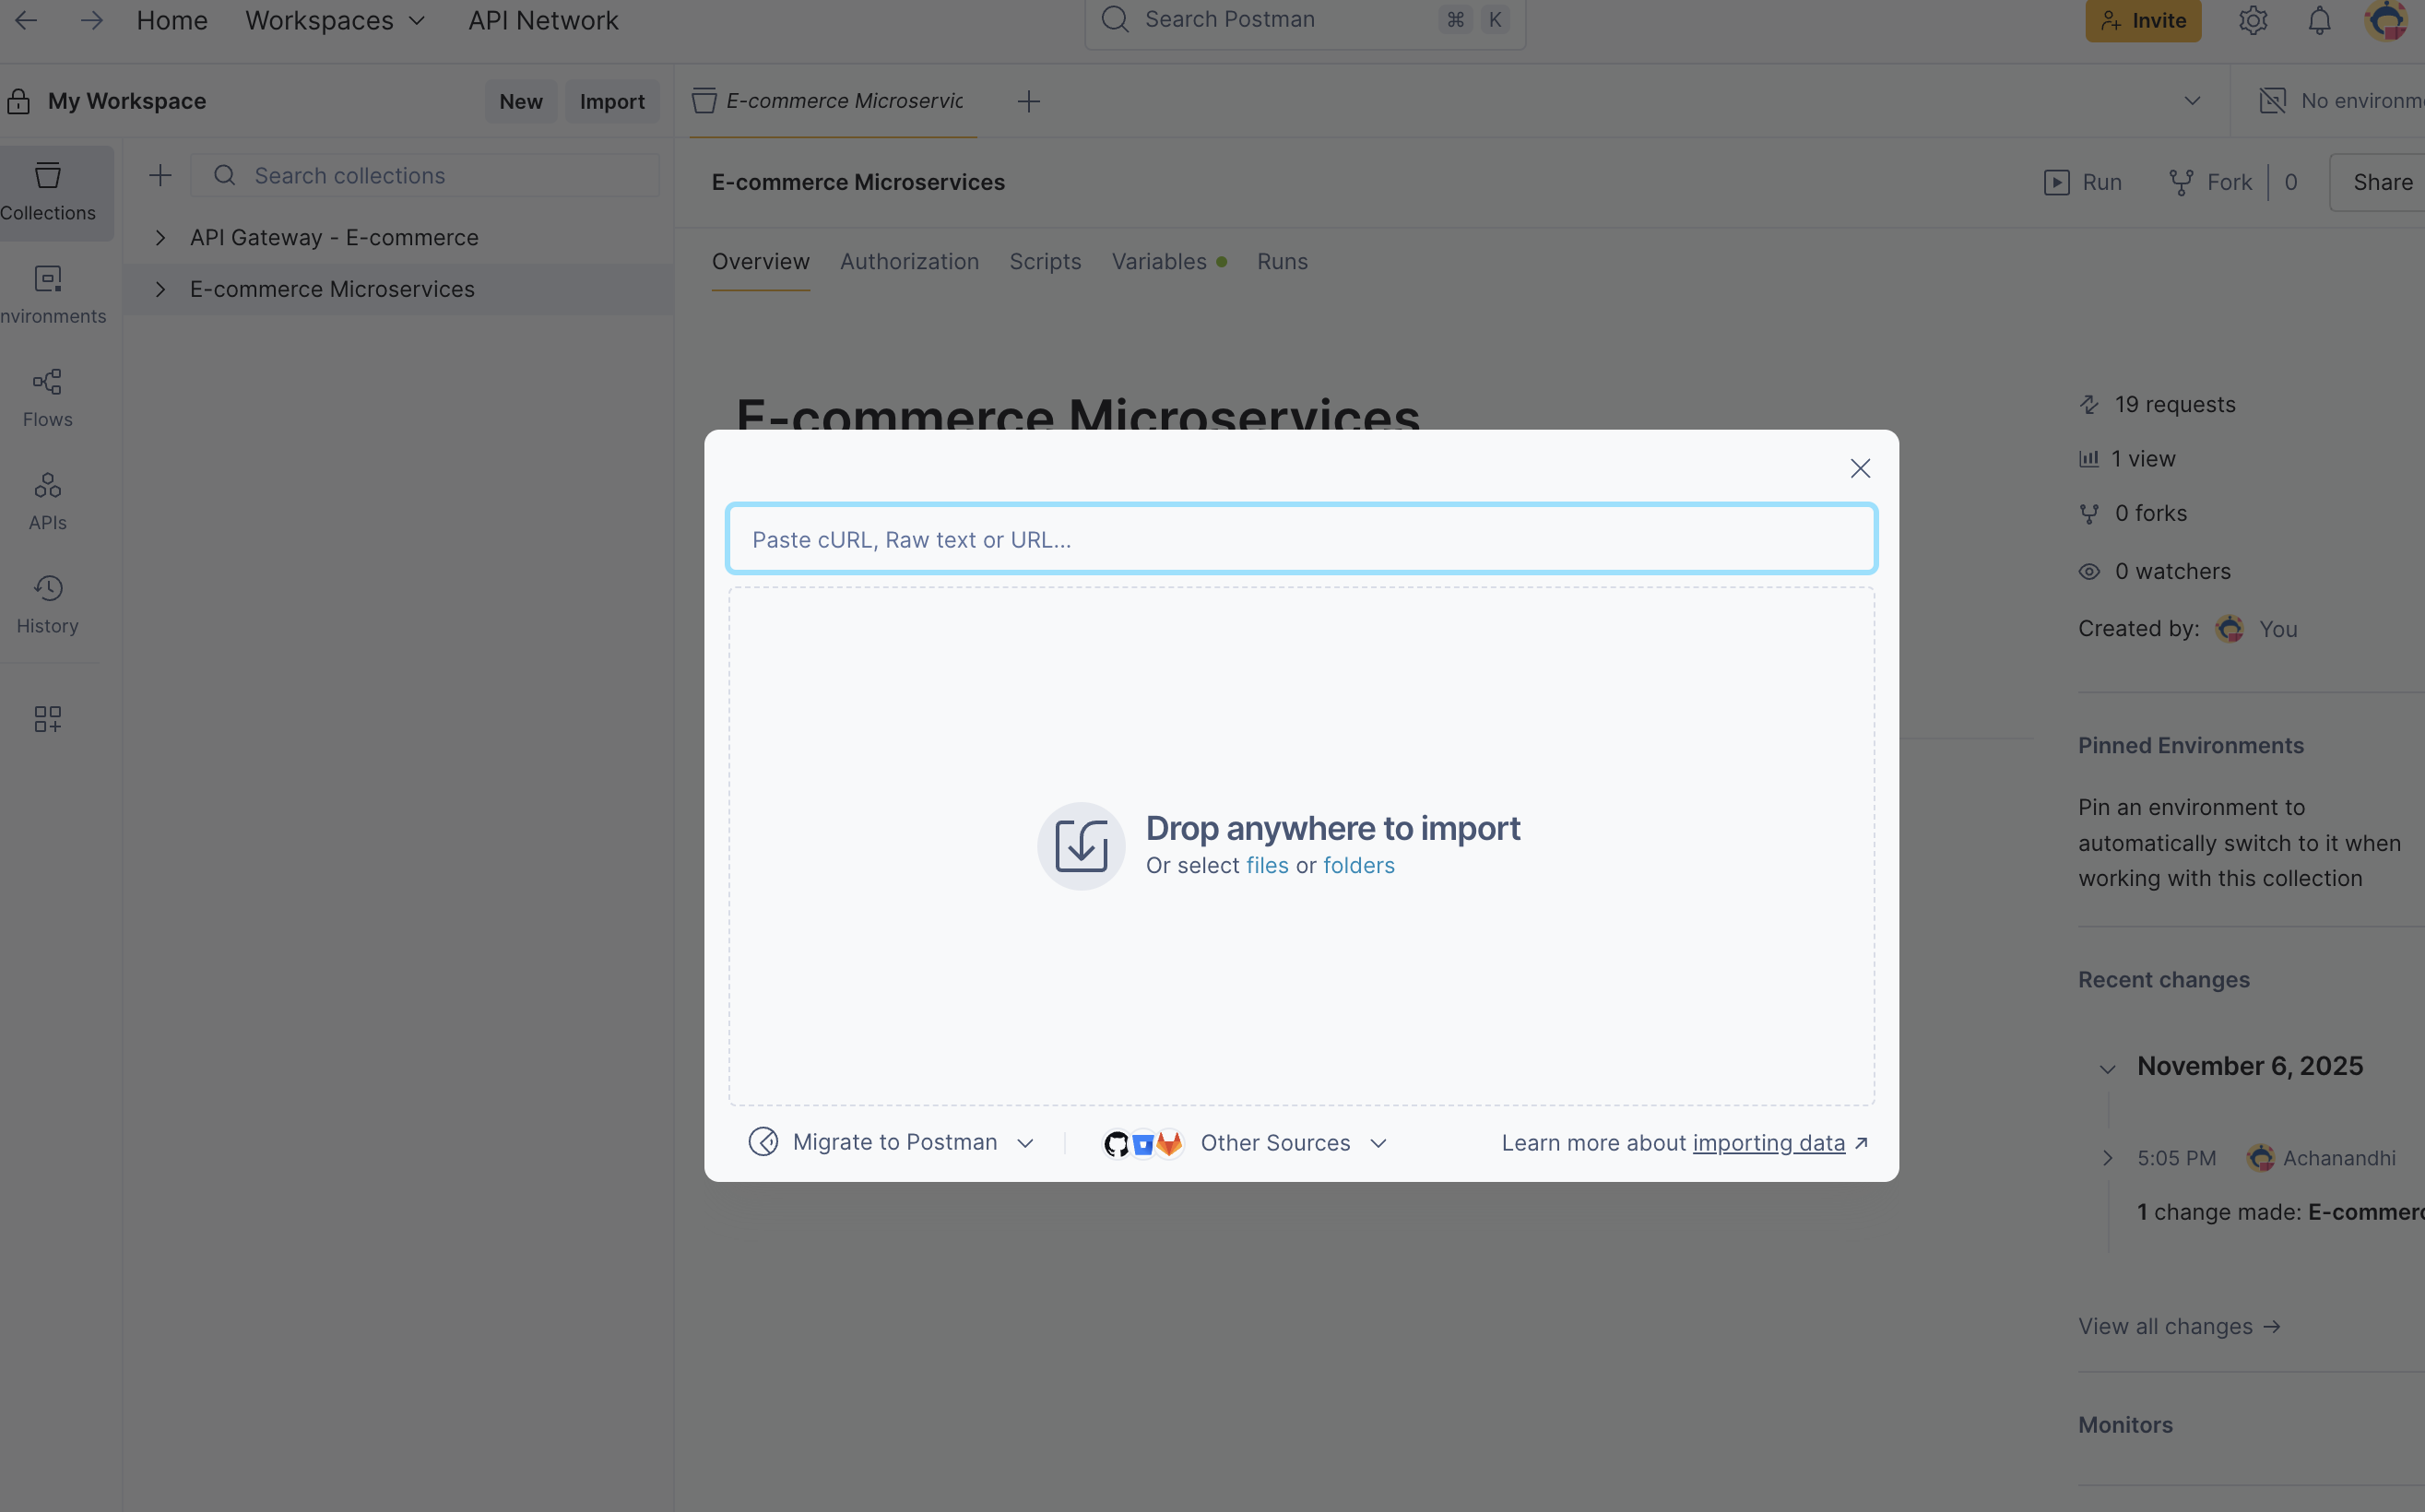
If you prefer an easier way, you can simply click the copy full collections button the below.
{
"info": {
"name": "E-commerce Full Stack (Gateway + Microservices)",
"schema": "https://schema.getpostman.com/json/collection/v2.1.0/collection.json"
},
"item": [
{
"name": "API Gateway",
"item": [
{
# ...
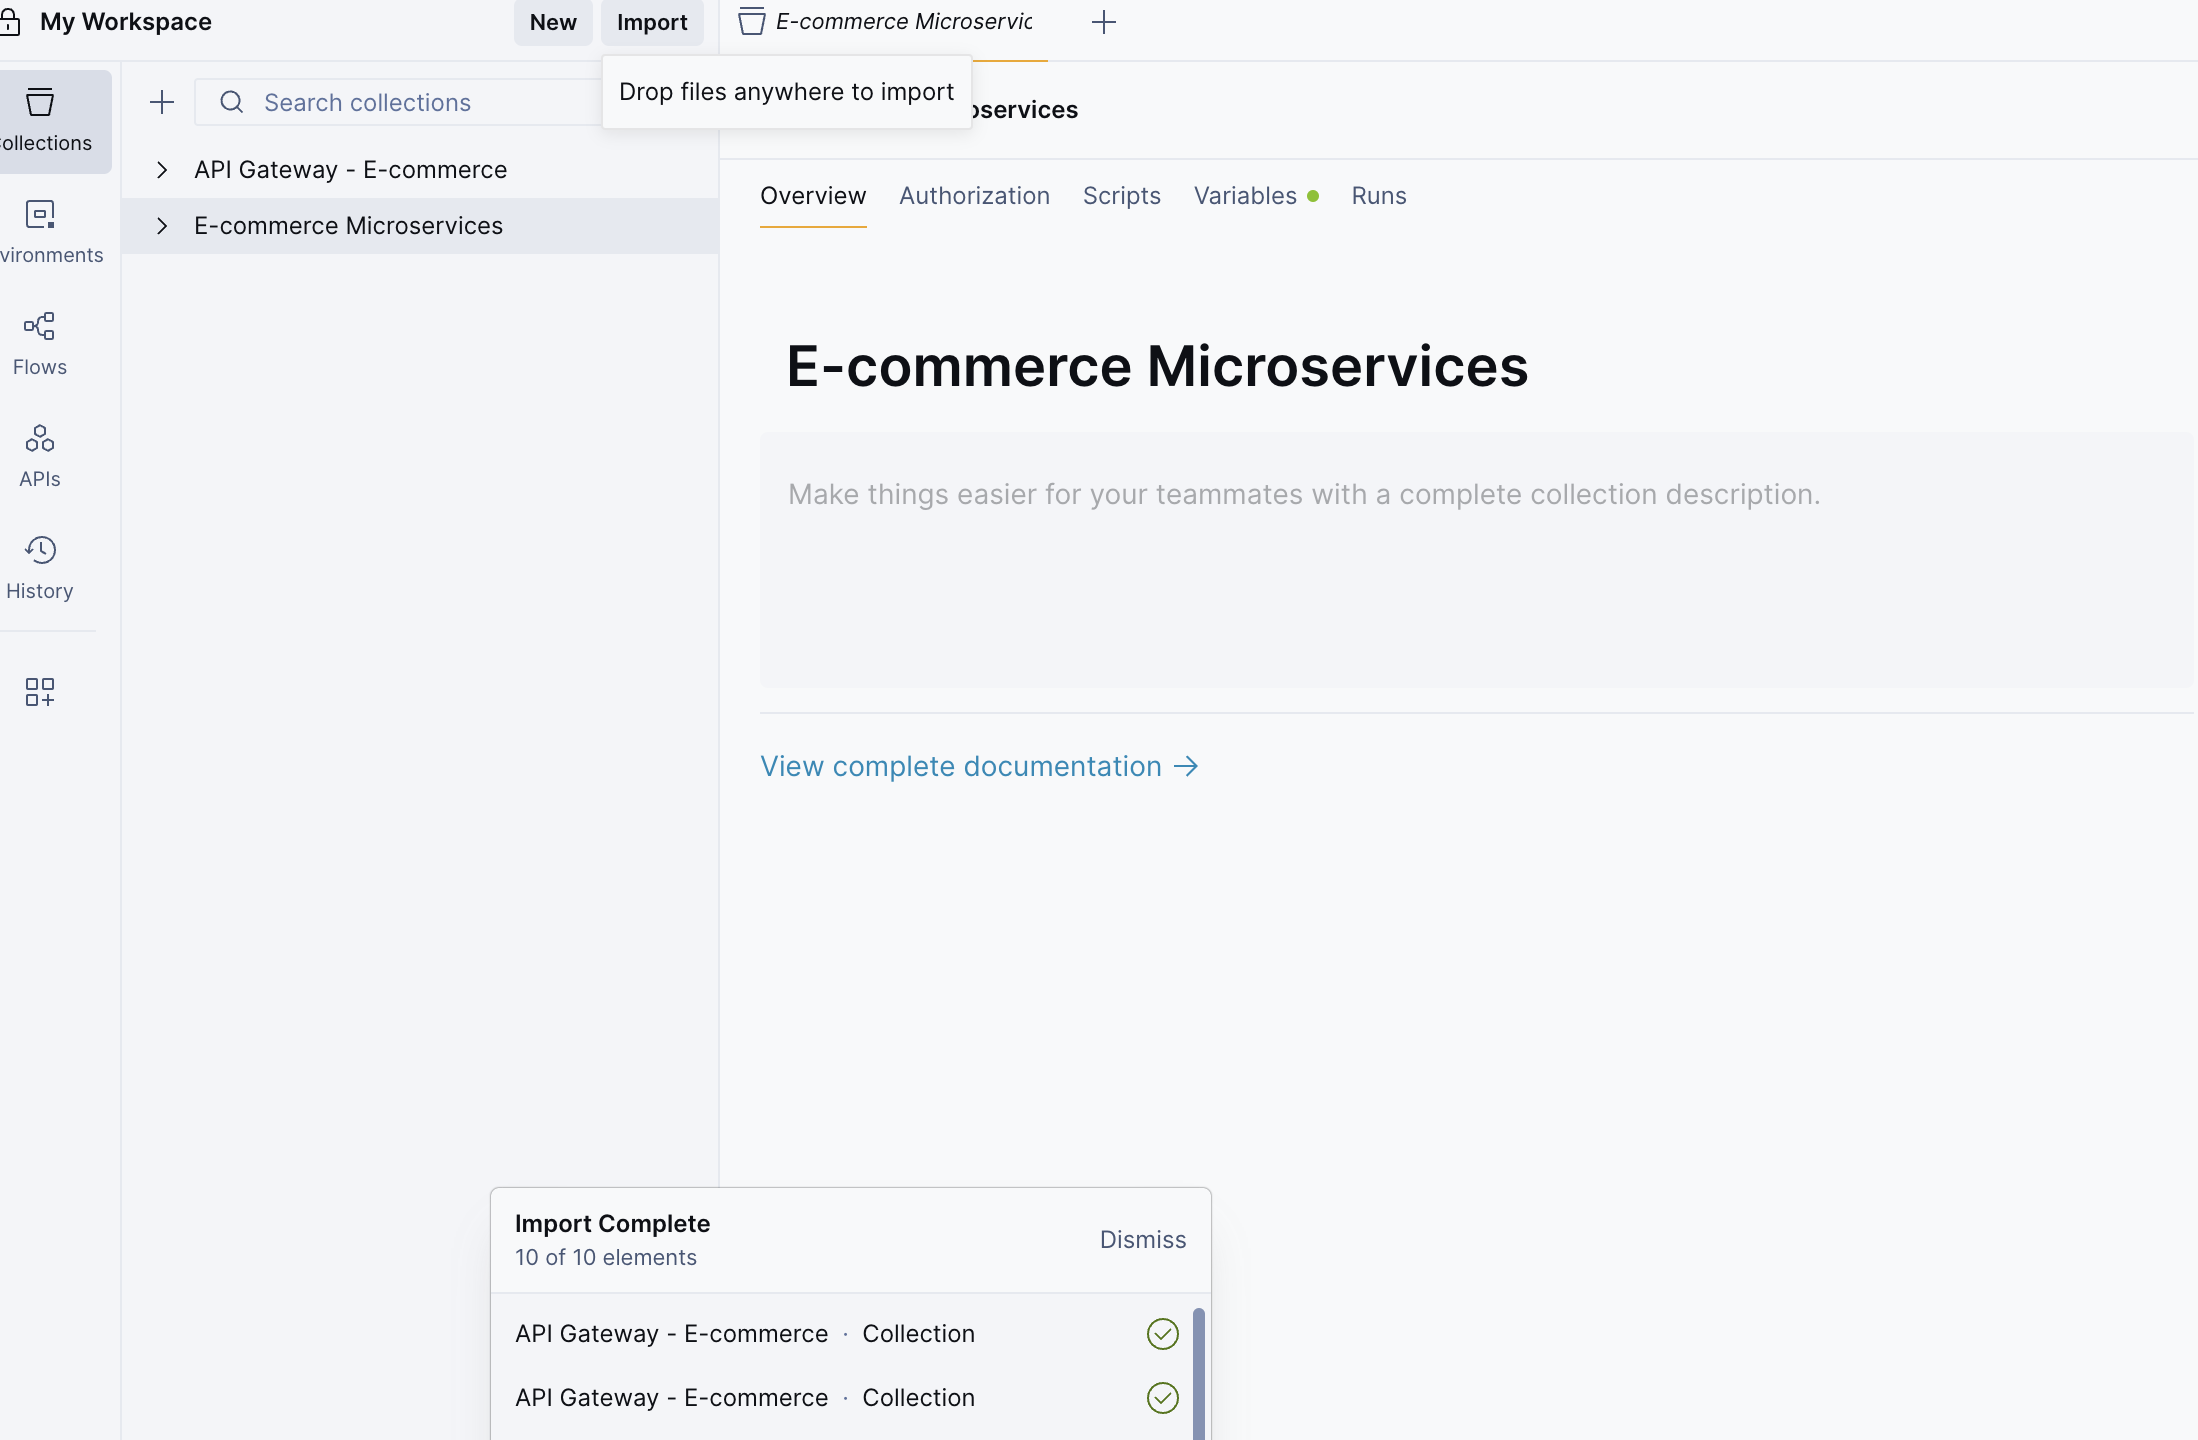
Step 1: If you’ve already downloaded the collection, upload it.
Step 2: After the upload is complete, you will see the Ecommerce Microservices collection in the left panel. Open the collection to continue.
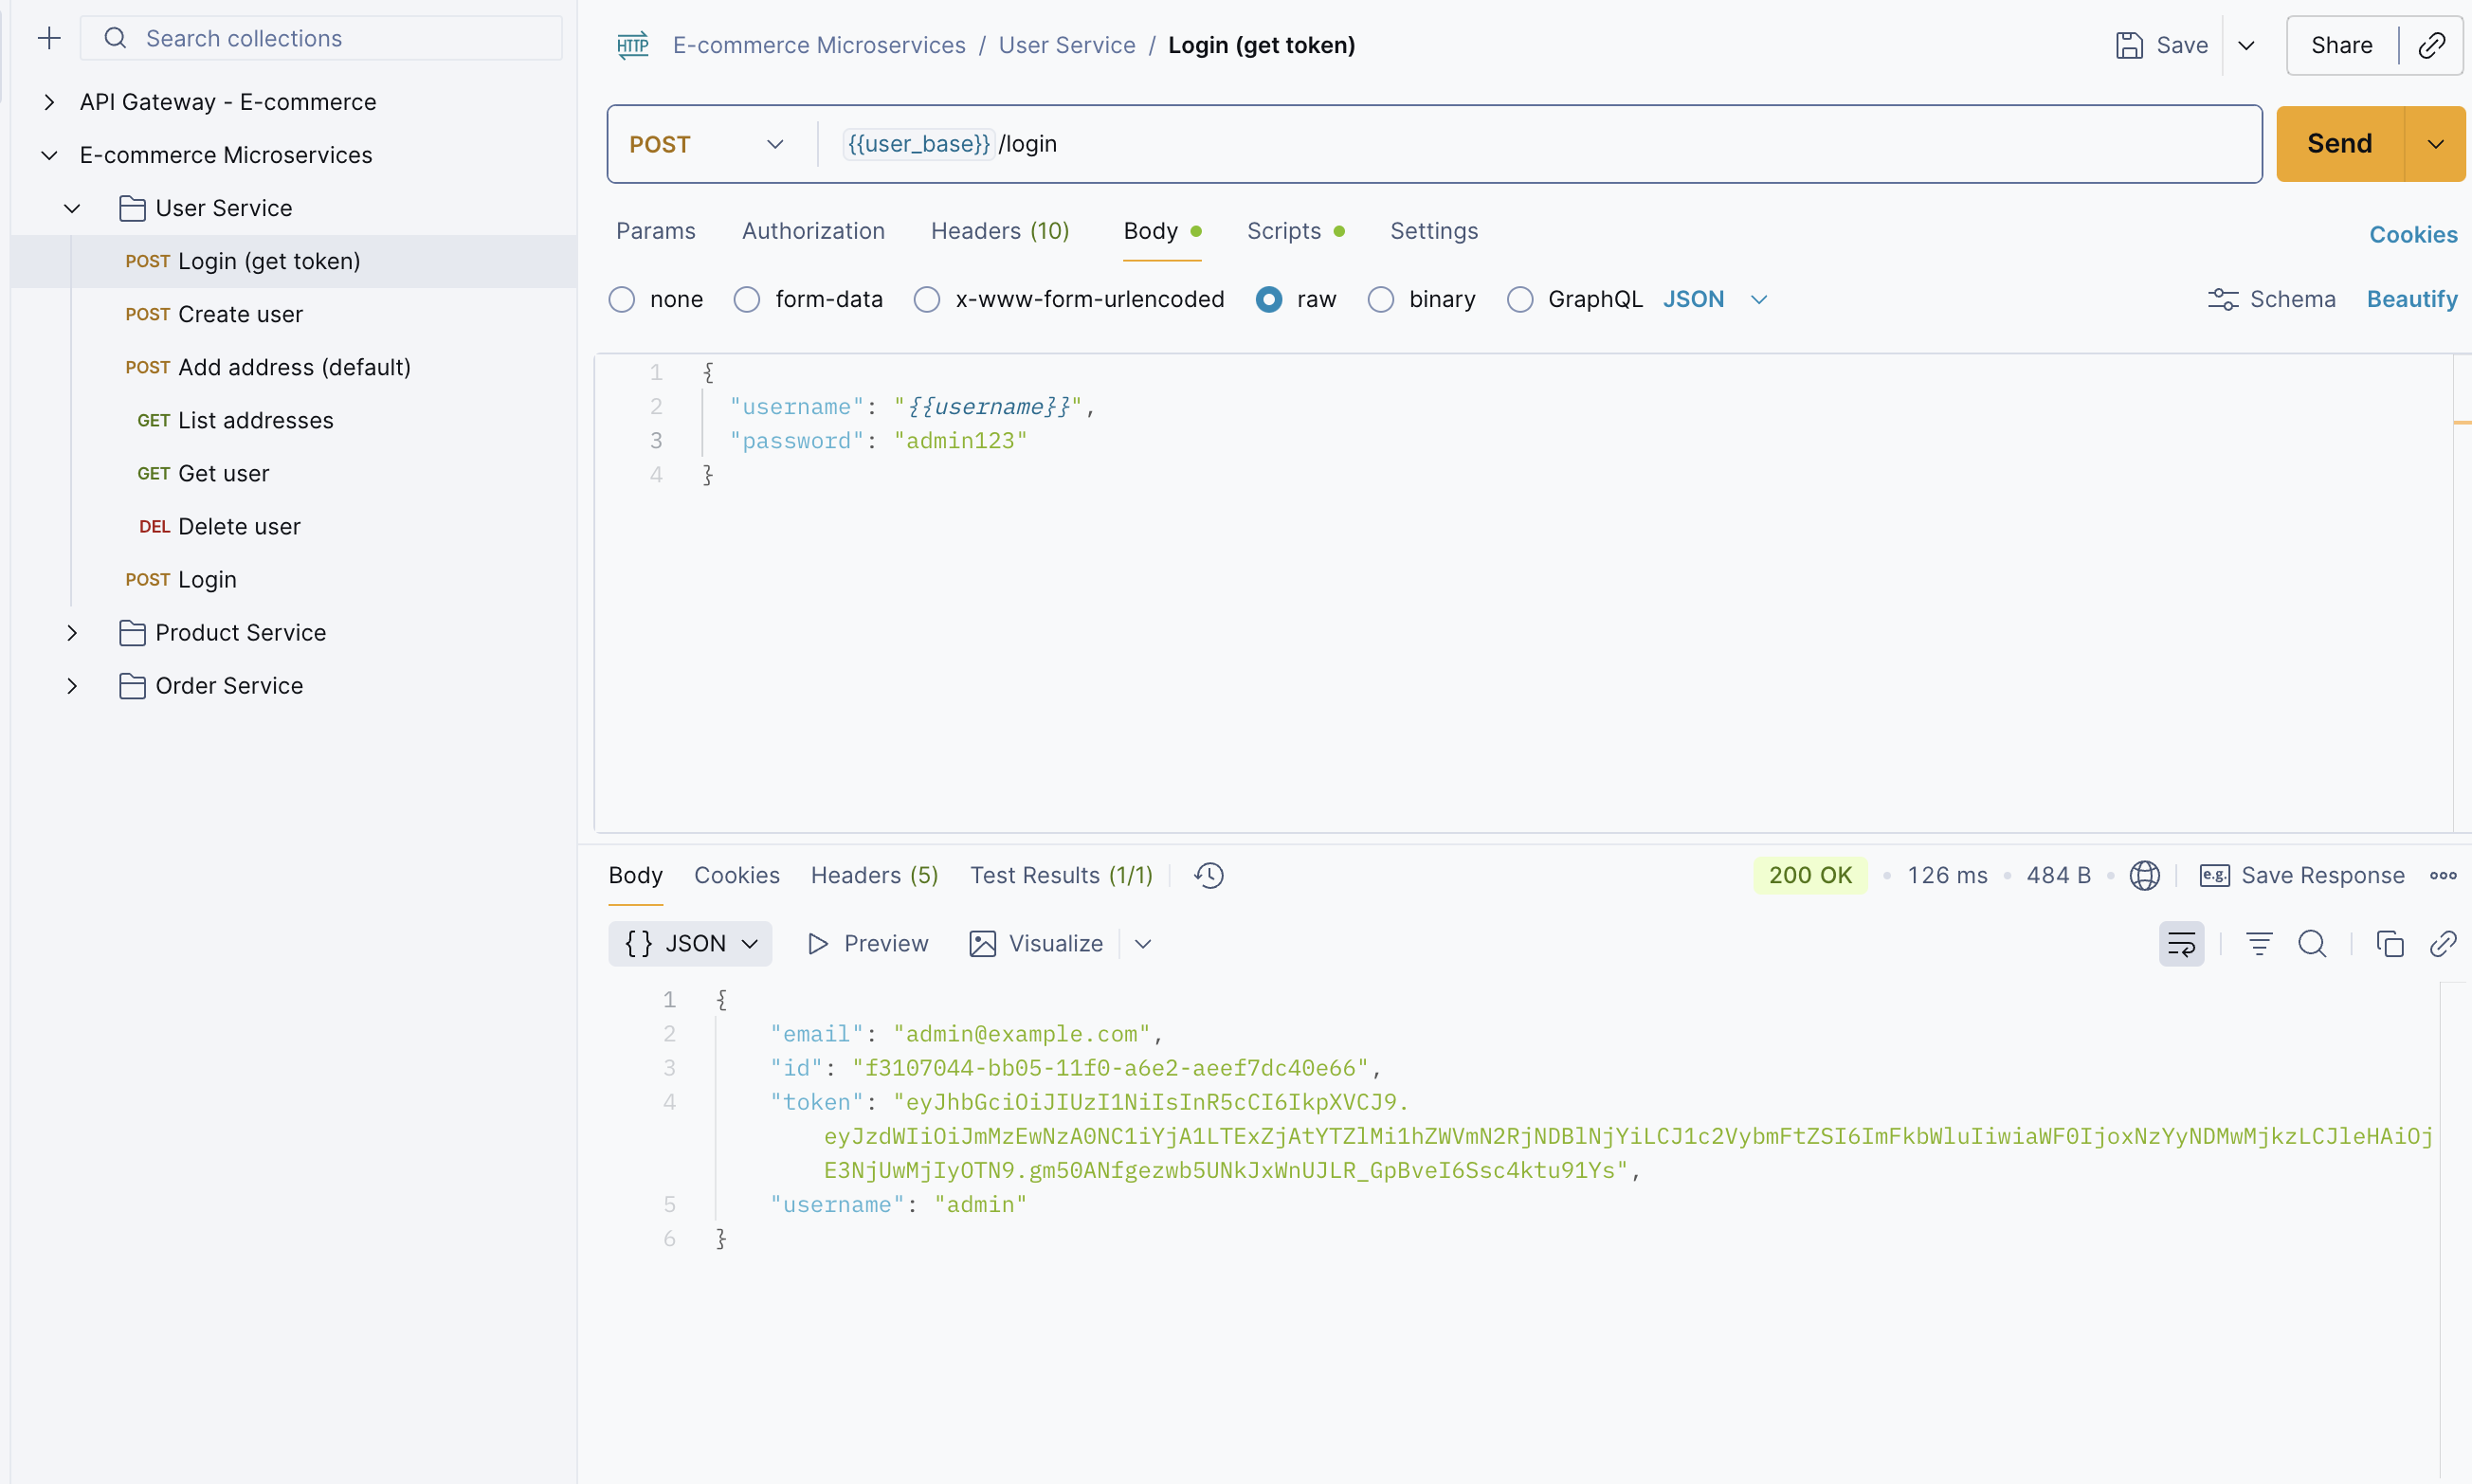
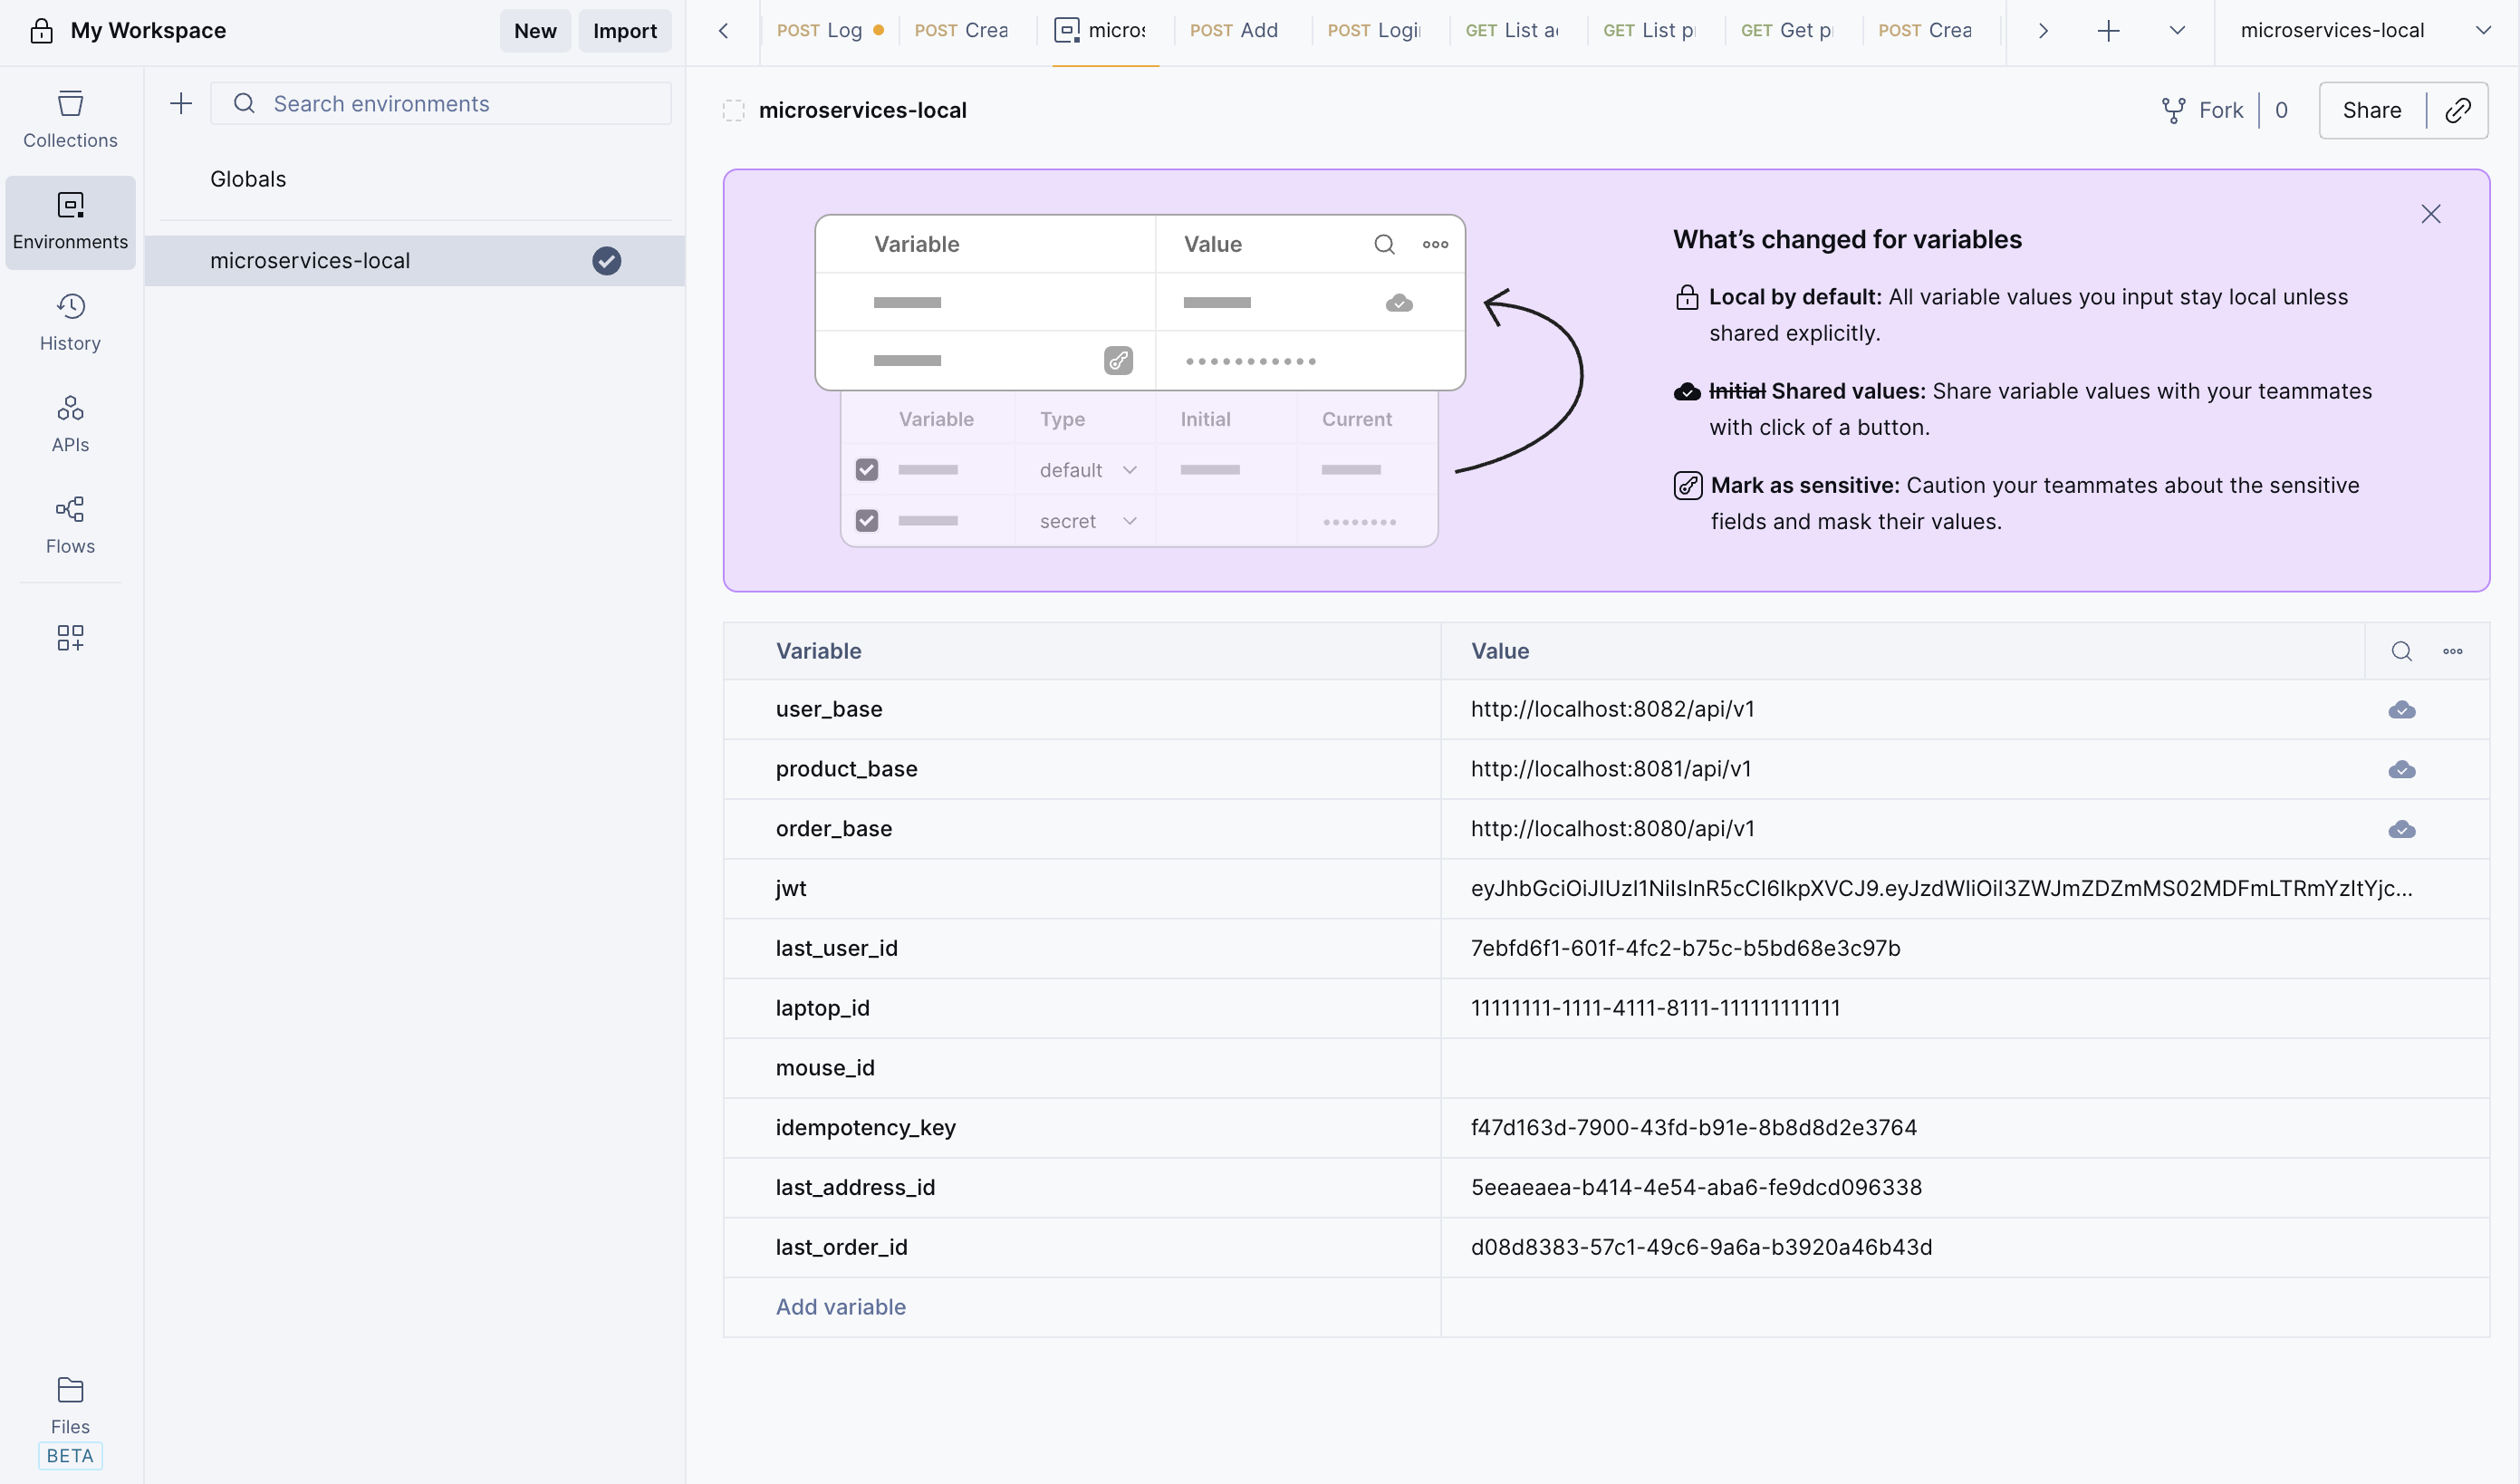
Step 3: Before sending any requests, ensure you have generated a JWT token. Click on User Service. Use the Login API and enter the following credentials: Username: admin and Password: admin123. After a successful login, you will receive a JWT token. Copy the token and paste it into your Environment settings.
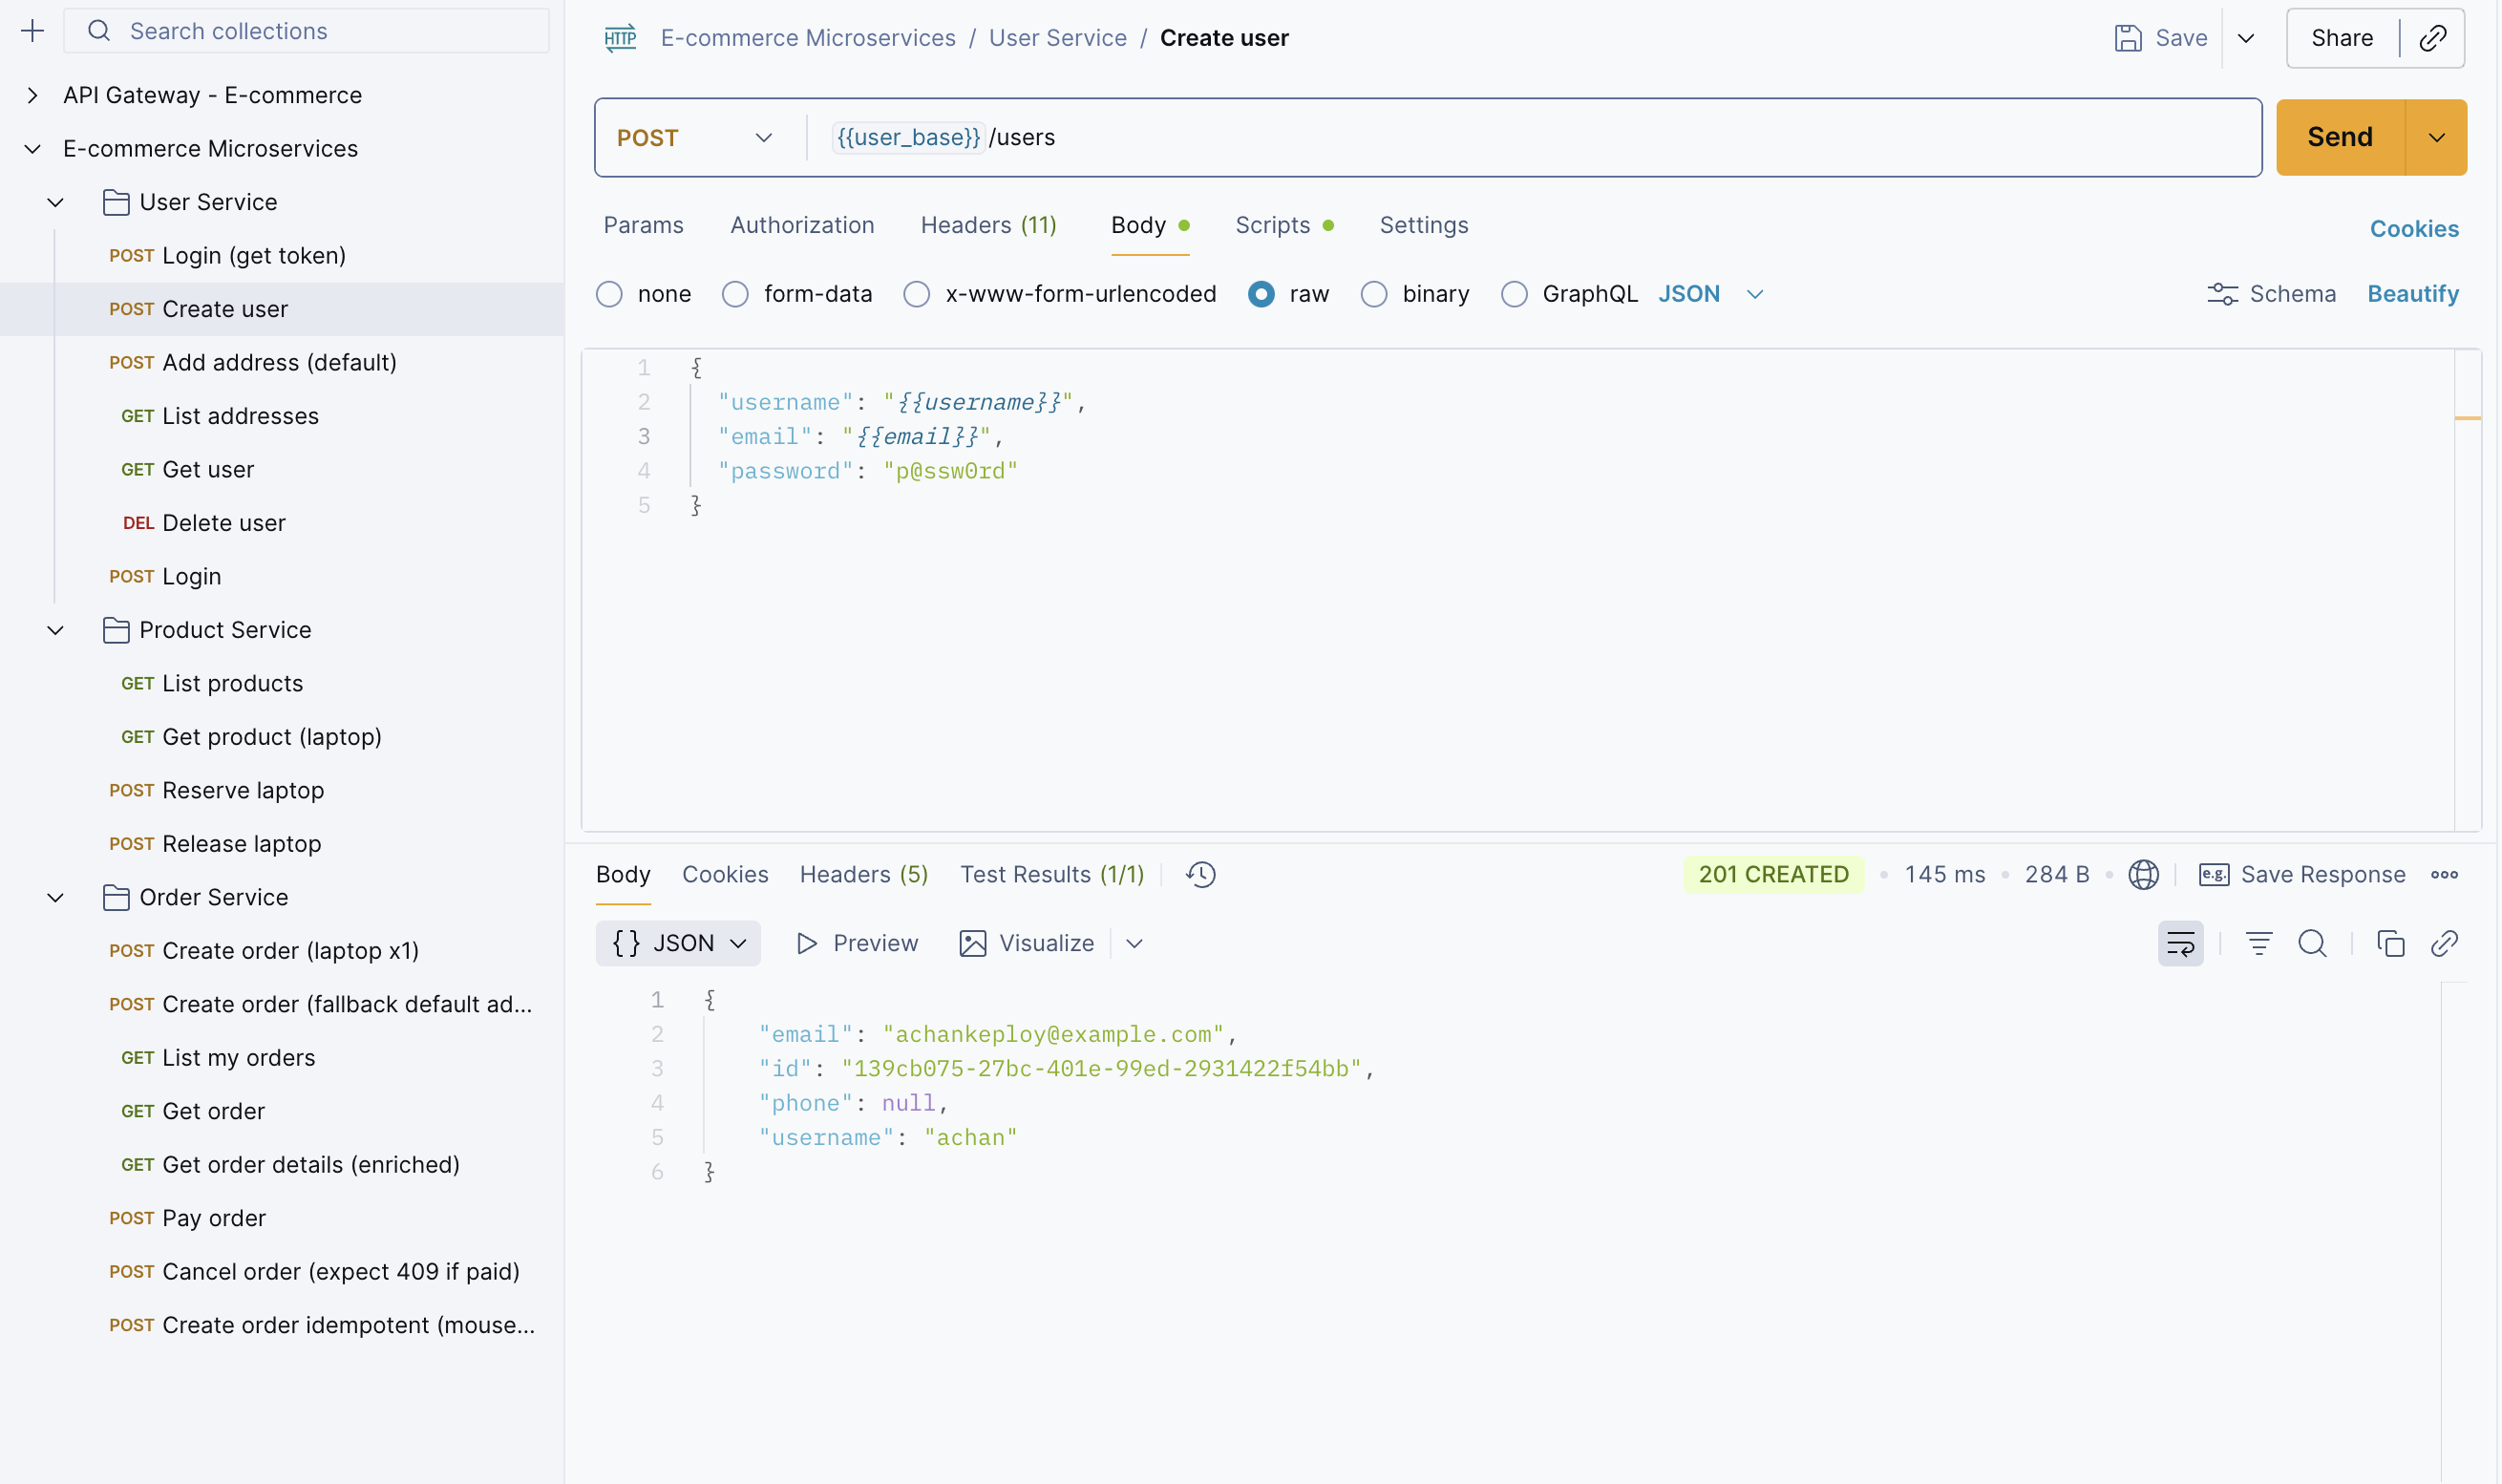
Step 4: We need to create a user before placing an order. So, create a user using the Create User API.
Step 5: Then, create an address for the user.

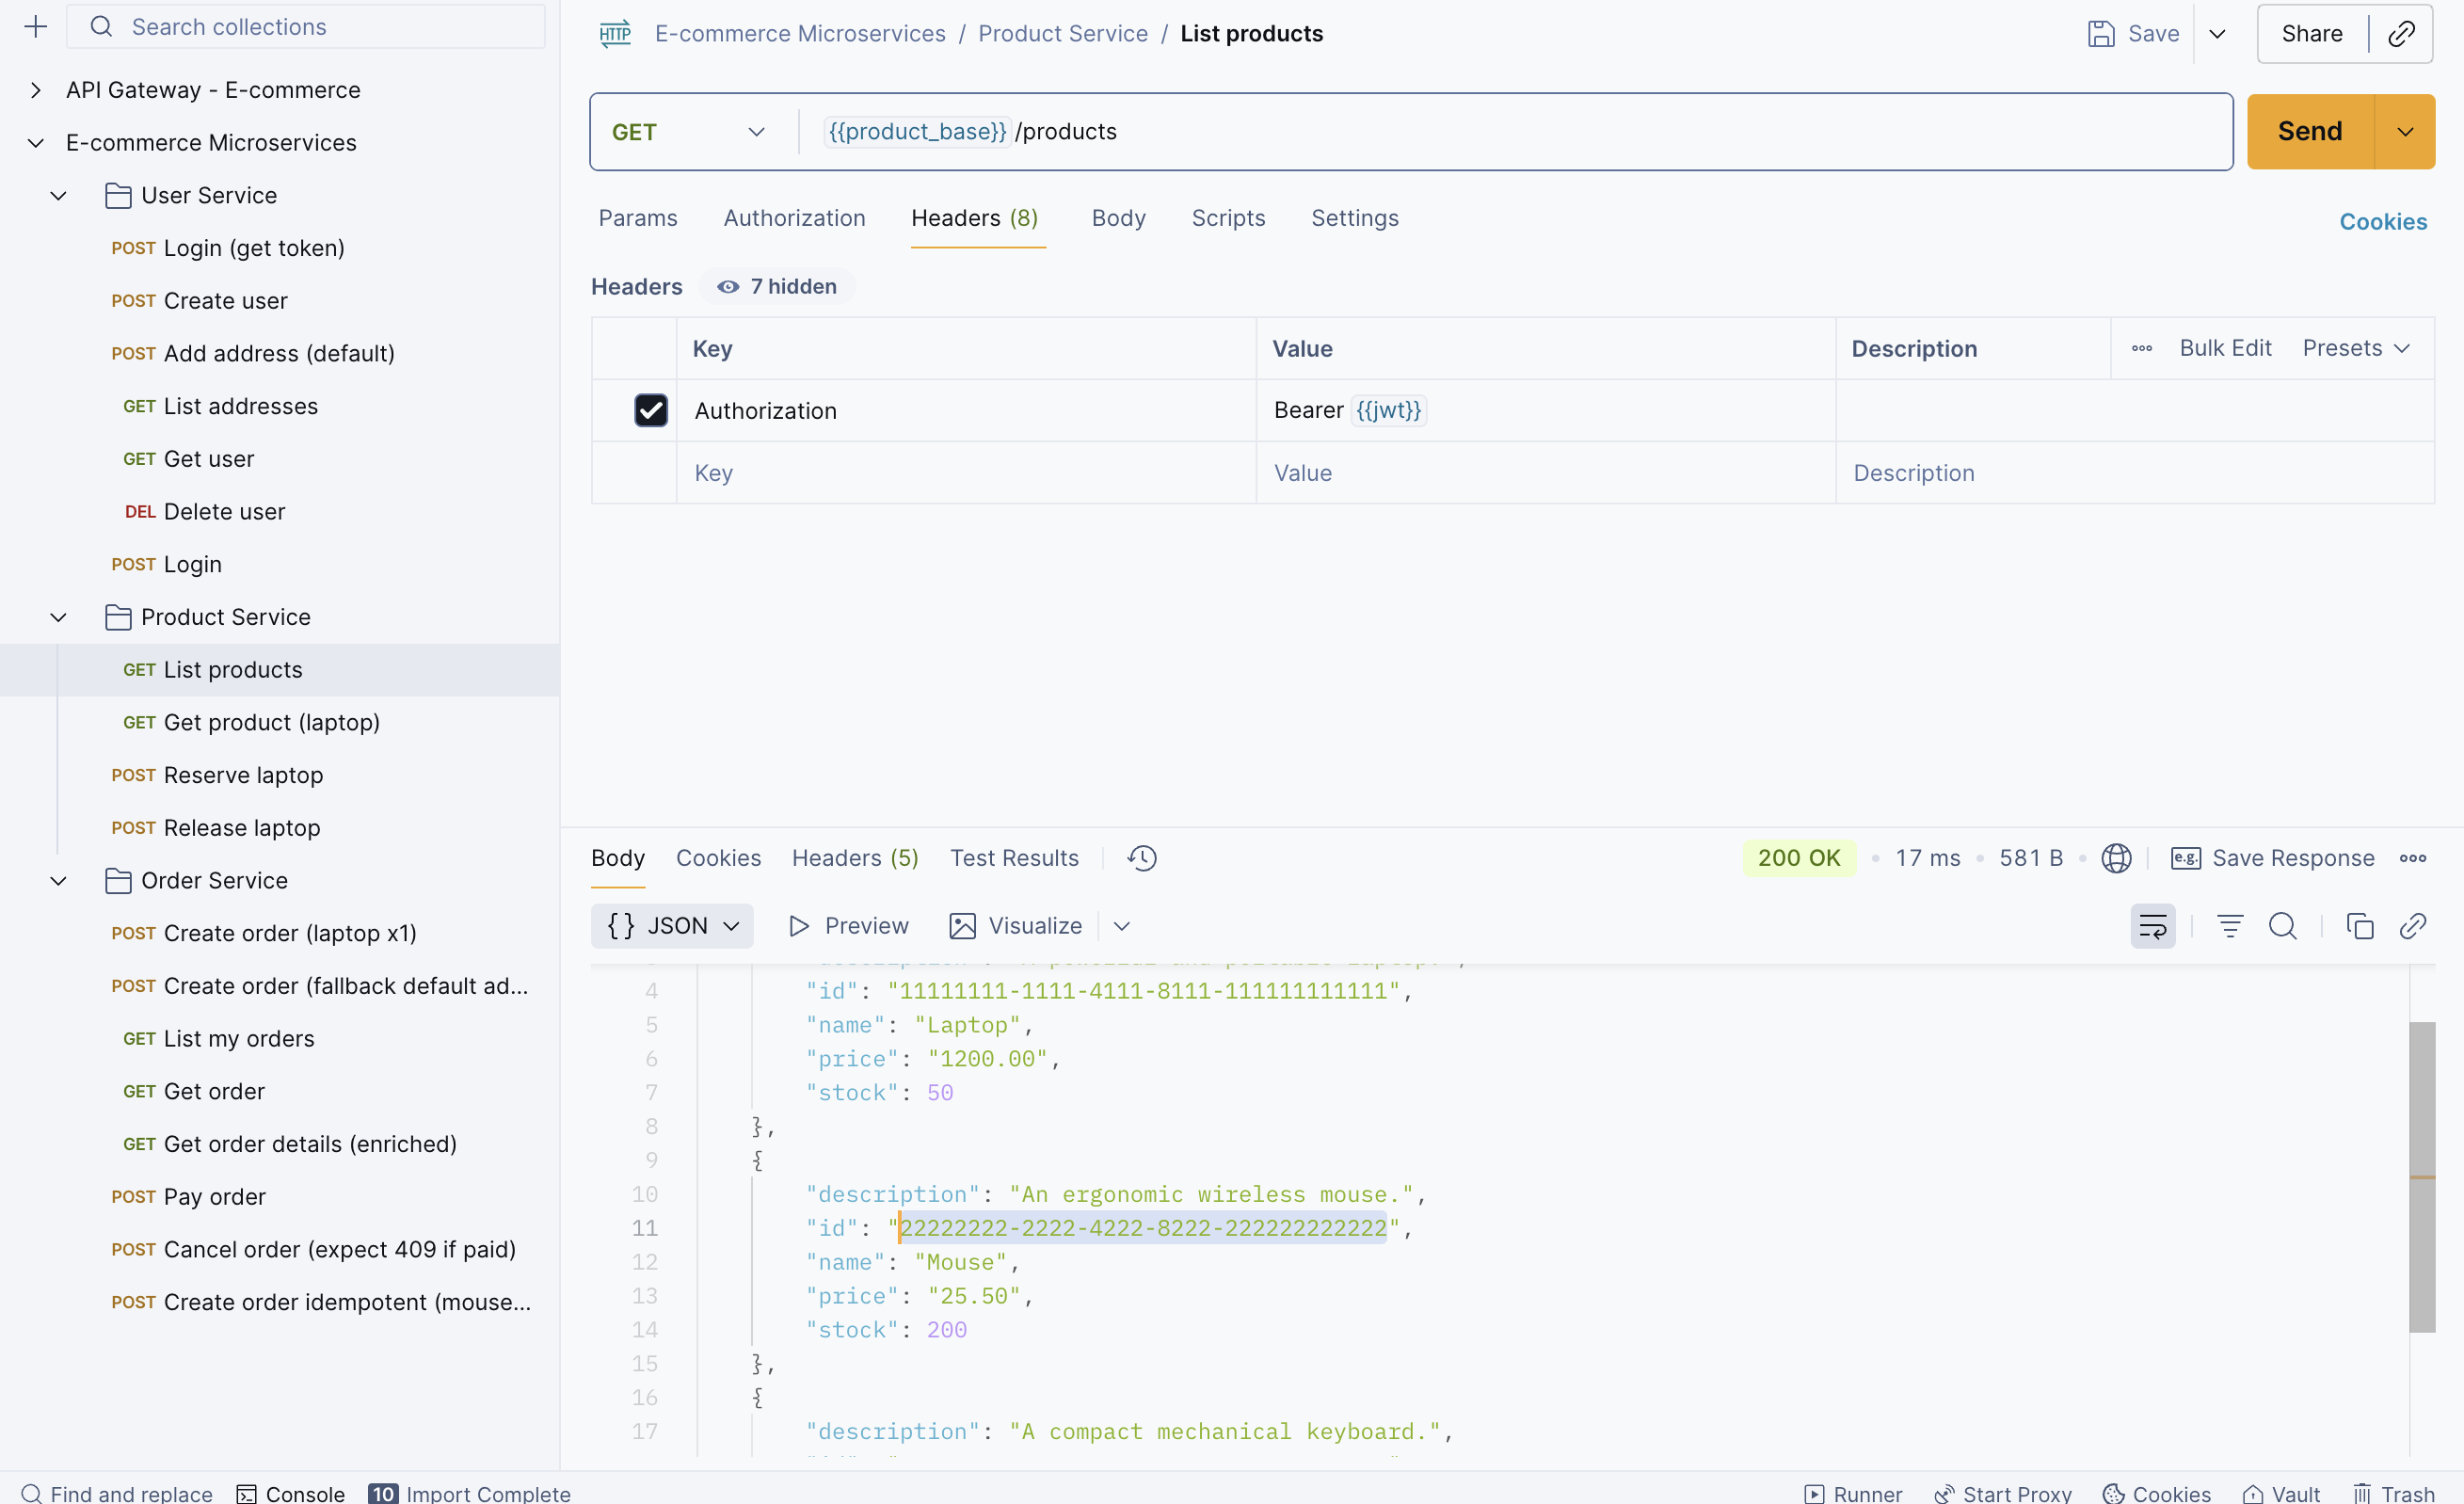
Step 6: Once you’re done creating the user details, let’s fetch the product details. This will be helpful when placing an order.
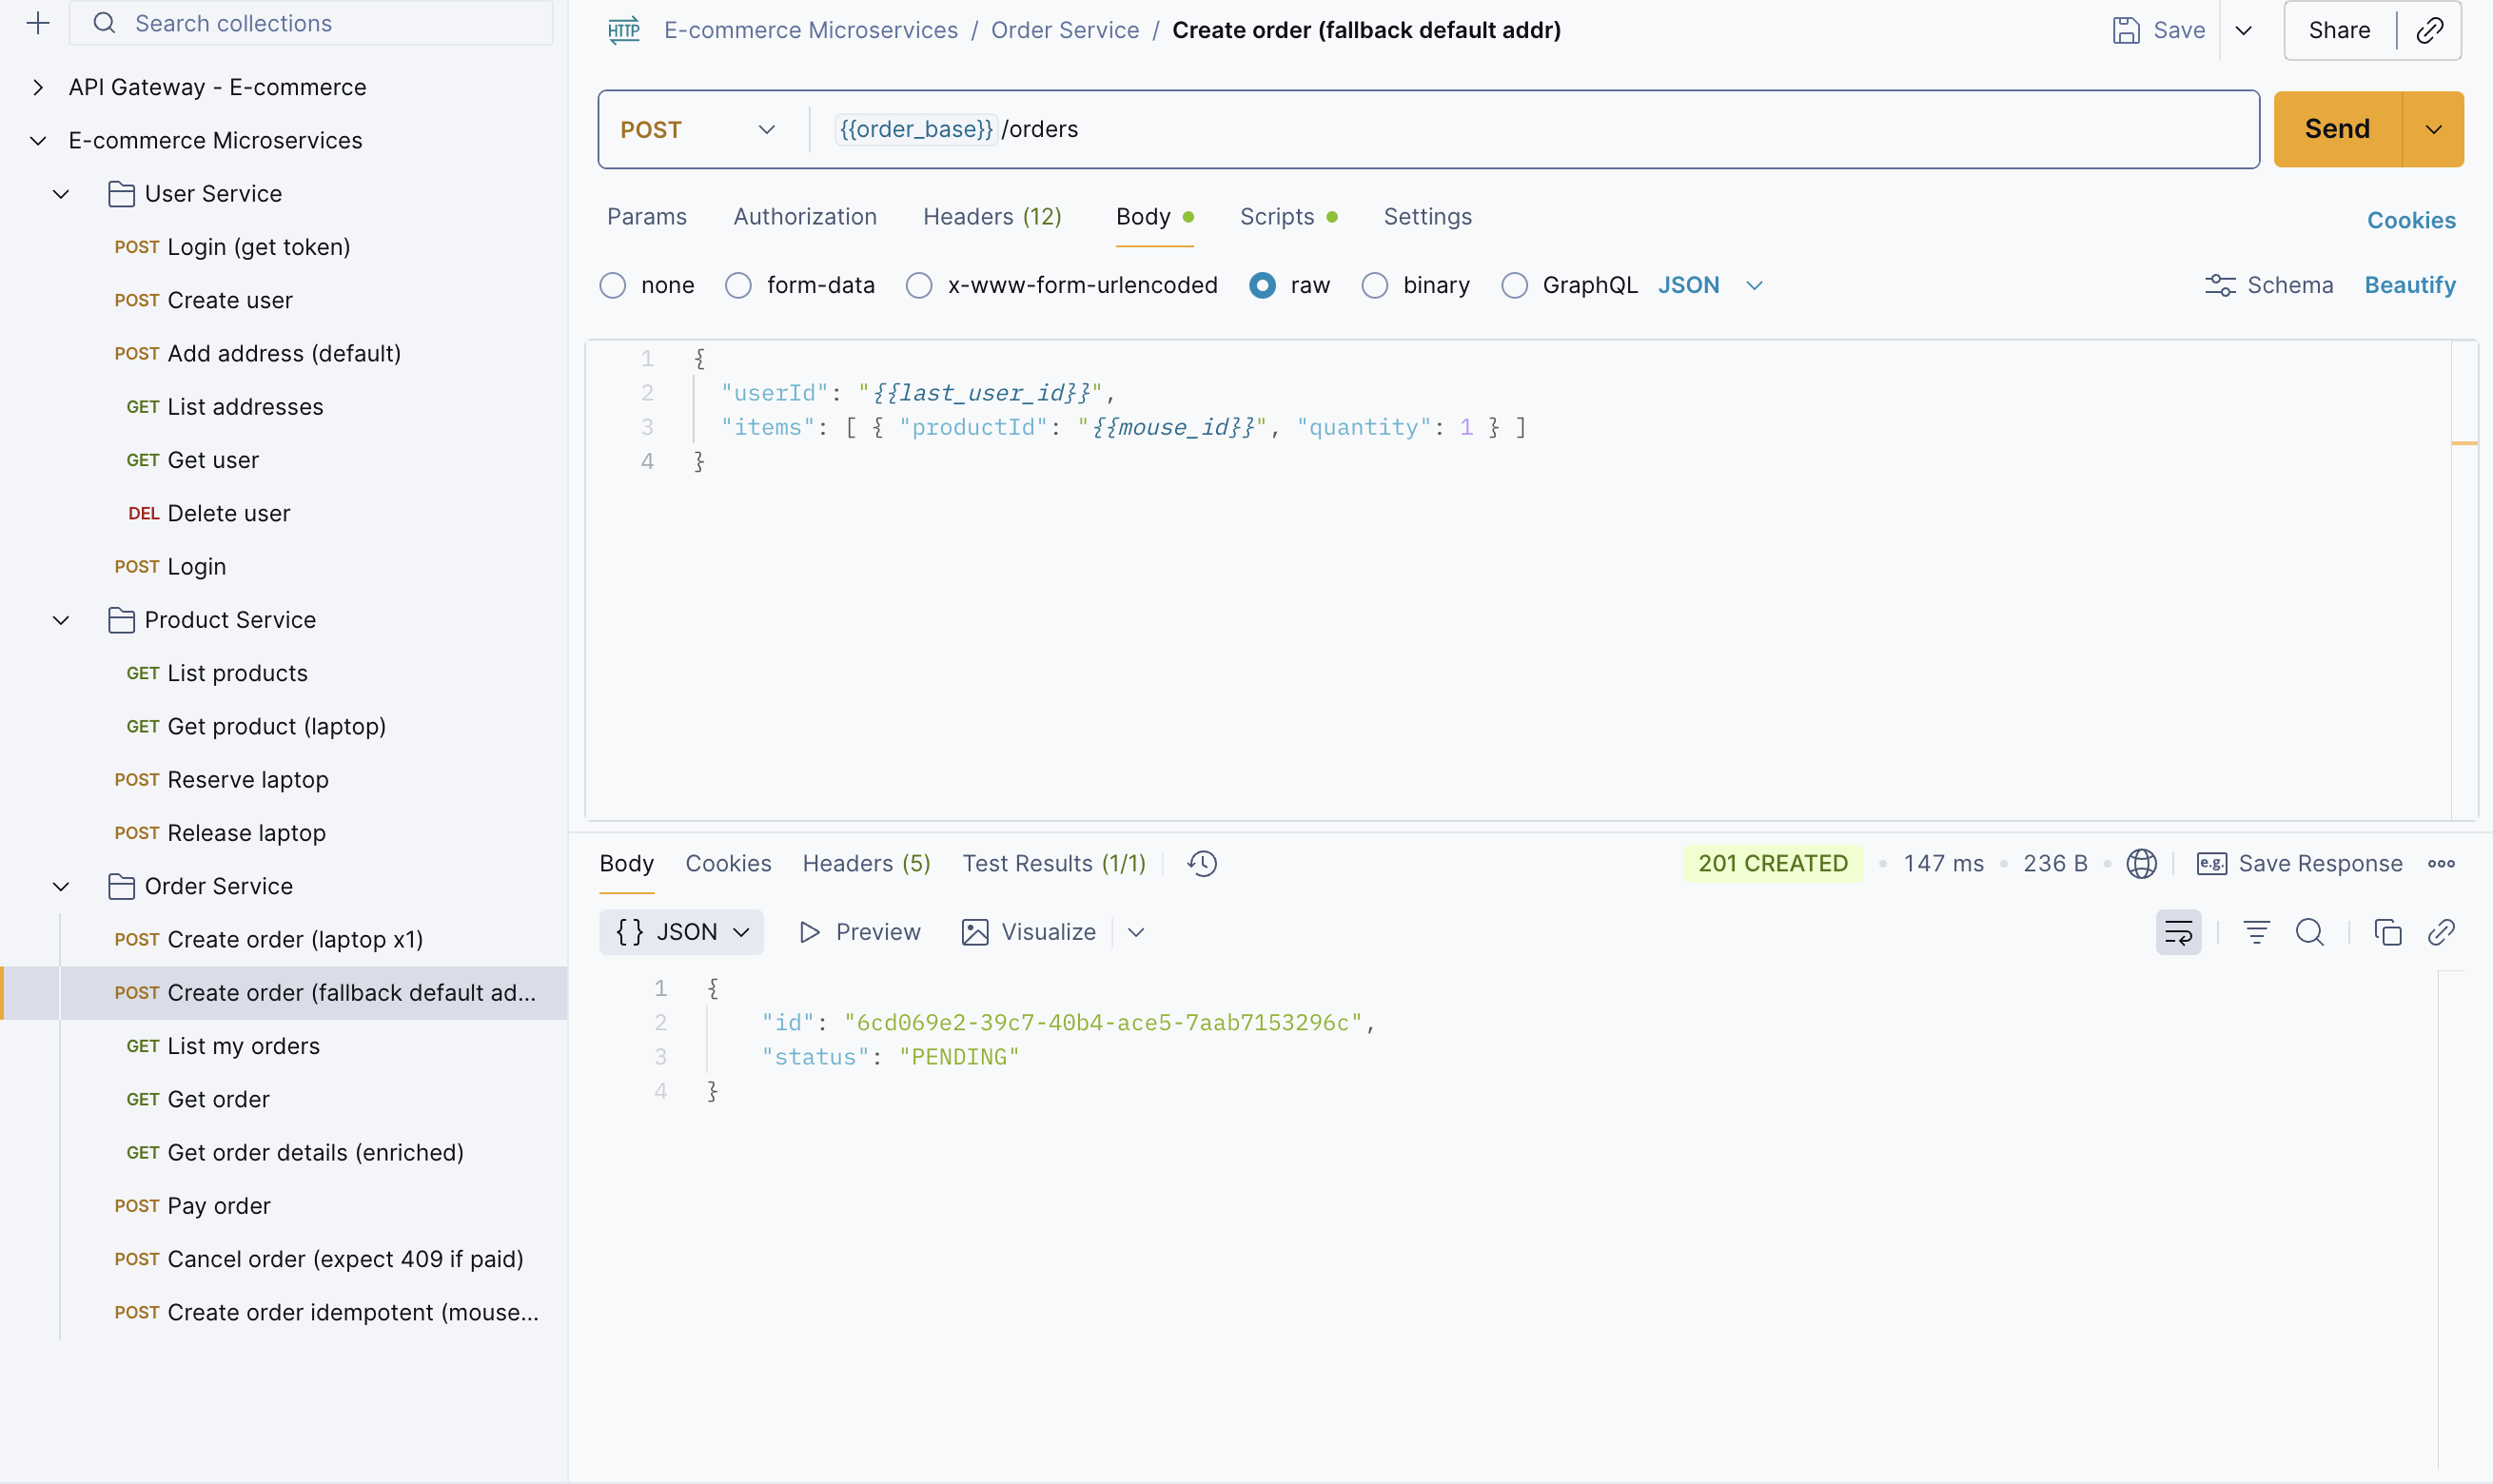
Step 7: Create an order, but before that, copy the mouse_id to place the order.
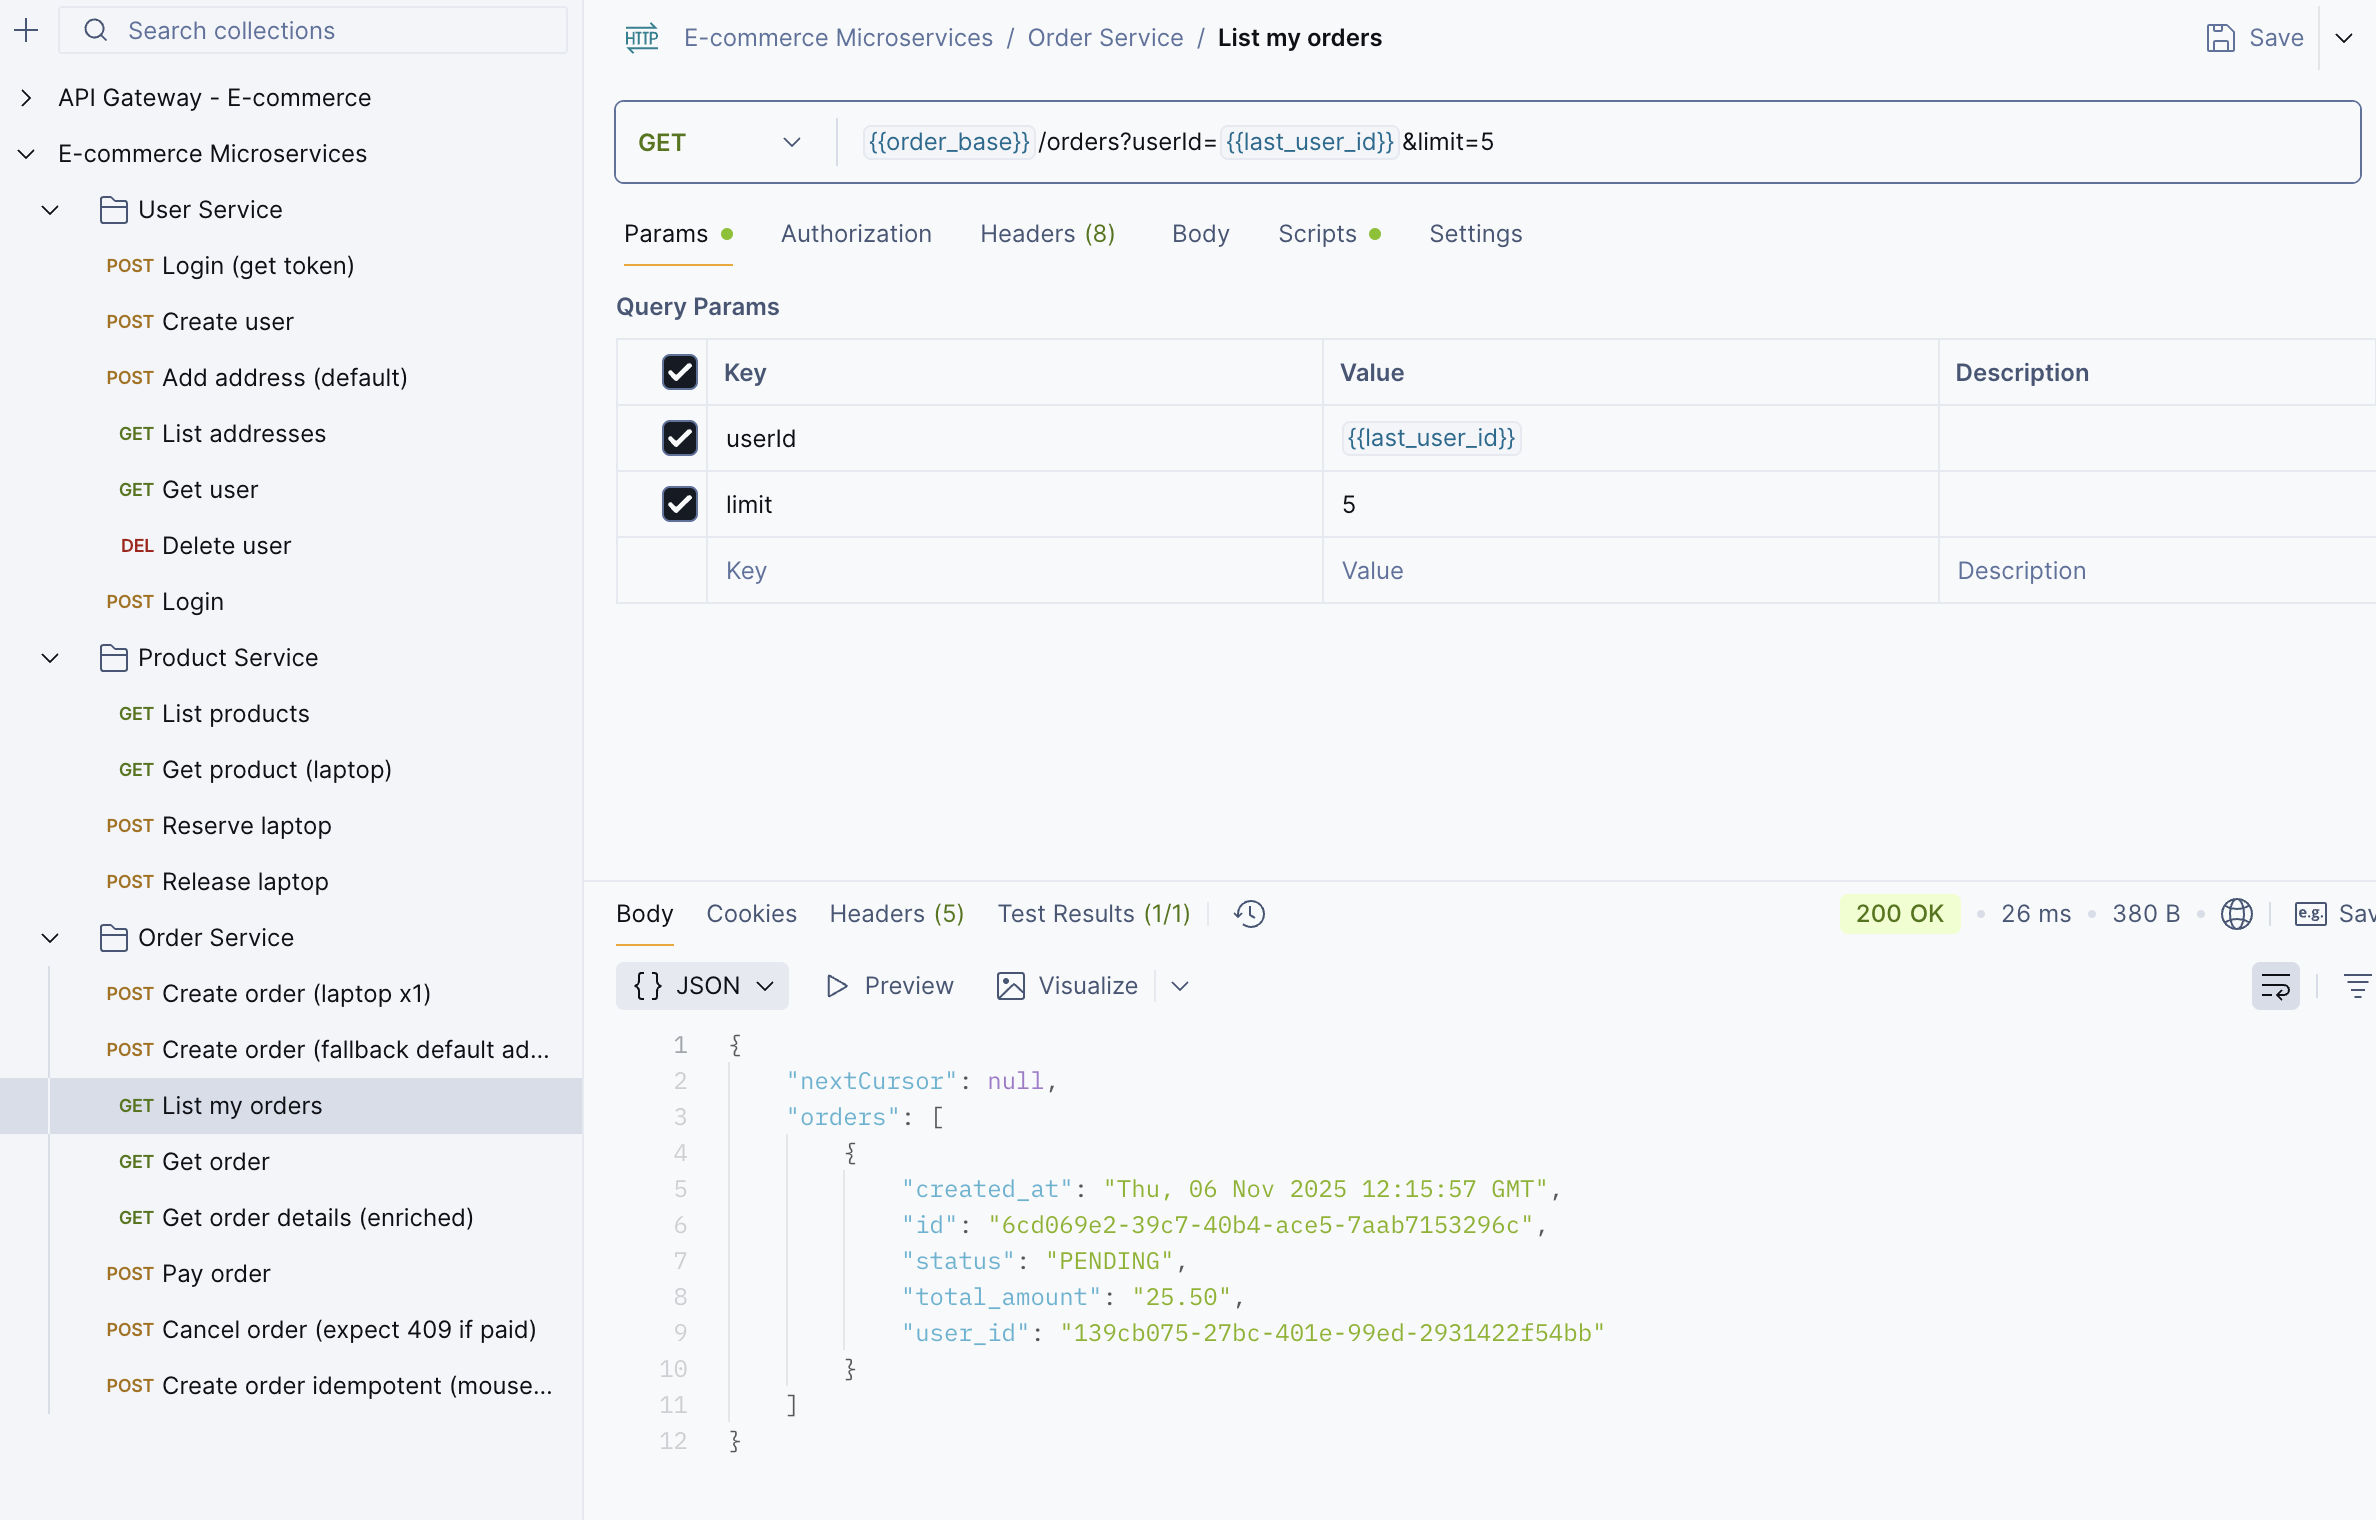
Step 8: You can verify it using the List Order API.
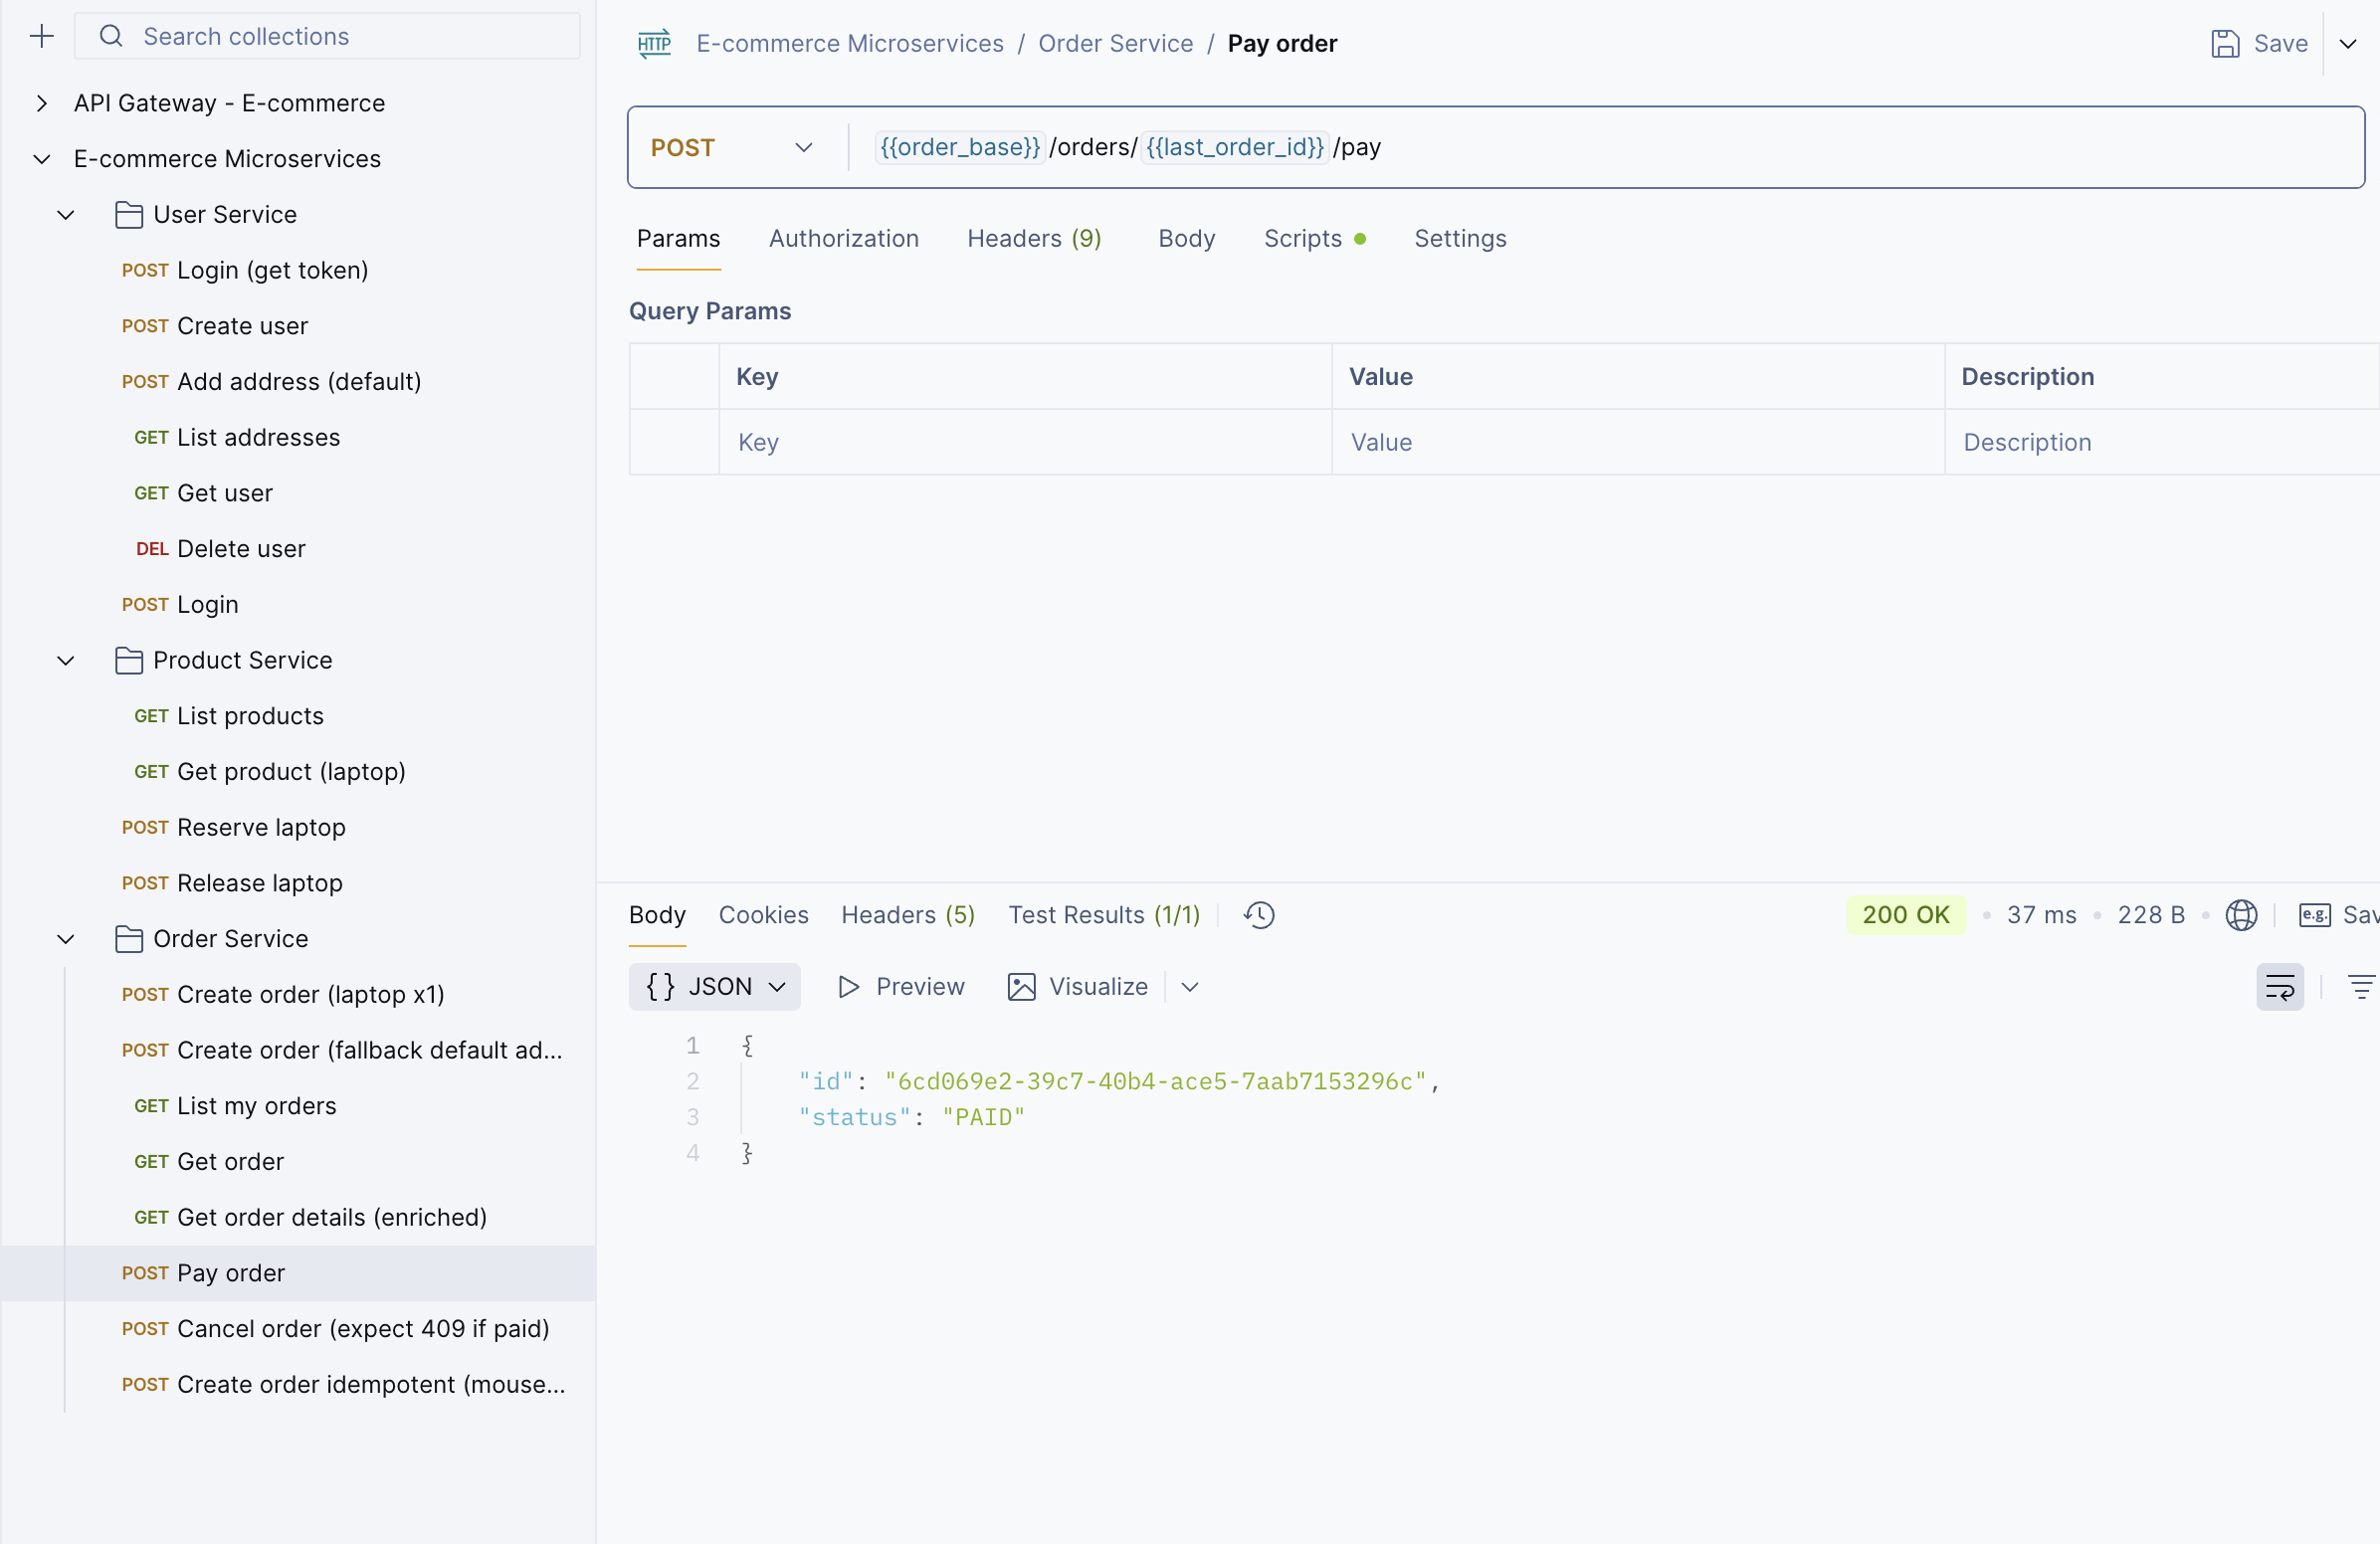
Step 9: Once you’ve created an order, use the Payment API to pay for the order.
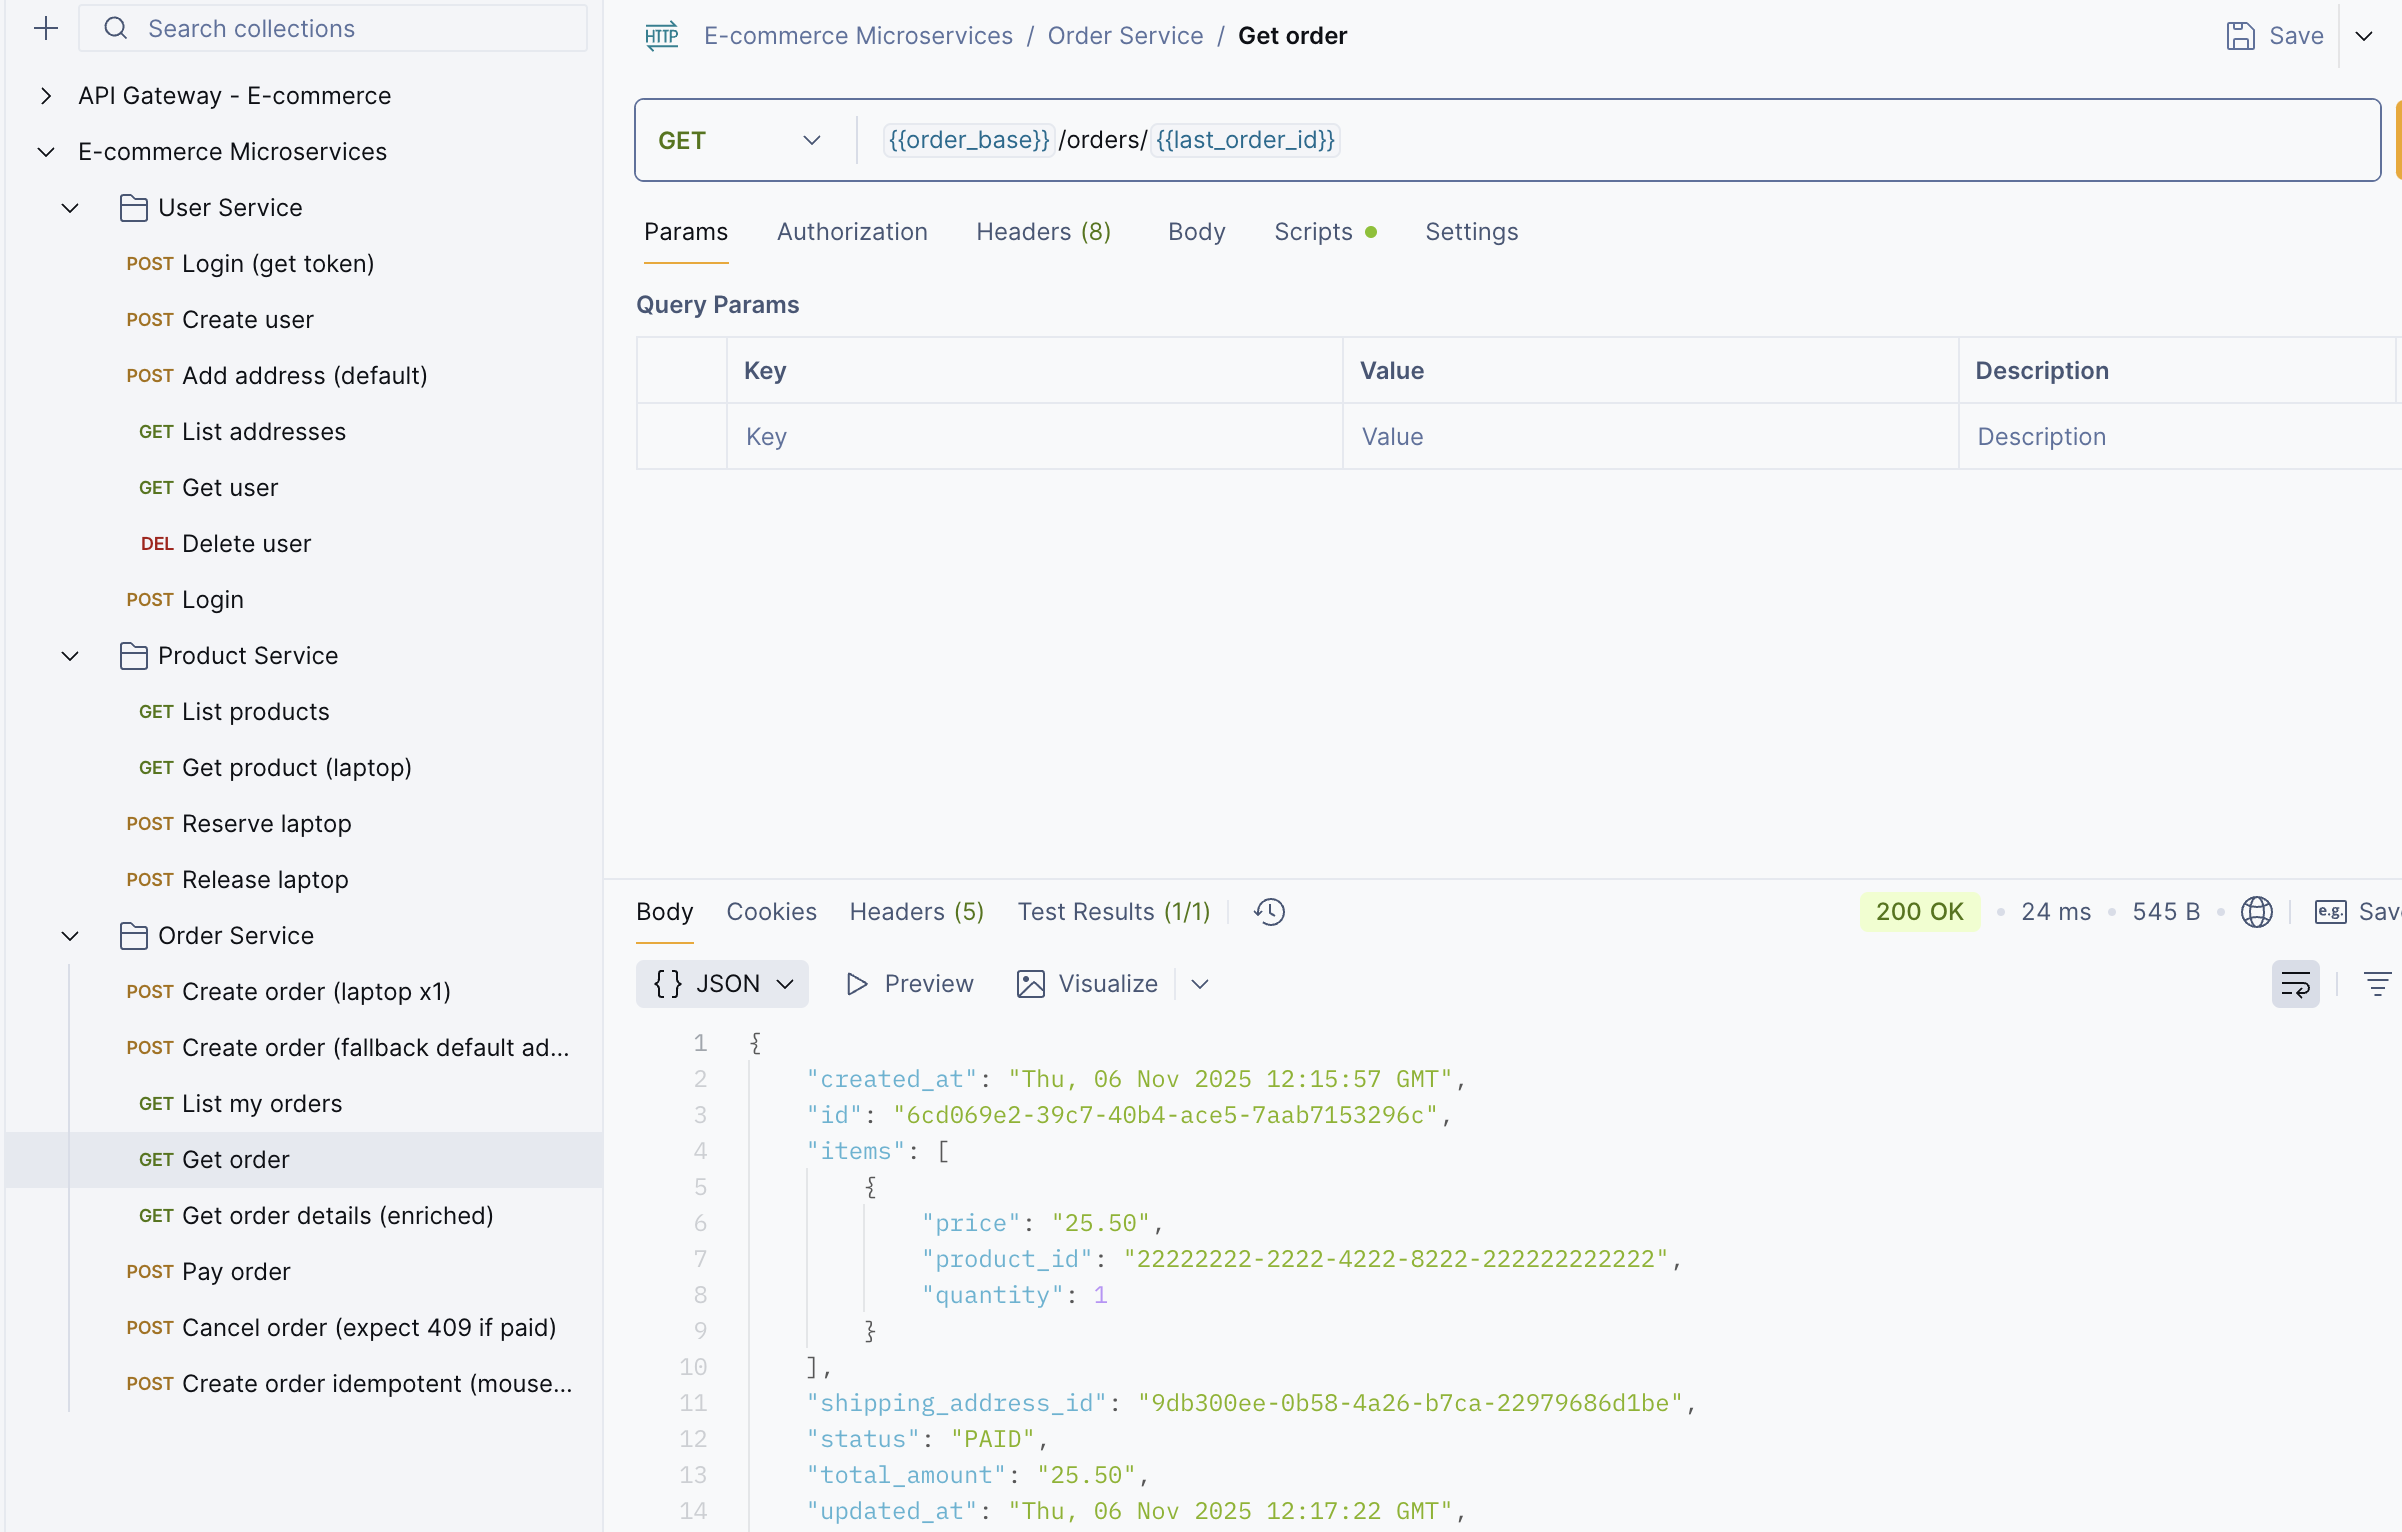
Step 10: You can use the Get Order API to check the status of your order.
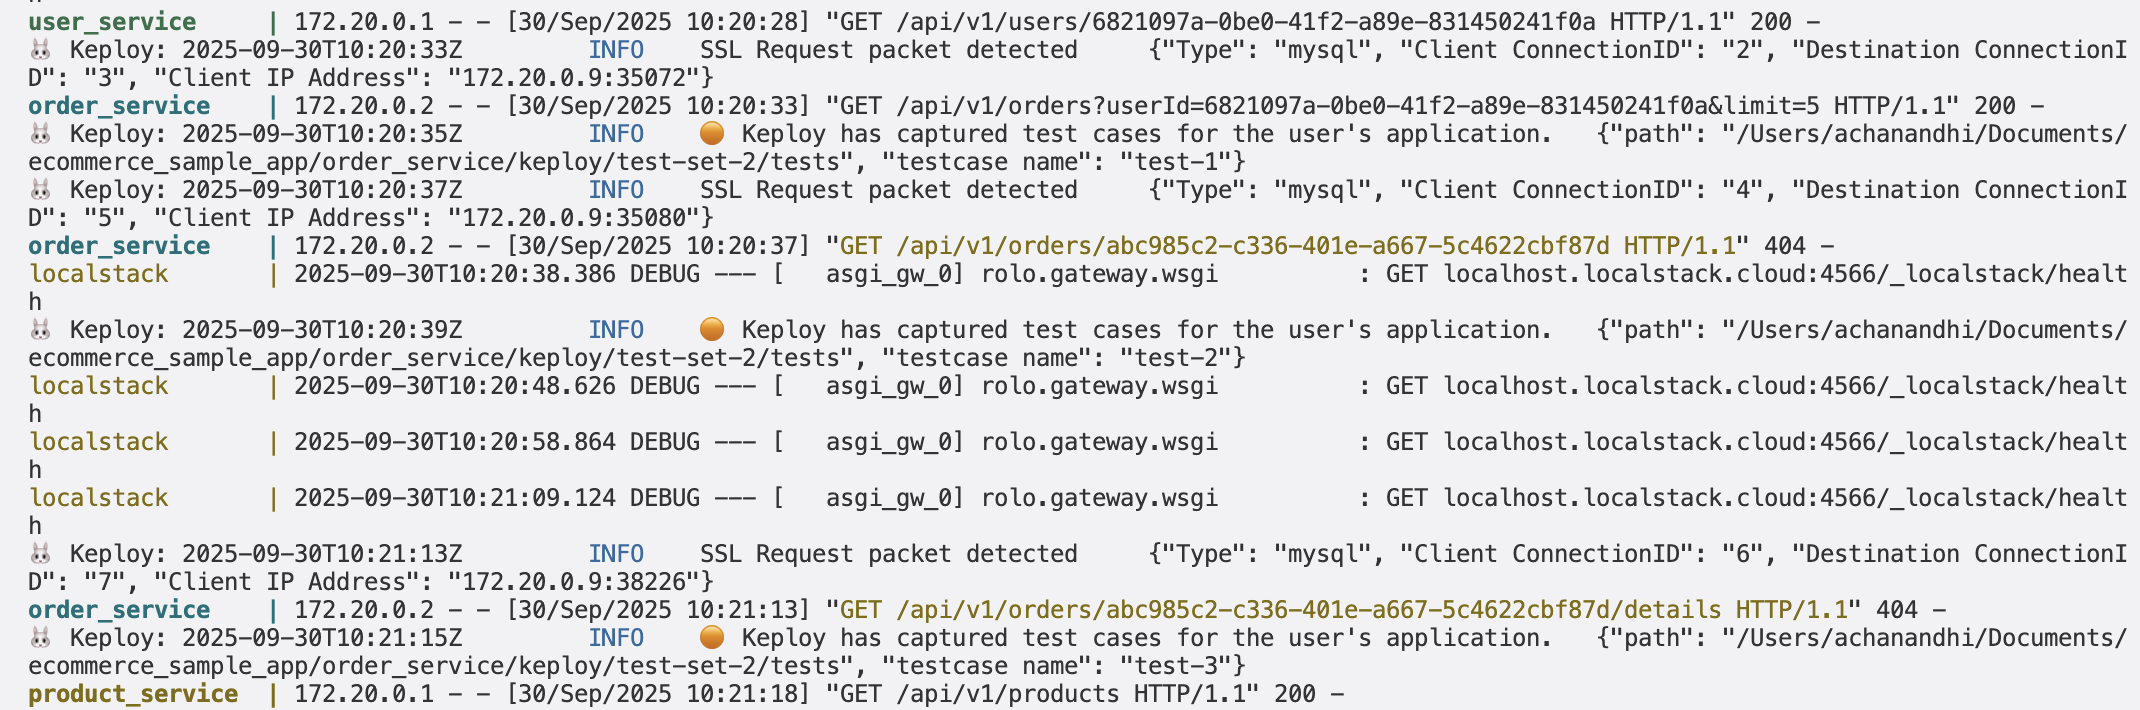
Note: You can see that Keploy only captures the network calls related to the order service. It can’t capture other network calls because we are recording only for the order service.
Stop the Recording
And once you are done, you can stop the recording and give yourself a pat on the back! With that simple spell, you've conjured up a test case with a mock! Explore the keploy directory and you'll discover your handiwork in tests directory and mocks.yml.
# Generated by Keploy (2.10.9)
version: api.keploy.io/v1beta1
kind: Http
name: test-1
spec:
  metadata: {}
  req:
    method: POST
    proto_major: 1
    proto_minor: 1
    url: http://localhost:8080/api/v1/orders
    header:
      Accept: "*/*"
      Accept-Encoding: gzip, deflate, br
      Authorization: Bearer eyJhbGciOiJIUzI1NiIsInR5cCI6IkpXVCJ9.eyJzdWIiOiJiMTNjNWJhZS04OTc5LTExZjAtOGM0Ny1iNmM3ZmQwZmY2MmQiLCJ1c2VybmFtZSI6ImFkbWluIiwiaWF0IjoxNzU2OTg0ODQxLCJleHAiOjE3NTk1NzY4NDF9.1OVaOL09j10oB7ahwOKu4mi-ZgnI8ha72MhhaUzKAnE
      Connection: keep-alive
      Content-Length: "141"
      Content-Type: application/json
      Host: localhost:8080
      Idempotency-Key: 904a1d88-707b-4c14-b7d6-9bd9accea3e7
      Postman-Token: ede87575-325e-42f6-83e5-5cd55a9dca7e
      User-Agent: PostmanRuntime/7.45.0
    body: |-
      {
        "userId": "afdc272e-d748-4108-a701-59802b93ea29",
        "items": [ { "productId": "11111111-1111-4111-8111-111111111111", "quantity": 1 } ]
      }
    timestamp: 2025-09-04T11:30:48.75326438Z
  resp:
    status_code: 201
    header:
      Content-Length: "65"
      Content-Type: application/json
      Date: Thu, 04 Sep 2025 11:30:48 GMT
      Server: Werkzeug/3.1.3 Python/3.11.13
    body: |
      {"id":"44b0885e-e6e7-4e27-8ffe-97d87791b0b1","status":"PENDING"}
    status_message: Created
    proto_major: 0
    proto_minor: 0
    timestamp: 2025-09-04T11:30:50.896837215Z
  objects: []
  assertions:
    noise:
      header.Date: []
  created: 1756985450
This is how the mocks.yml looks like:
# Generated by Keploy (2.10.9)
version: api.keploy.io/v1beta1
kind: MySQL
name: mock-0
spec:
  metadata:
    connID: "0"
    requestOperation: HandshakeV10
    responseOperation: OK
    type: config
  requests:
    - header:
        header:
          payload_length: 32
          sequence_id: 1
        packet_type: SSLRequest
      message:
        capability_flags: 431991437
        max_packet_size: 1073741824
        character_set: 255
        filler:
          [0, 0, 0, 0, 0, 0, 0, 0, 0, 0, 0, 0, 0, 0, 0, 0, 0, 0, 0, 0, 0, 0, 0]
    - header:
        header:
          payload_length: 301
          sequence_id: 2
        packet_type: HandshakeResponse41
      message:
        capability_flags: 431991437
        max_packet_size: 1073741824
        character_set: 255
        filler:
          [0, 0, 0, 0, 0, 0, 0, 0, 0, 0, 0, 0, 0, 0, 0, 0, 0, 0, 0, 0, 0, 0, 0]
        username: user
        auth_response:
          [
            209,
            97,
            143,
            83,
            102,
            55,
            162,
            43,
            183,
            166,
            61,
            254,
            156,
            7,
            42,
            33,
            137,
            77,
            61,
            133,
            242,
            40,
            130,
            251,
            227,
            181,
            38,
            254,
            127,
            21,
            114,
            230,
          ]
        database: order_db
        auth_plugin_name: caching_sha2_password
        connection_attributes:
          _client_name: libmysql
          _client_version: 9.0.0
          _connector_license: GPL-2.0
          _connector_name: mysql-connector-python
          _connector_version: 9.0.0
          _os: Linux
          _pid: "1090"
          _platform: aarch64
          _source_host: 44b86cee3ae3
        zstdcompressionlevel: 0
    - header:
        header:
          payload_length: 9
          sequence_id: 4
        packet_type: plain_password
      message: cGFzc3dvcmQA
  responses:
    - header:
        header:
          payload_length: 74
          sequence_id: 0
        packet_type: HandshakeV10
      message:
        protocol_version: 10
        server_version: 8.0.43
        connection_id: 9
        auth_plugin_data:
          [
            116,
            65,
            114,
            34,
            83,
            28,
            115,
            61,
            126,
            49,
            53,
            28,
            111,
            34,
            76,
            37,
            91,
            73,
            114,
            88,
            0,
          ]
        filler: 0
        capability_flags: 3758096383
        character_set: 255
        status_flags: 2
        auth_plugin_name: caching_sha2_password
    - header:
        header:
          payload_length: 2
          sequence_id: 3
        packet_type: AuthMoreData
      message:
        status_tag: 1
        data: PerformFullAuthentication
    - header:
        header:
          payload_length: 20
          sequence_id: 5
        packet_type: OK
      message:
        header: 0
        affected_rows: 0
        last_insert_id: 0
        status_flags: 16386
        warnings: 0
        info: "\0\v\x01\t\border_db"
  created: 1756985266
  reqtimestampmock: 2025-09-04T11:27:46.15043888Z
  restimestampmock: 2025-09-04T11:27:46.162389255Z
Run the Tests
Now, let’s run the tests that were automatically generated by Keploy. Use this command:
keploy test -c "docker compose up" --containerName="order_service" --delay 30 --path="./order_service" --config-path="./order_service"
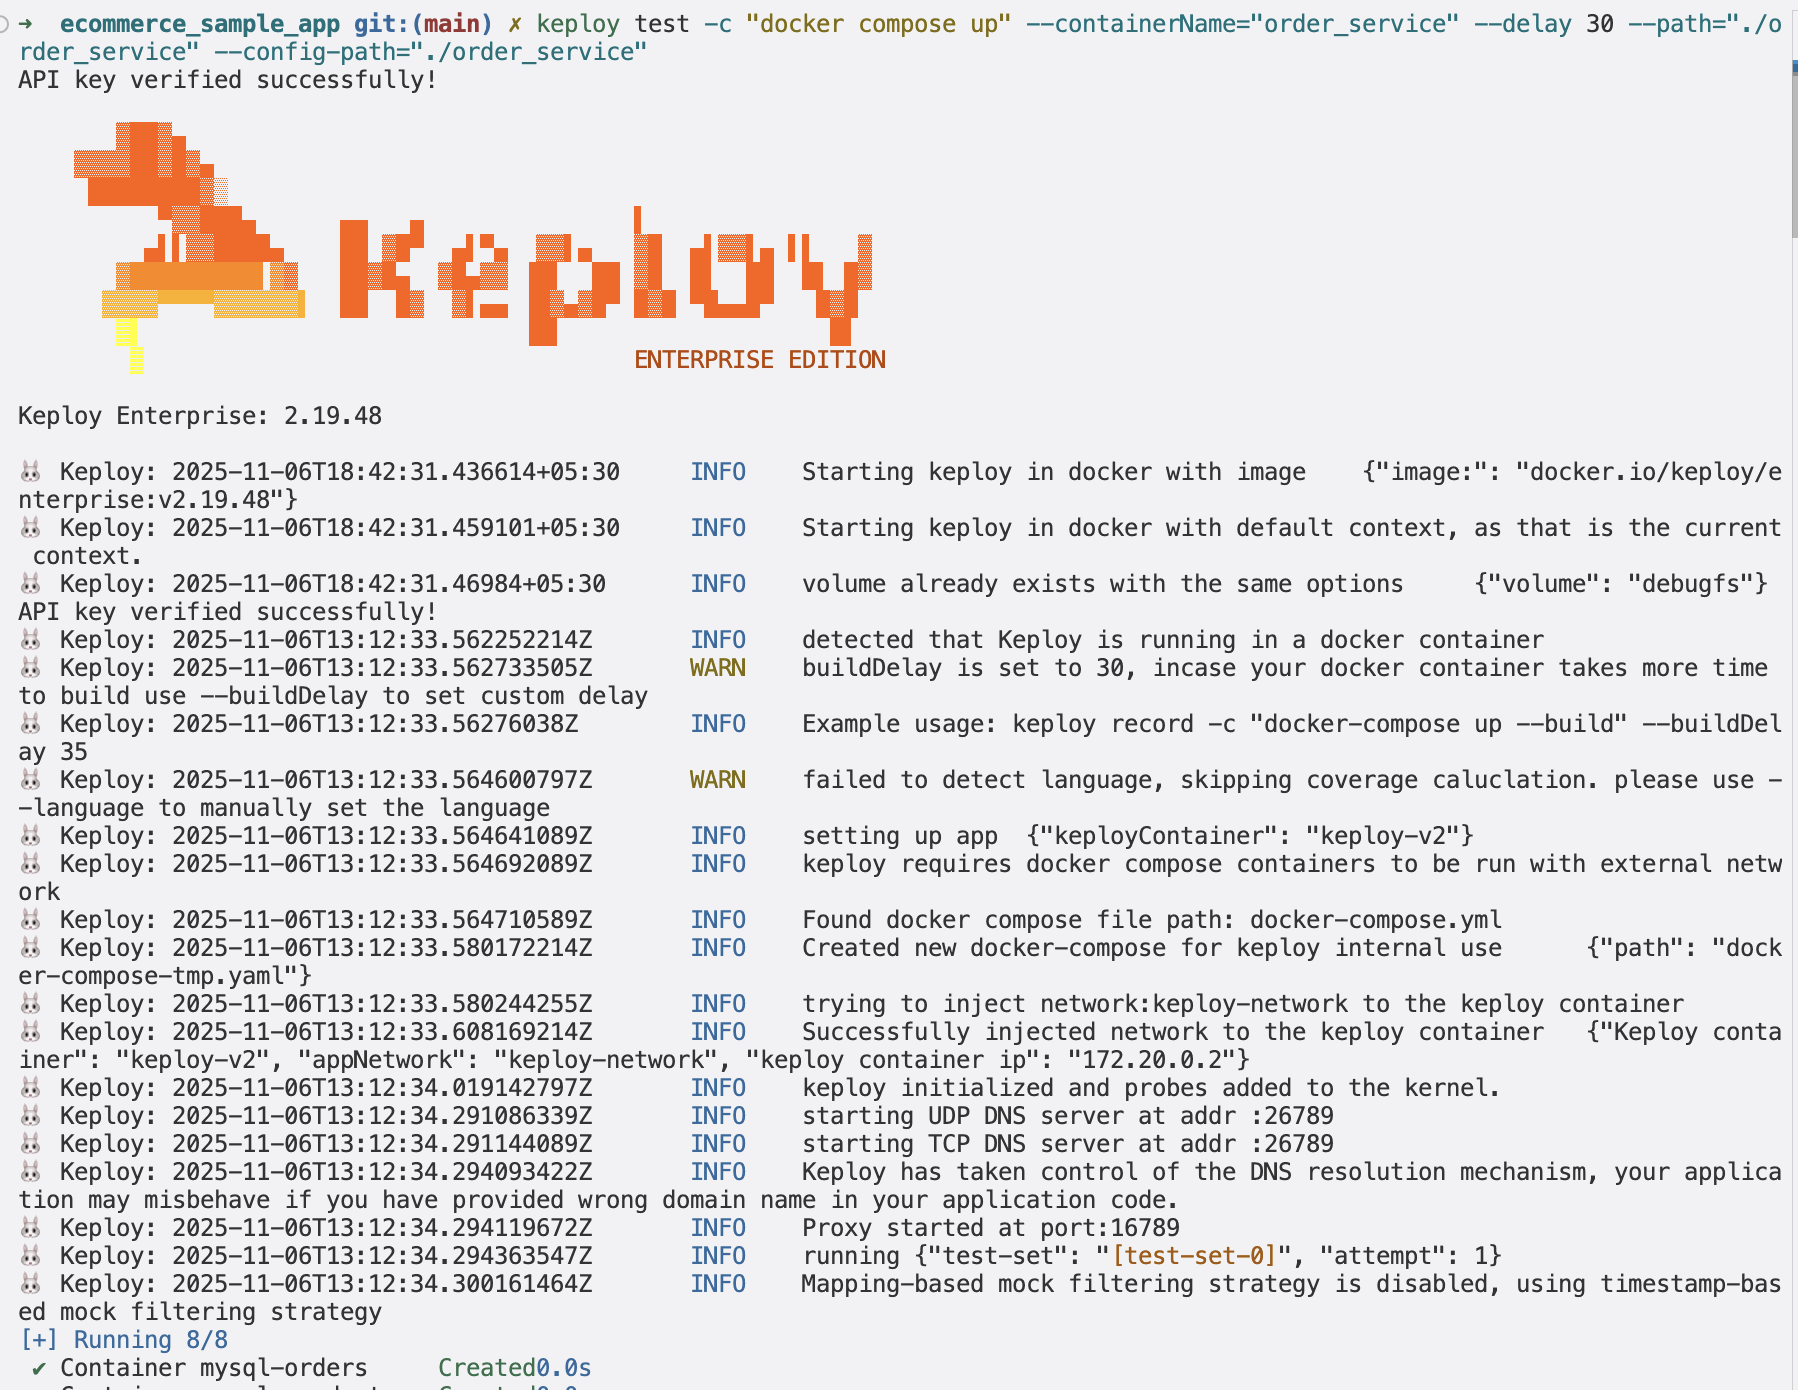
The --delay flag gives the app a short pause (in seconds) before running the tests. After the tests finish, you can inspect the results and tweak the test data in the mocks.yml or test-x.yml files.
Check Test Coverage
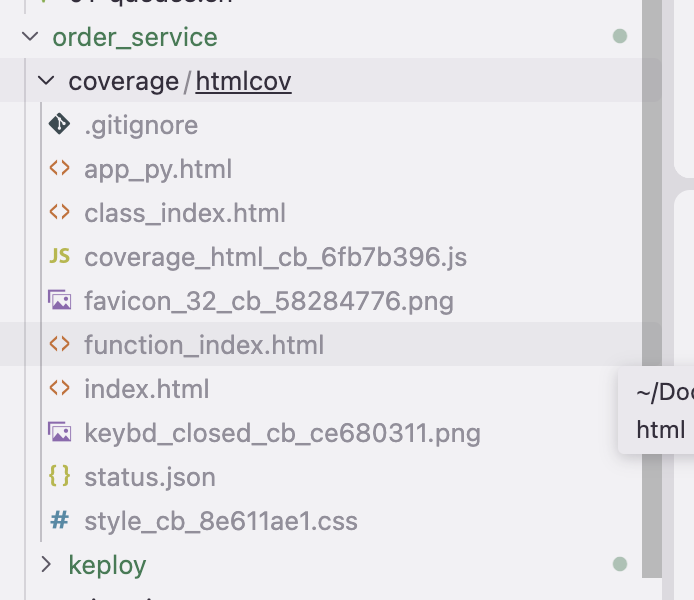
Keploy also helps you track test coverage for your app.
The coverage files will be generated automatically by Keploy. You can find those files in the coverage directory.Click on any one of the HTML files to see the test coverage.
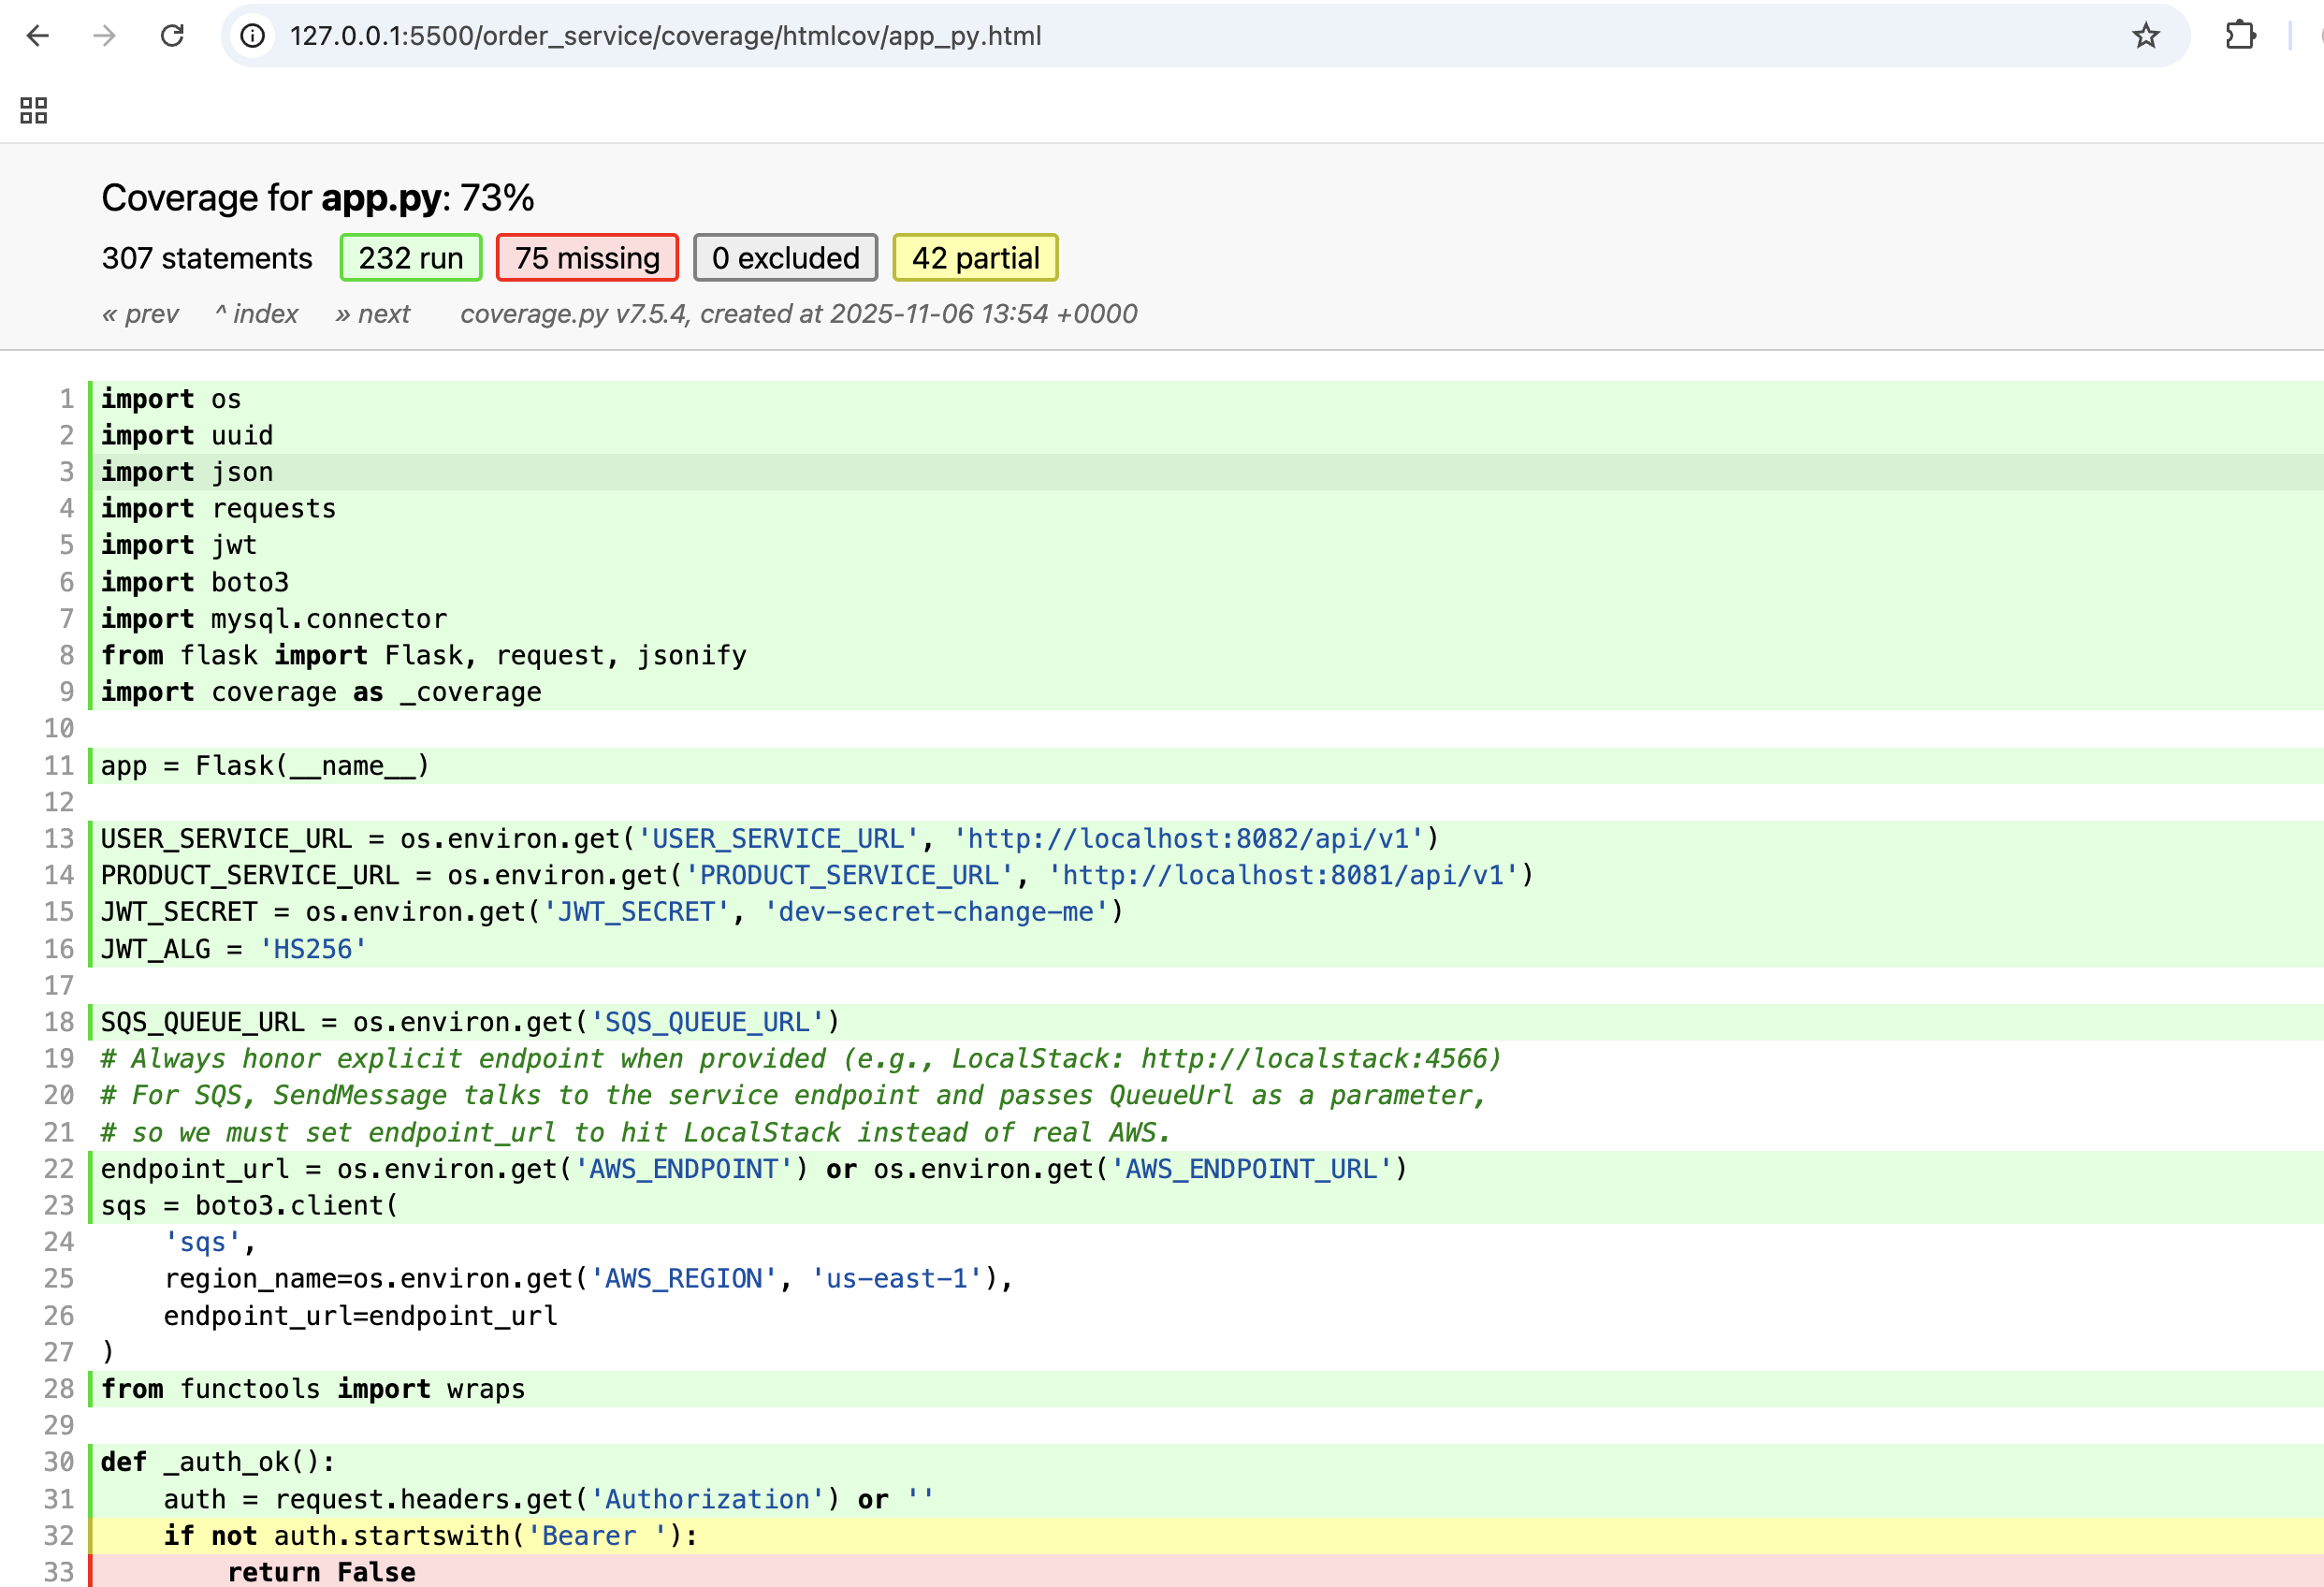
Let's see the overall coverage report:
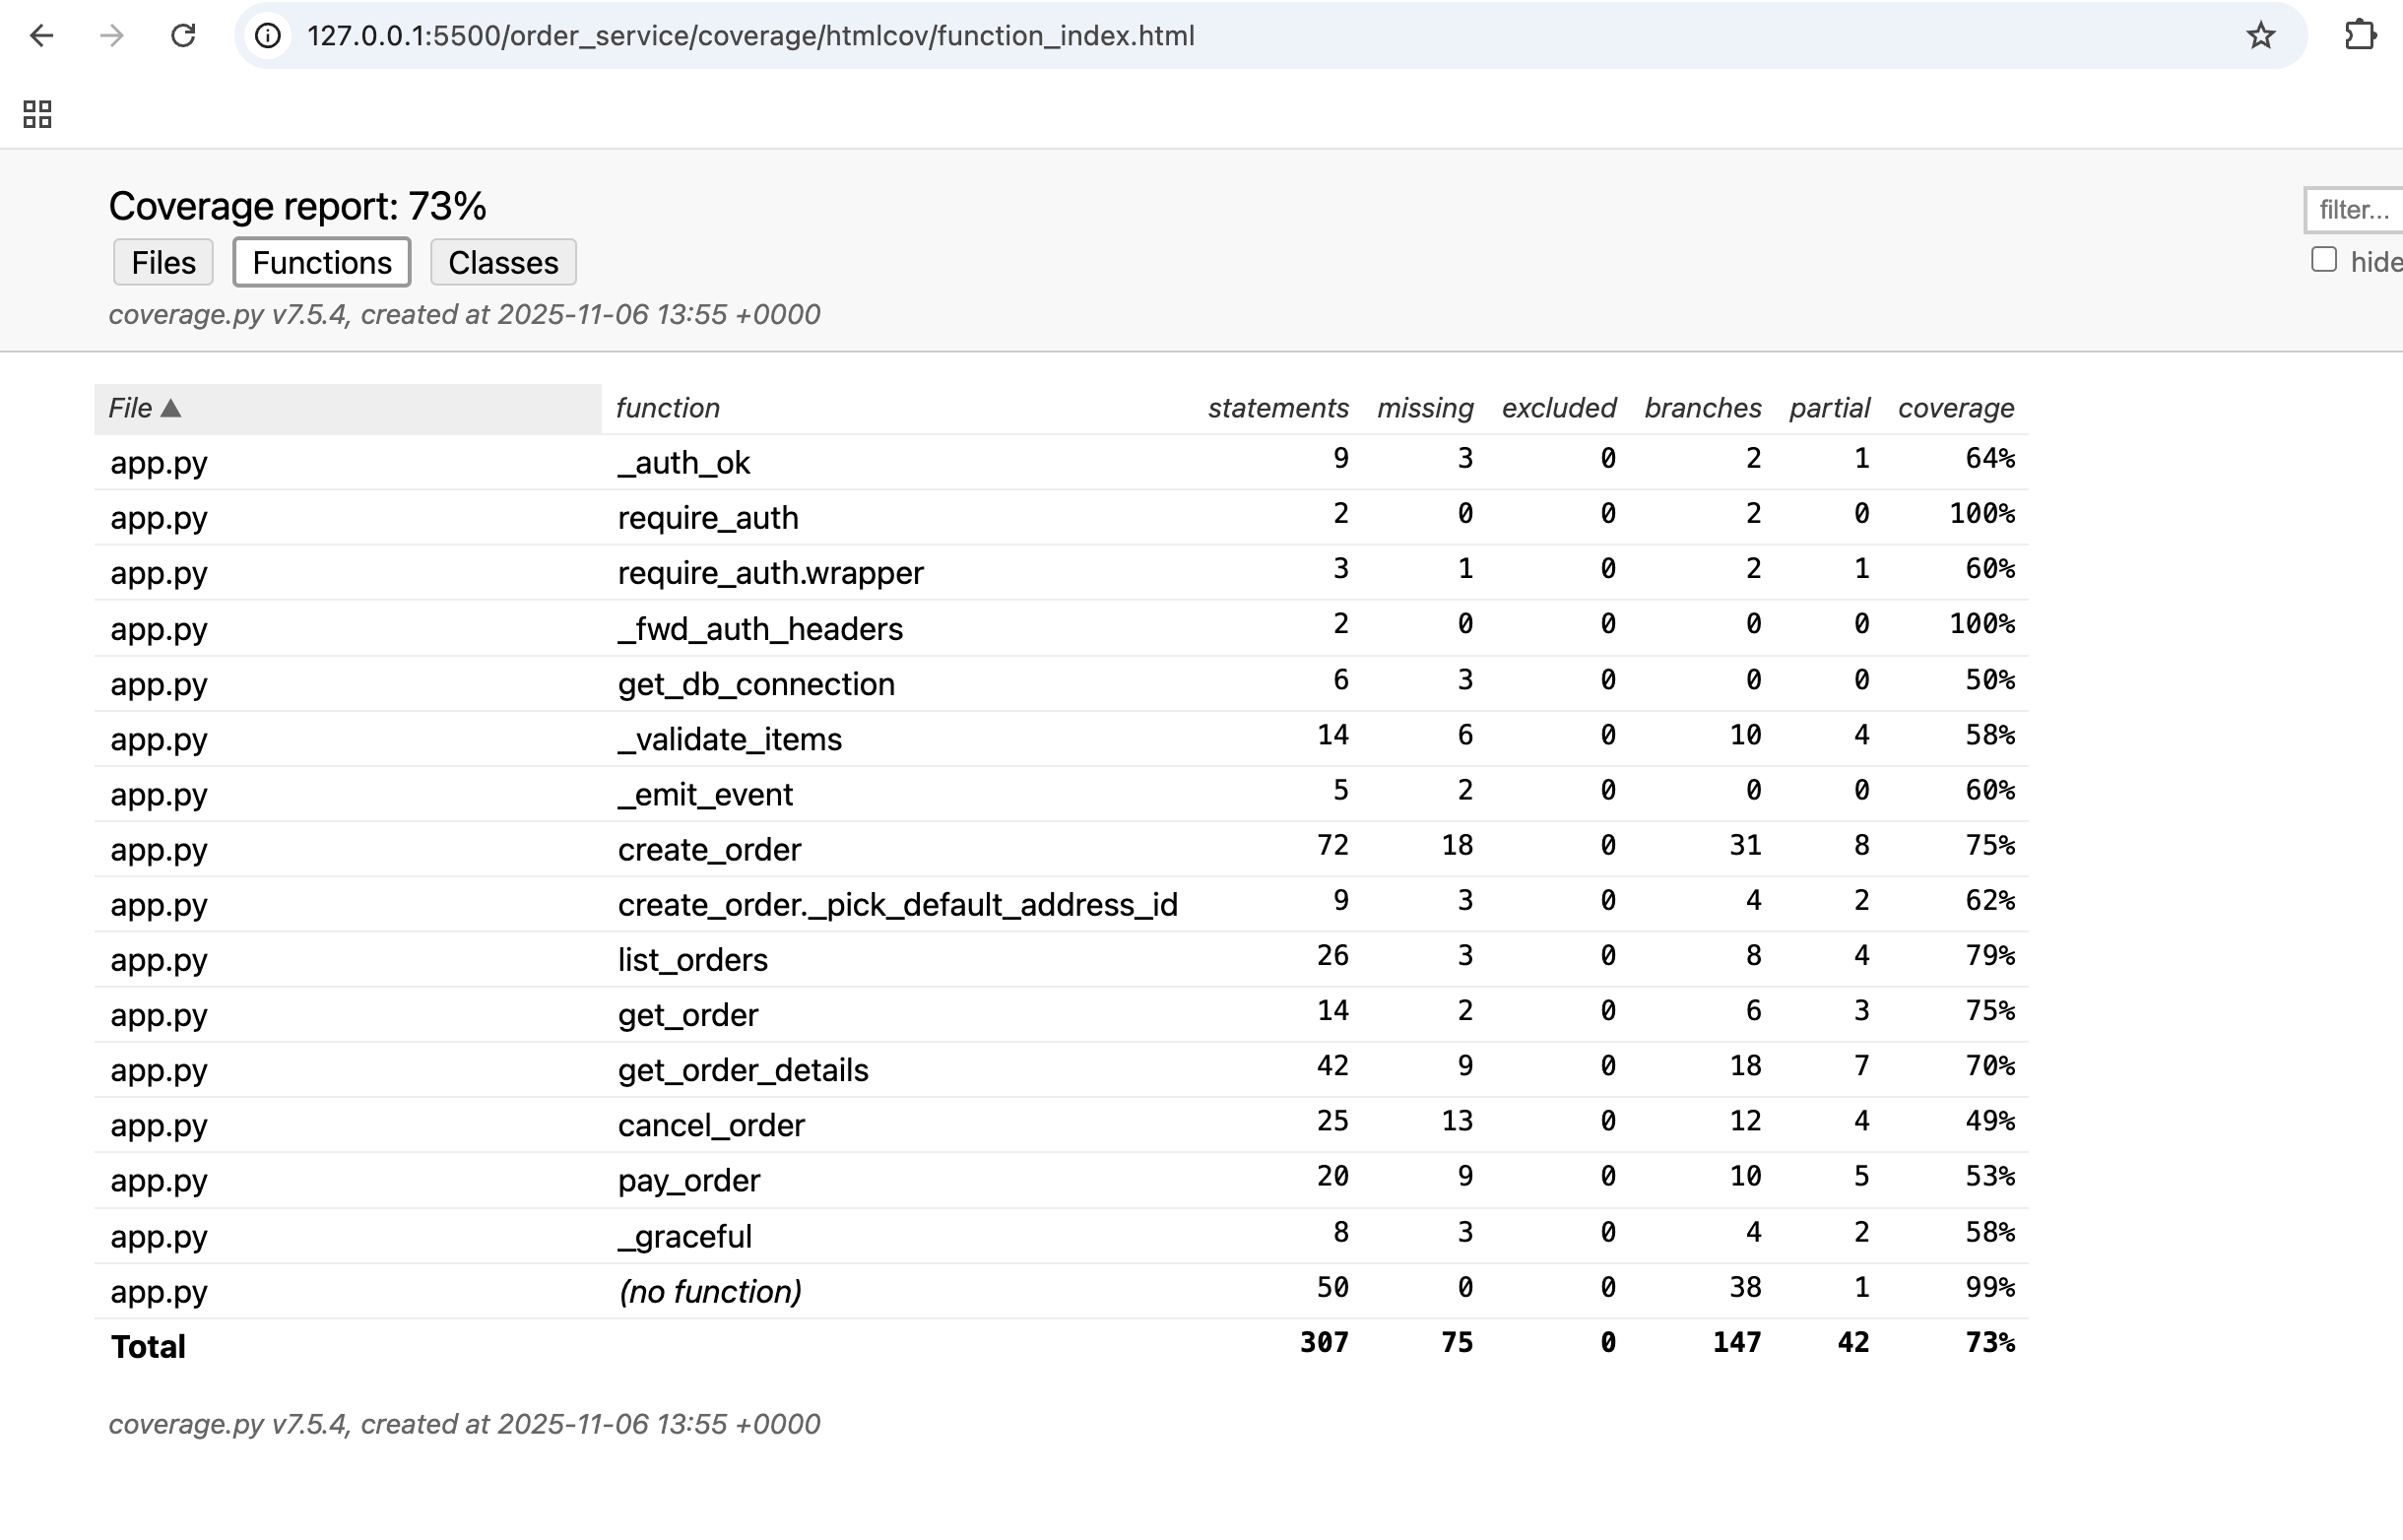
Let's see the overall coverage report by functions:
Once you’ve got the coverage, let’s check the test reports in the Keploy Dashboard.
Let’s take a look at the Test Reports section.
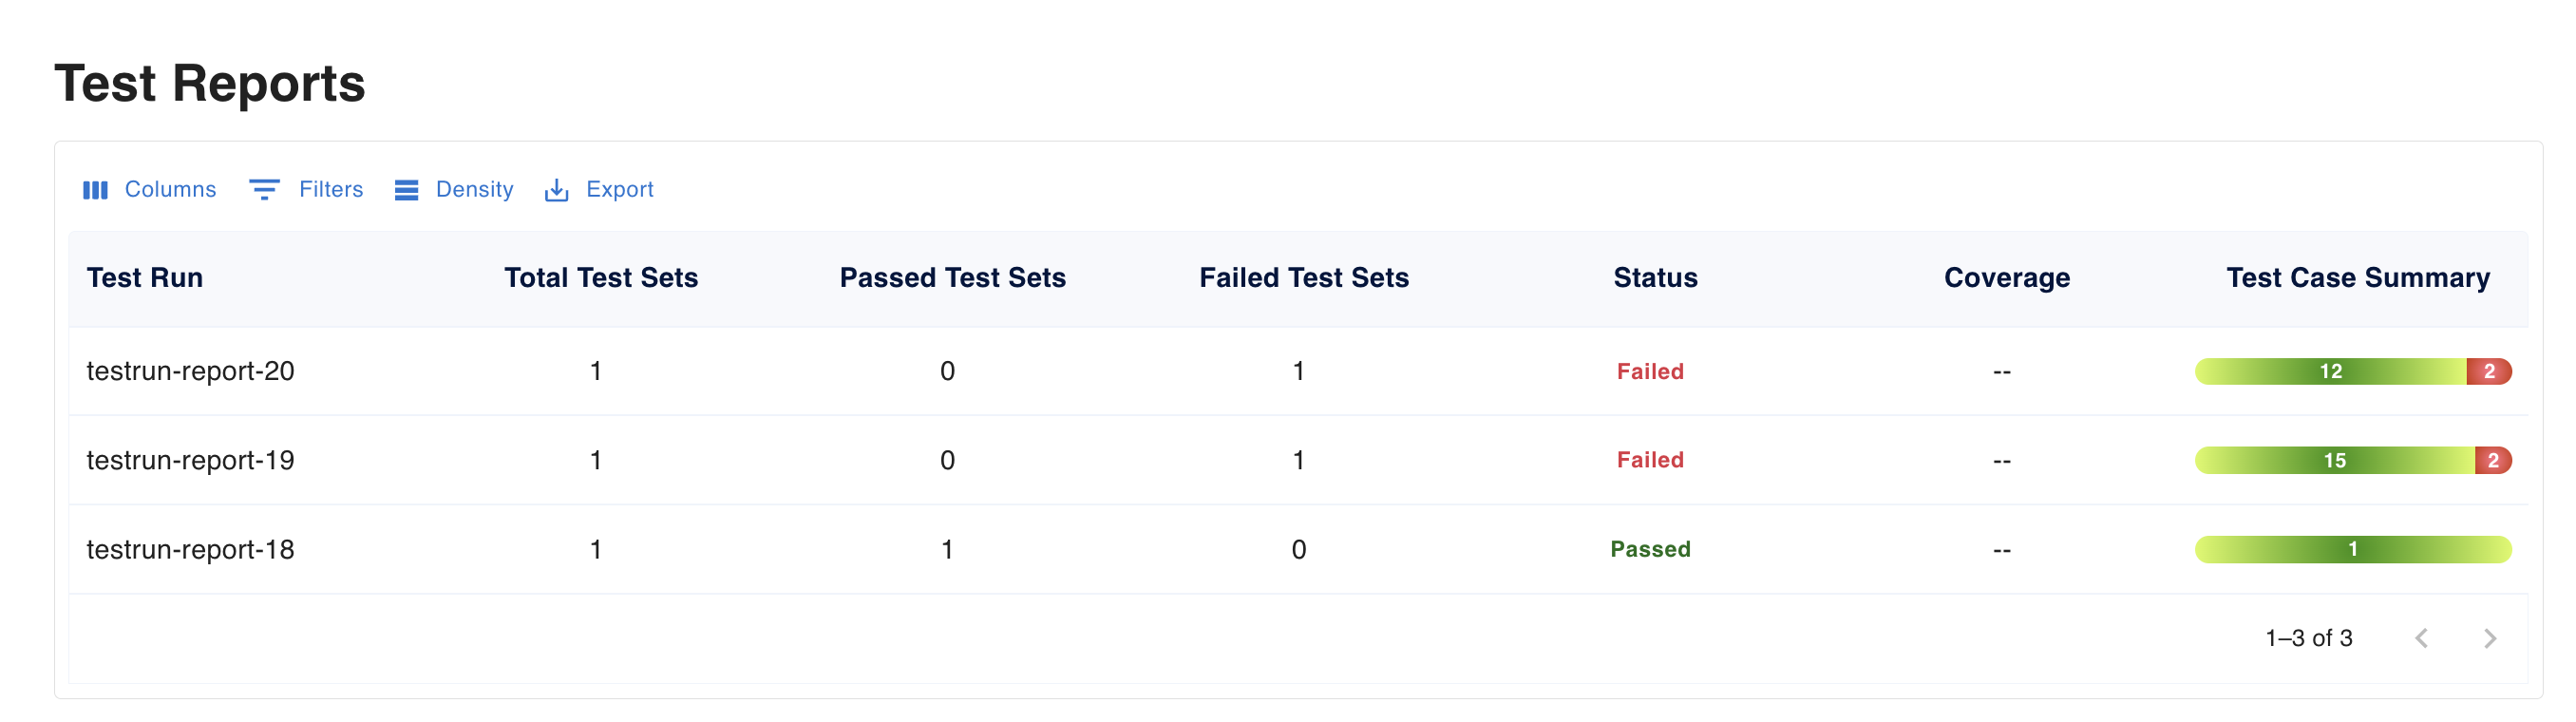
Now, let’s go to the individual Test Report section and review the output.
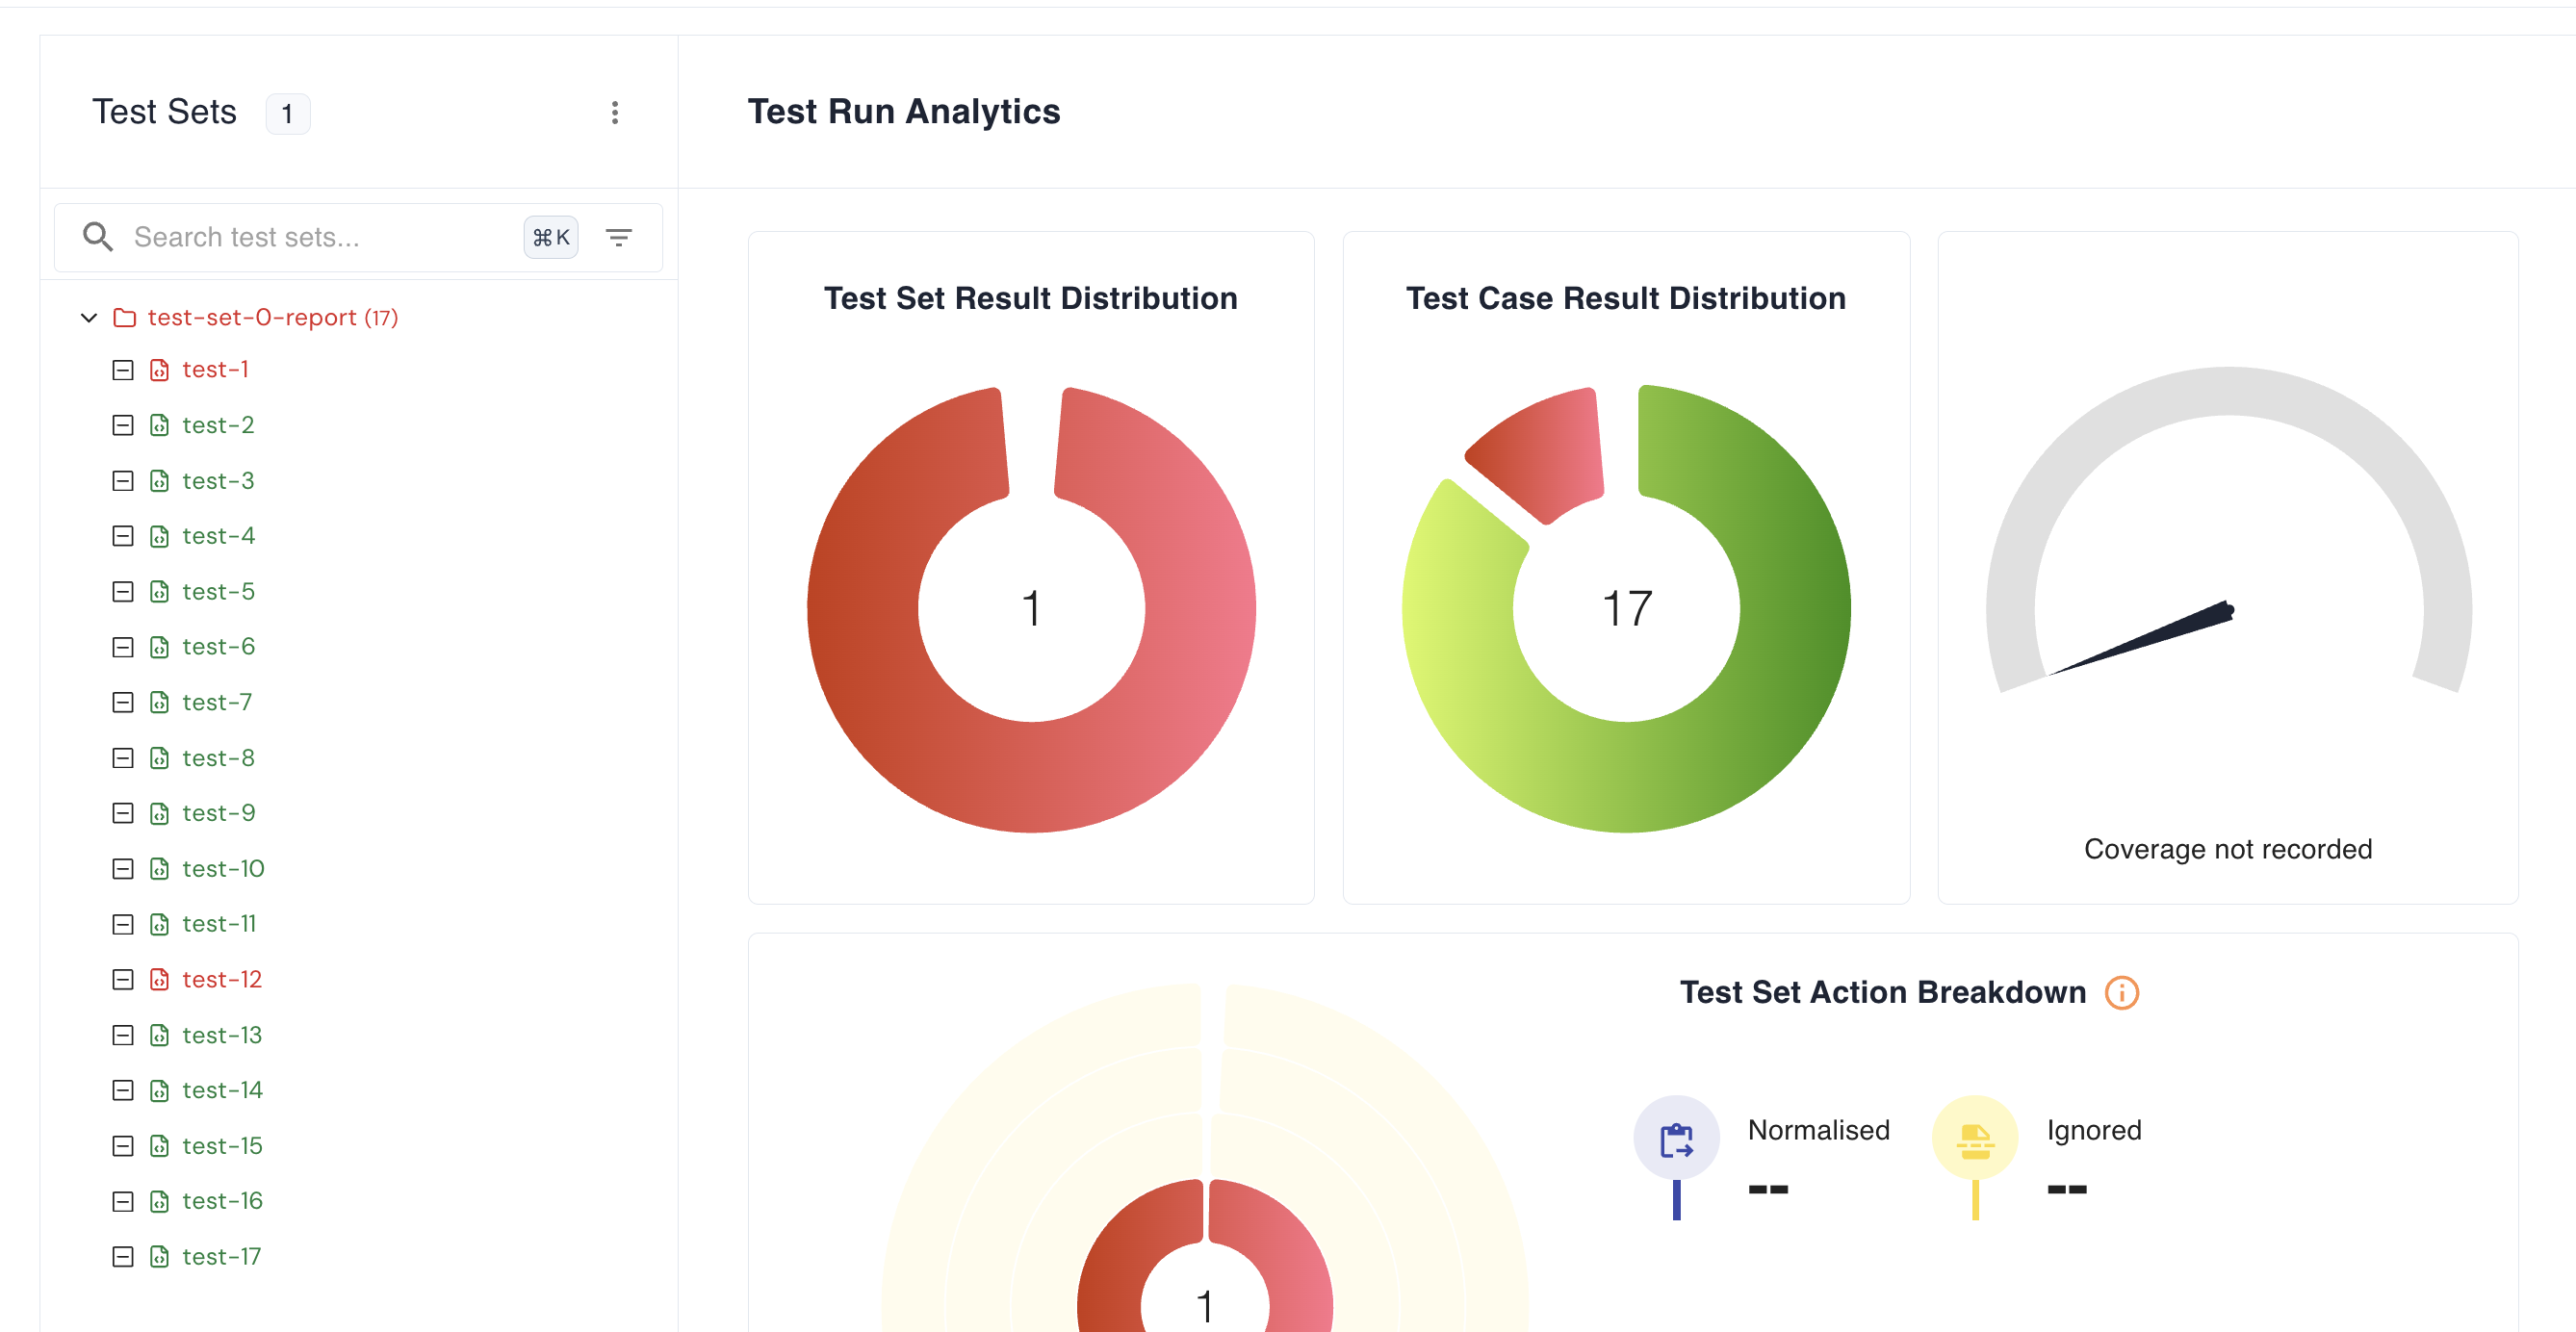
Two tests have failed — let’s check why they failed.
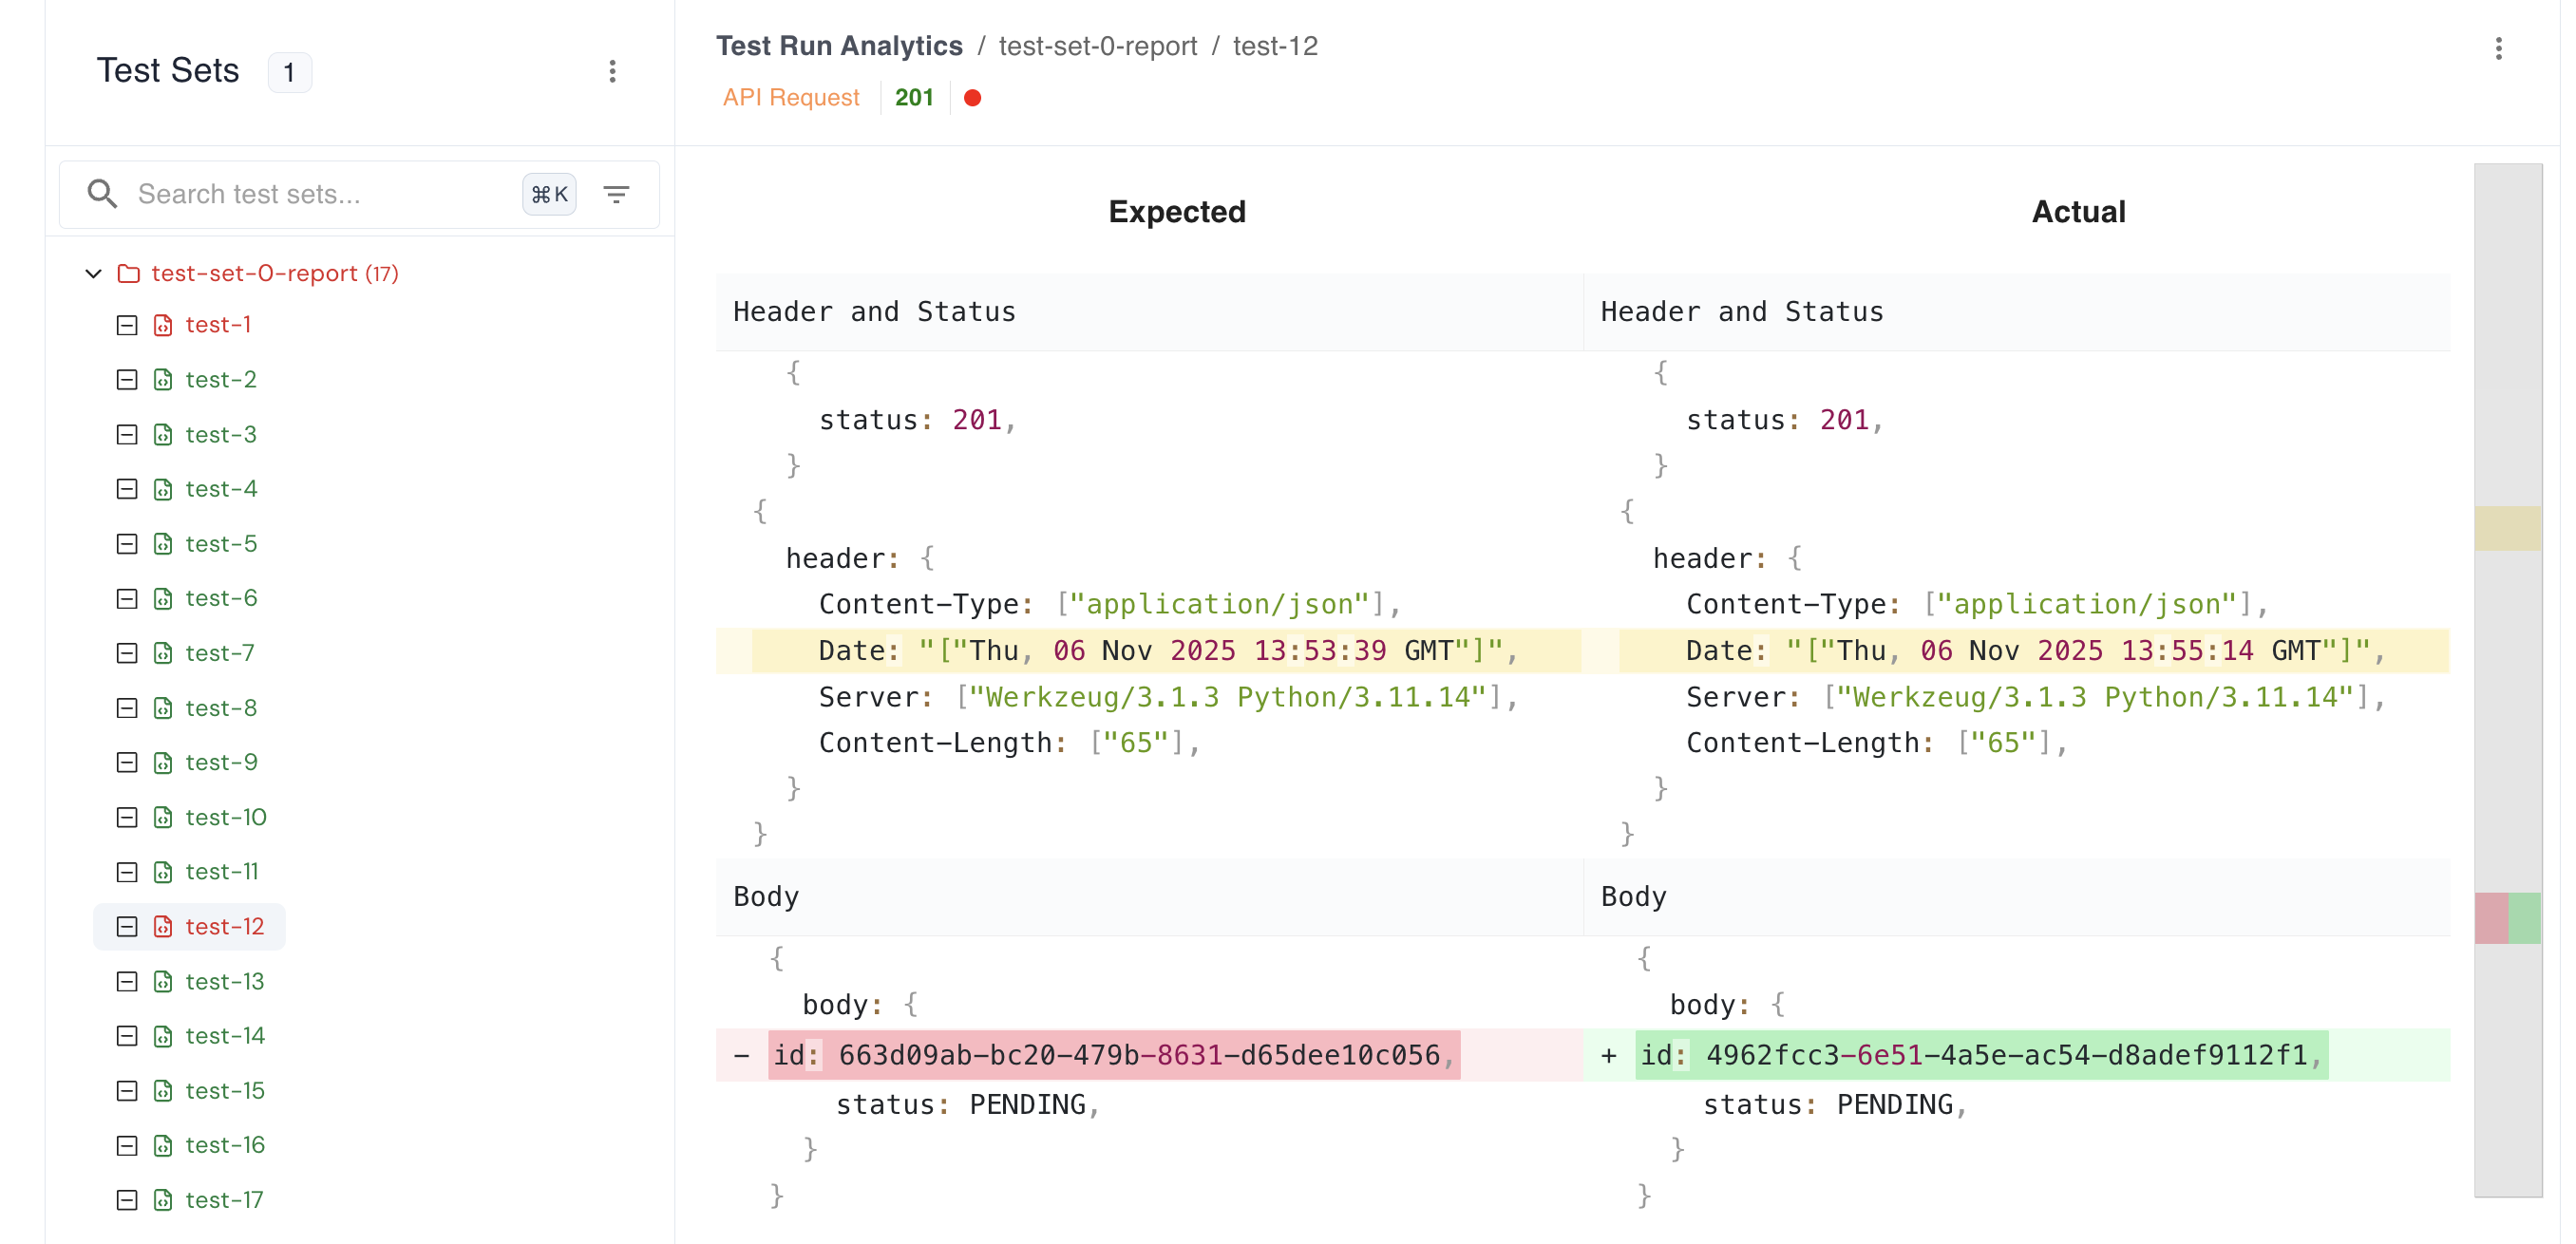
From the dashboard, you can see the diff that explains why it failed.
Note: We have just tested only one microservice (Order Service). You can use the same command to test other microservices by changing the name and config path.
Keploy API testing
This section will walk you through testing an E-commerce microservices application using Keploy API Testing.
We’ll use the Keploy Chrome extension to generate and run API tests — no coding or manual setup required.
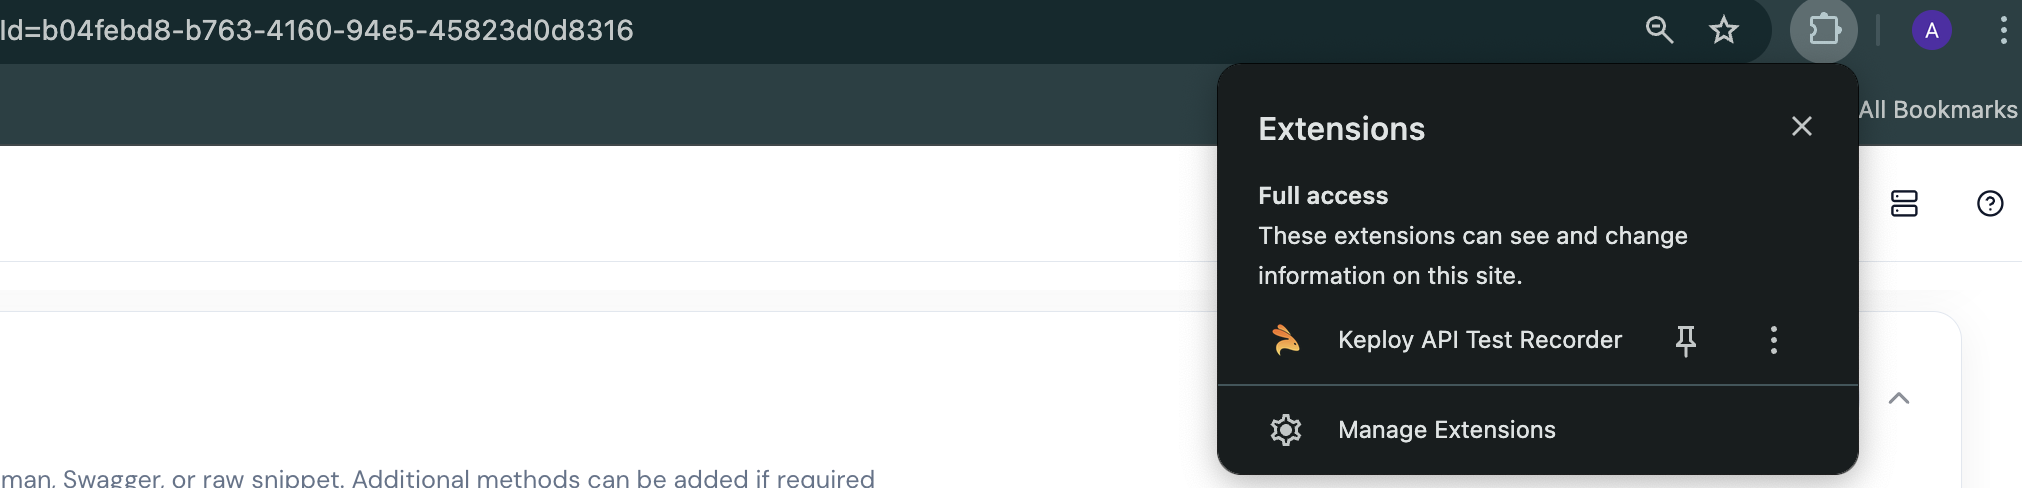
Use the following link to install the Chrome Extension
Note: This extension works only on the Chrome browser. Make sure you’re using Chrome to try it out.
Also, please verify that the Keploy Chrome Extension is installed and running.
Once done, Go to Keploy Enterprise UI to try out Keploy API Testing. Once you sign in, you’ll see a dashboard like this:
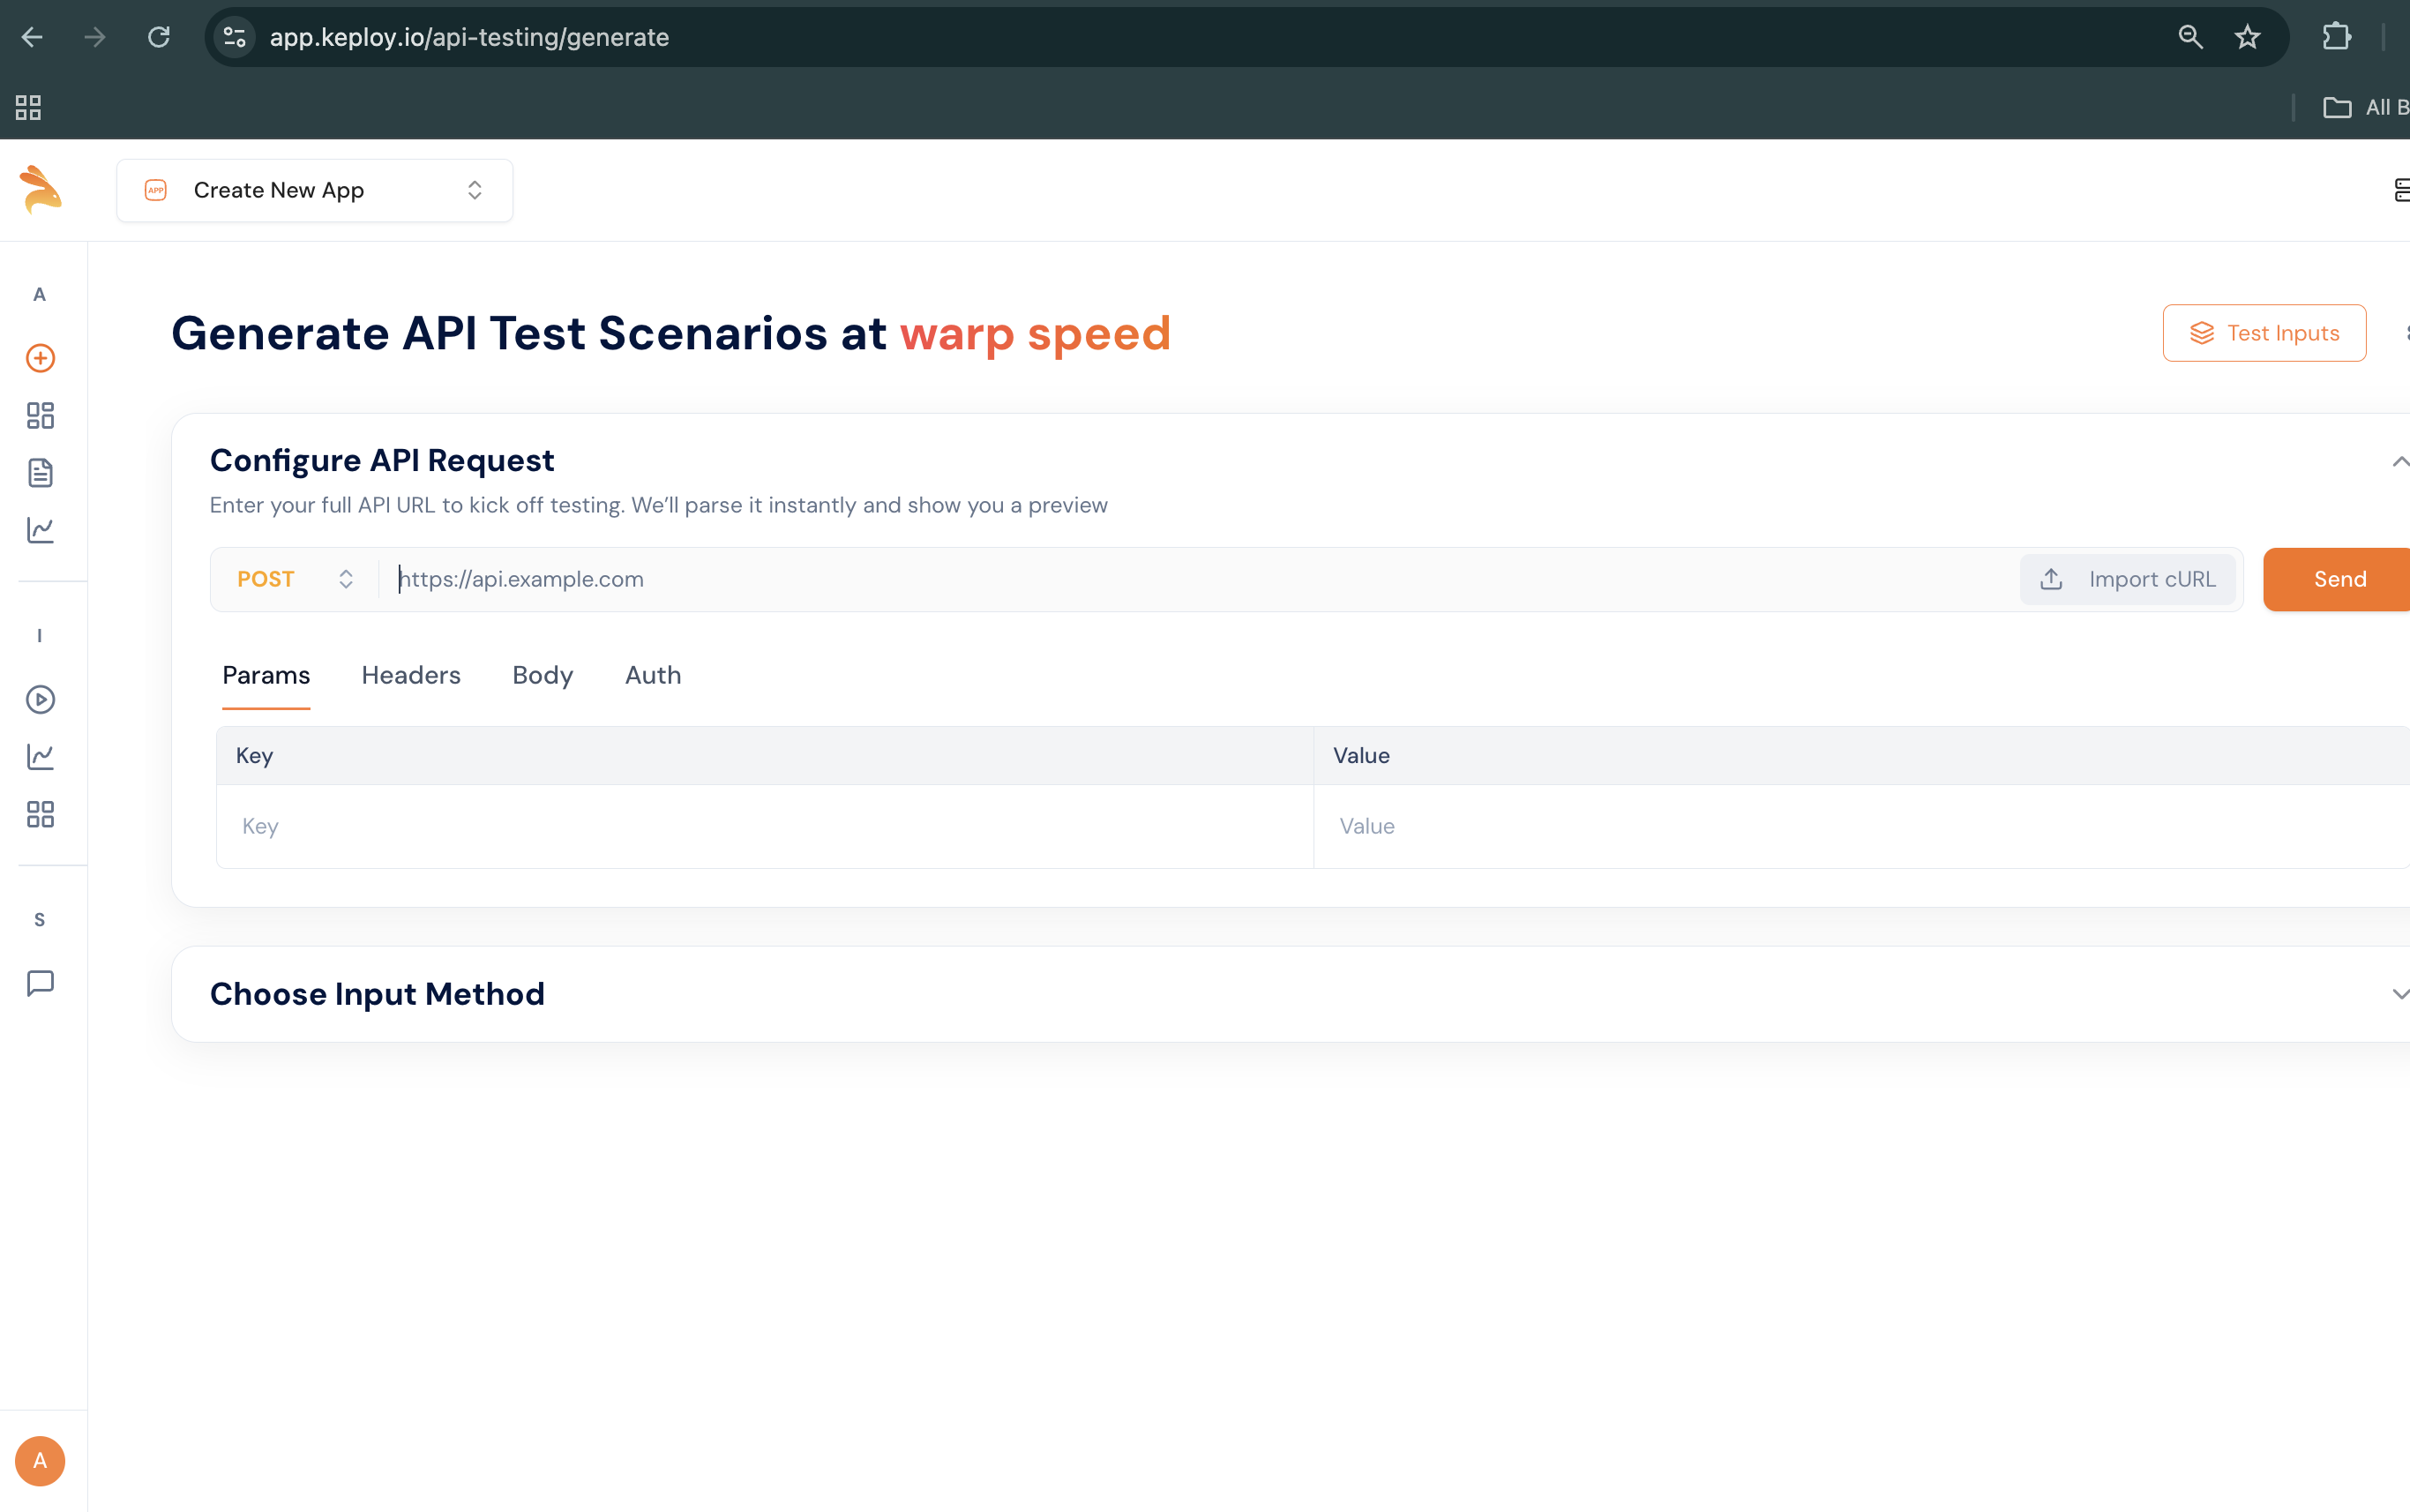
After reaching this step, provide your application URL and the working cURL commands. If the e-commerce application isn’t already running, start it using docker compose up.
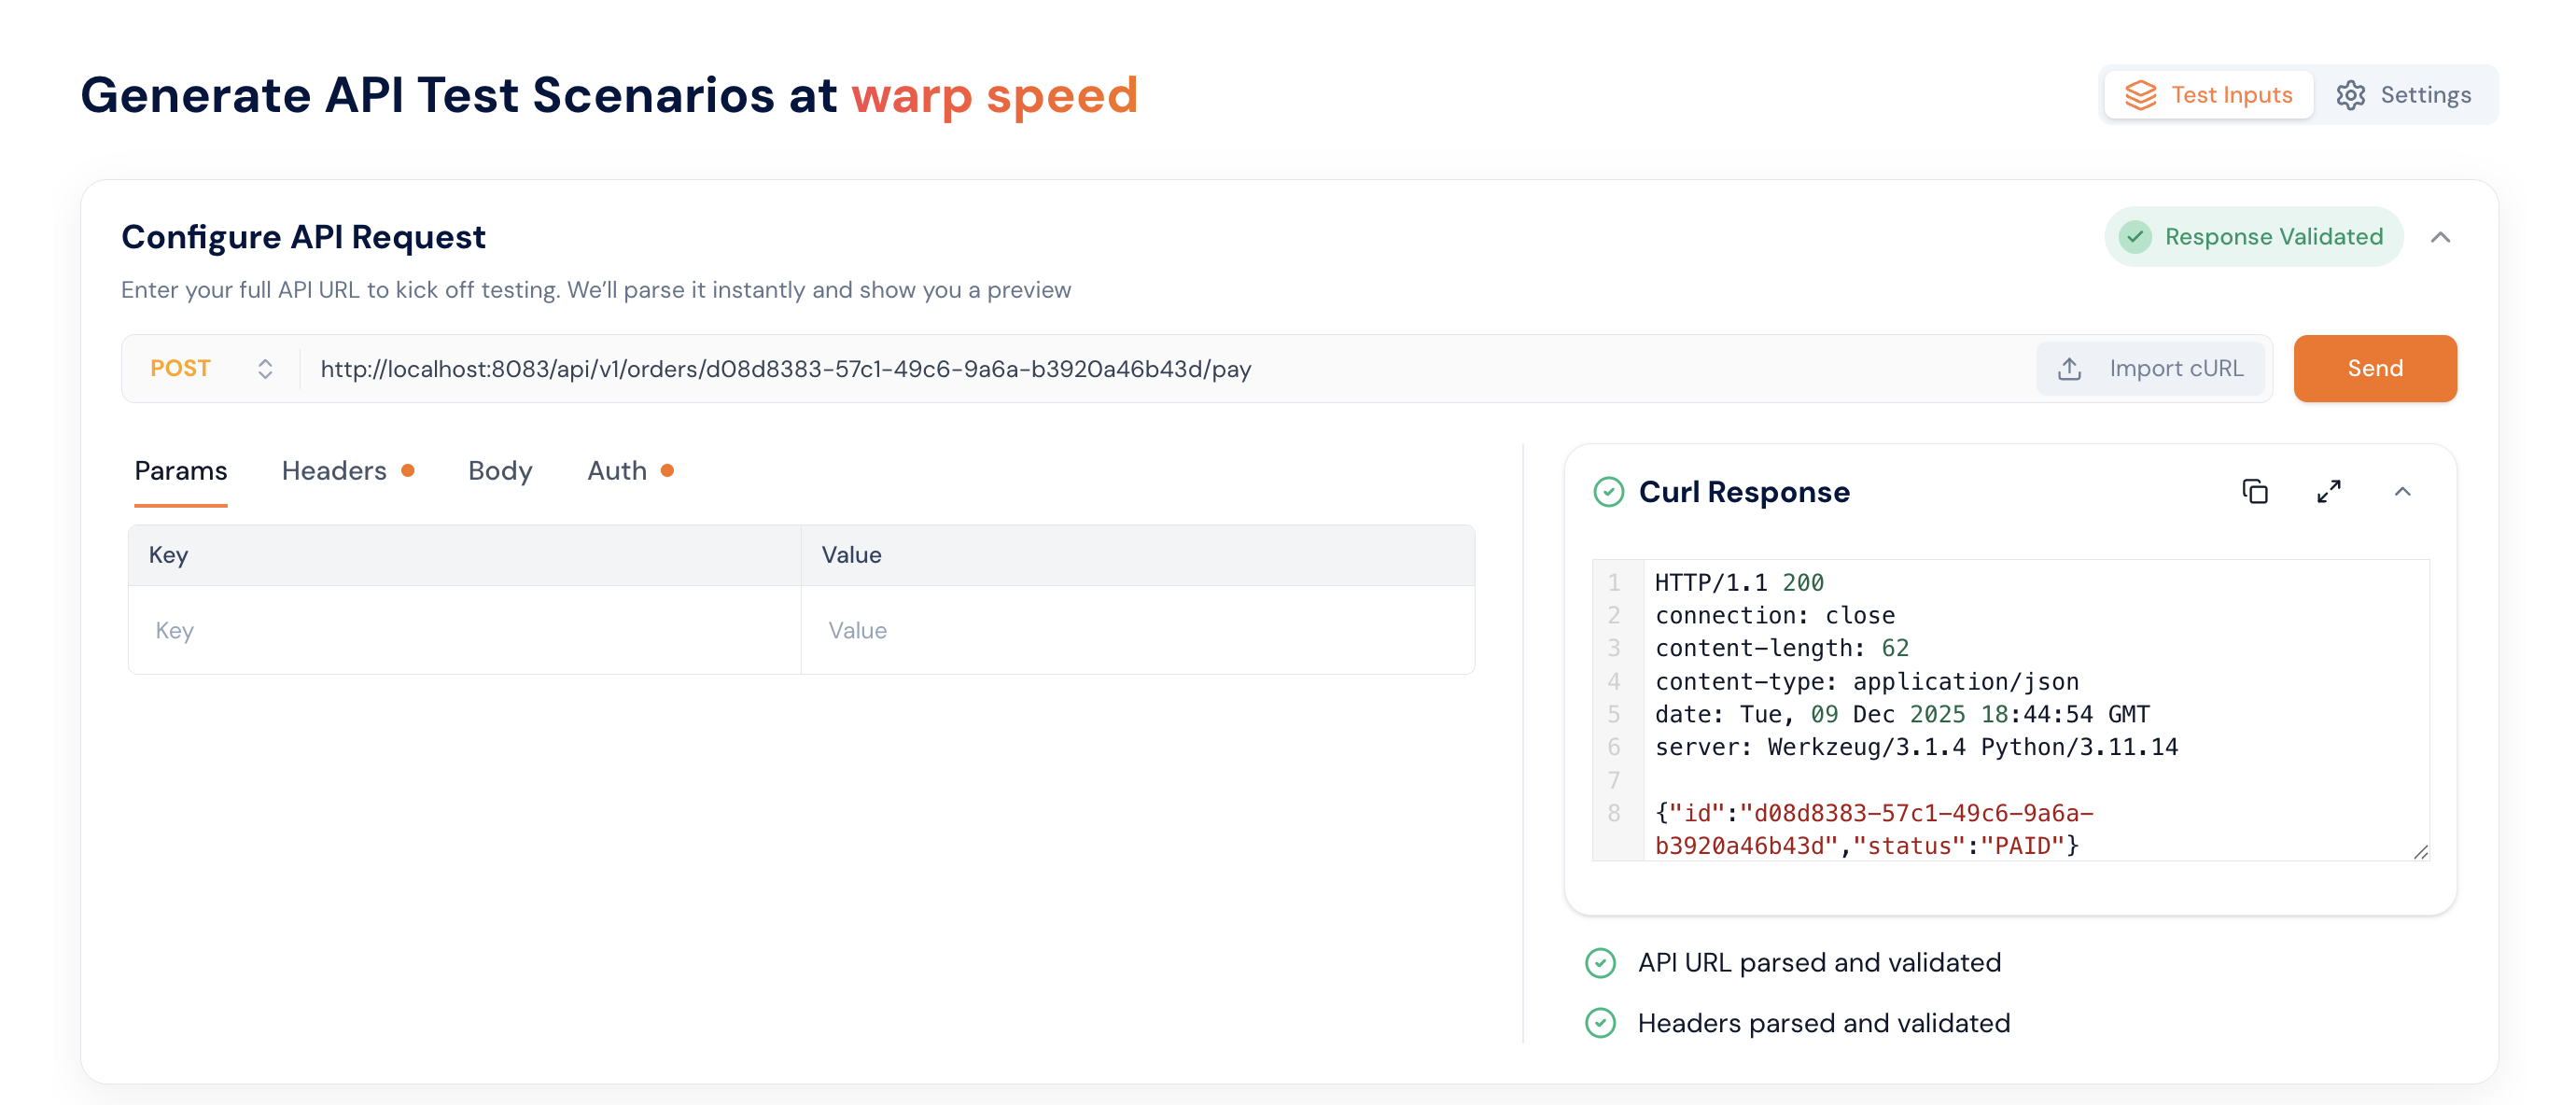
Step 1: Let's provide the curl command in the import curl section

Use the following cURL command to import:
curl --location --request POST 'http://localhost:8083/api/v1/orders/d08d8383-57c1-49c6-9a6a-b3920a46b43d/pay' \
--header 'Authorization: Bearer eyJhbGciOiJIUzI1NiIsInR5cCI6IkpXVCJ9.eyJzdWIiOiI3ZWJmZDZmMS02MDFmLTRmYzItYjc1Yy1iNWJkNjhlM2M5N2IiLCJ1c2VybmFtZSI6ImFkbWlubmV3IiwiaWF0IjoxNzY1MzA1NzQ0LCJleHAiOjE3Njc4OTc3NDR9.4pGTa6FgCzZRXYl_0cMpDGc_2XO1GxBlrTlnB7QAhaU'
Step 2: Once you provide the input, you will see a response. This means we are able to reach your application and are now ready to generate tests. We’re just performing a validation before generating the test cases.
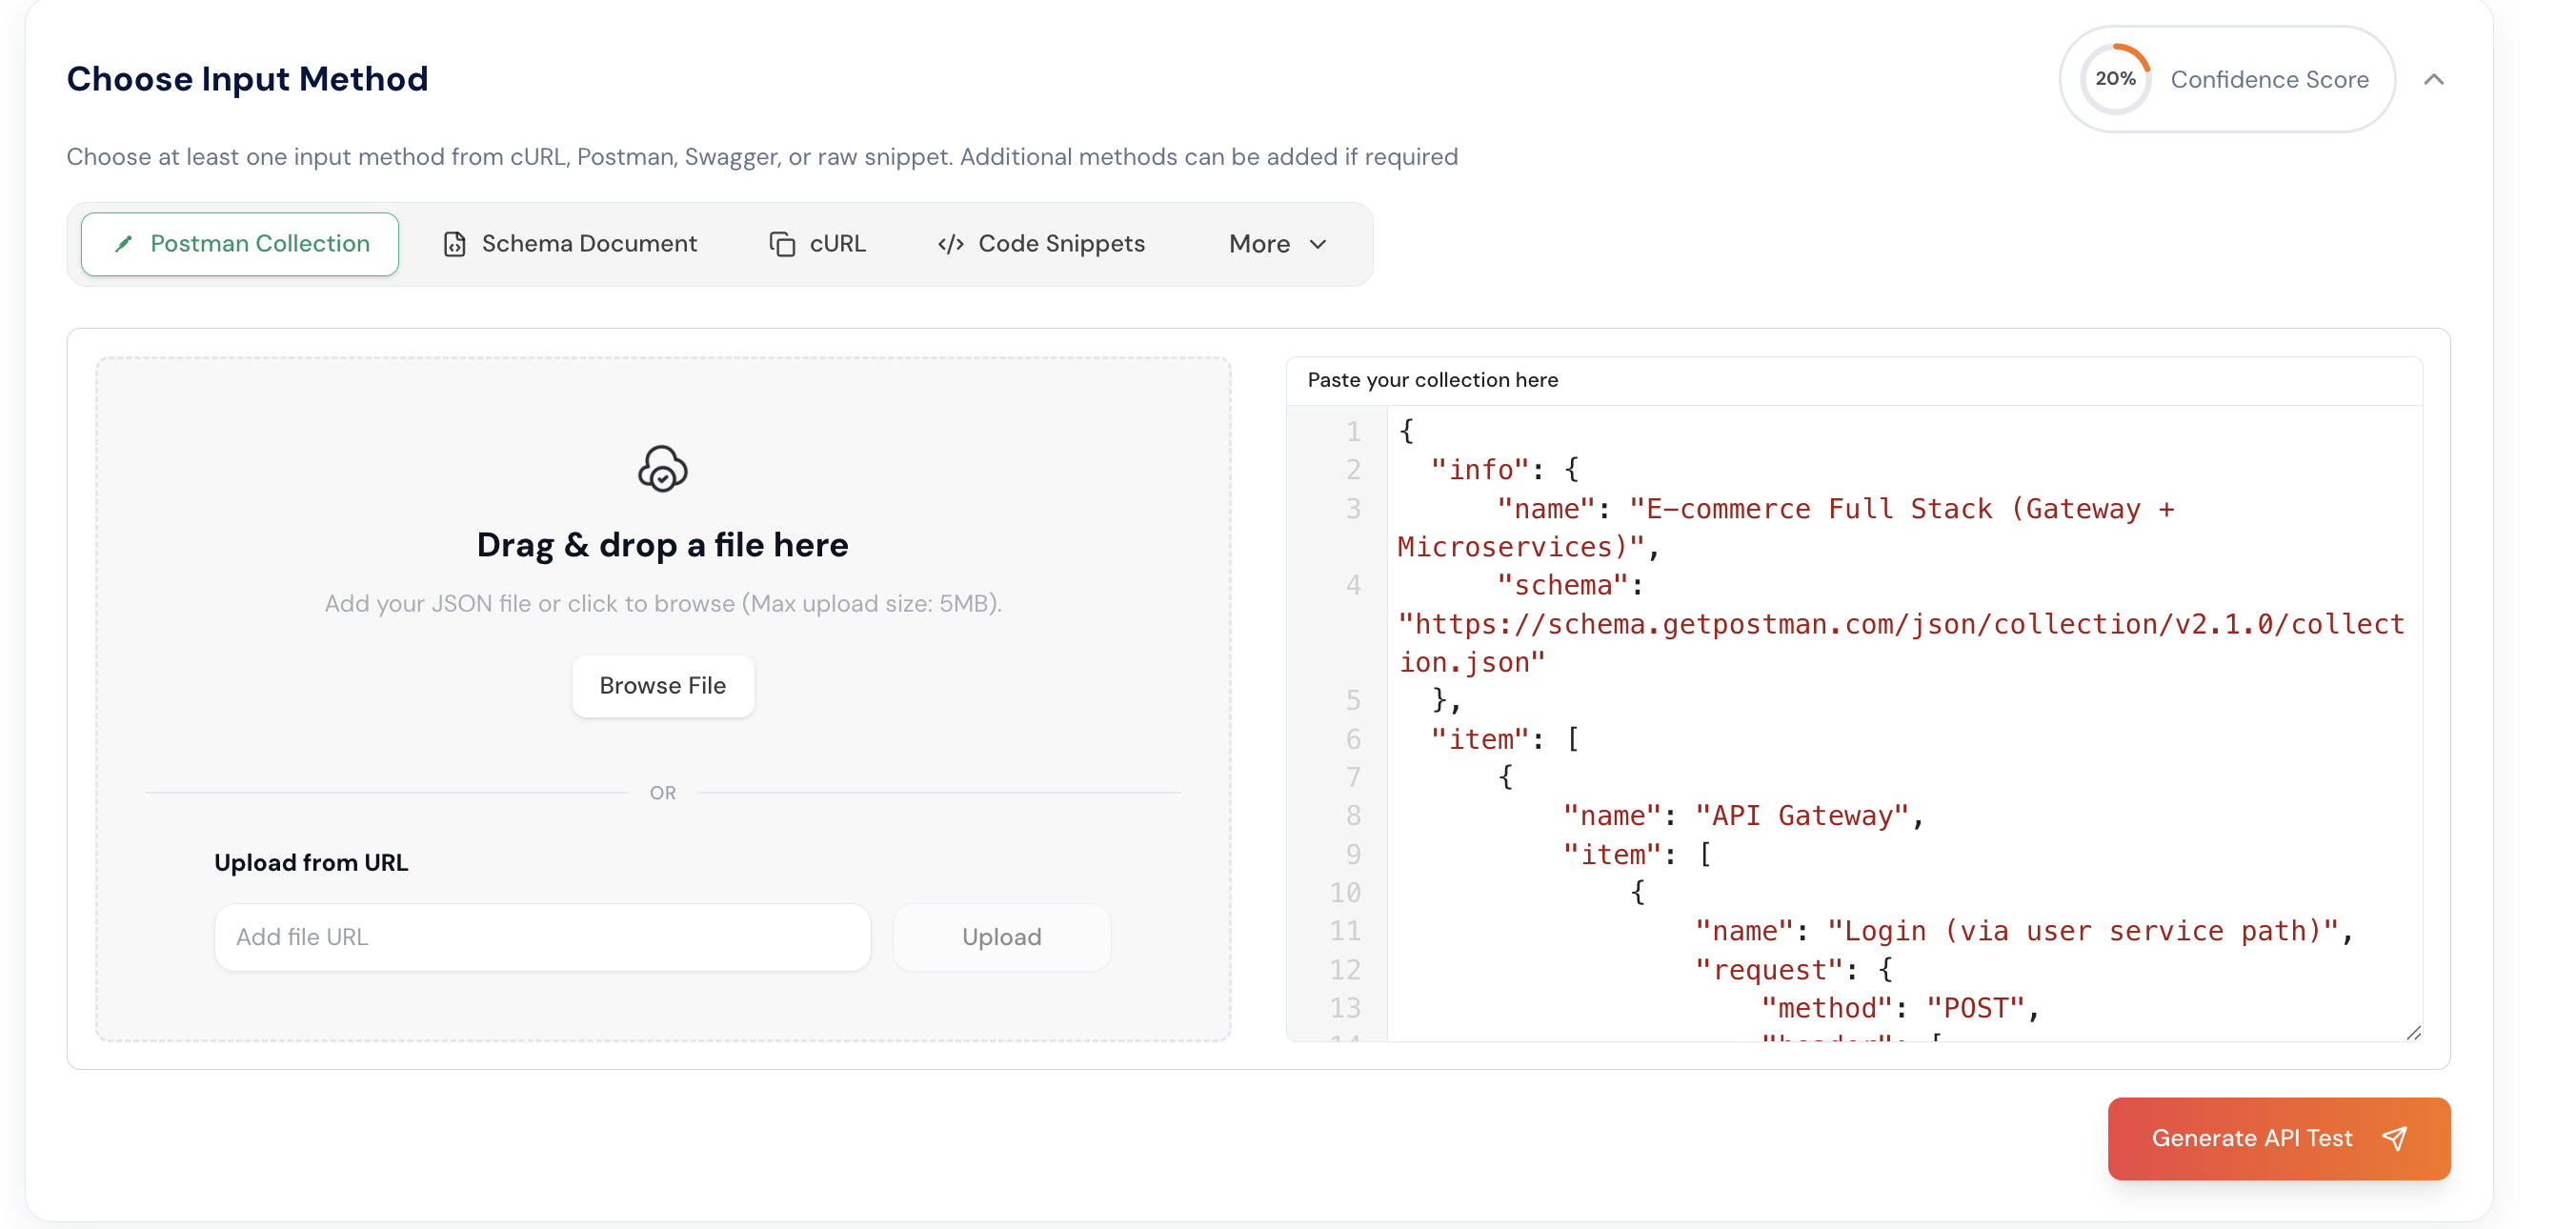
Step 3: Next, it’s time to provide the input — such as cURL commands, Postman collections, or an OpenAPI schema. Remember, the more input or content you provide, the better your test cases will be. For this demo, we’ll use Postman collections and cURL commands.
Copy this postman collection
{
"info": {
"name": "E-commerce Full Stack (Gateway + Microservices)",
"schema": "https://schema.getpostman.com/json/collection/v2.1.0/collection.json"
},
"item": [
{
"name": "API Gateway",
"item": [
{
# ...
Paste the collections in the postman collections section.
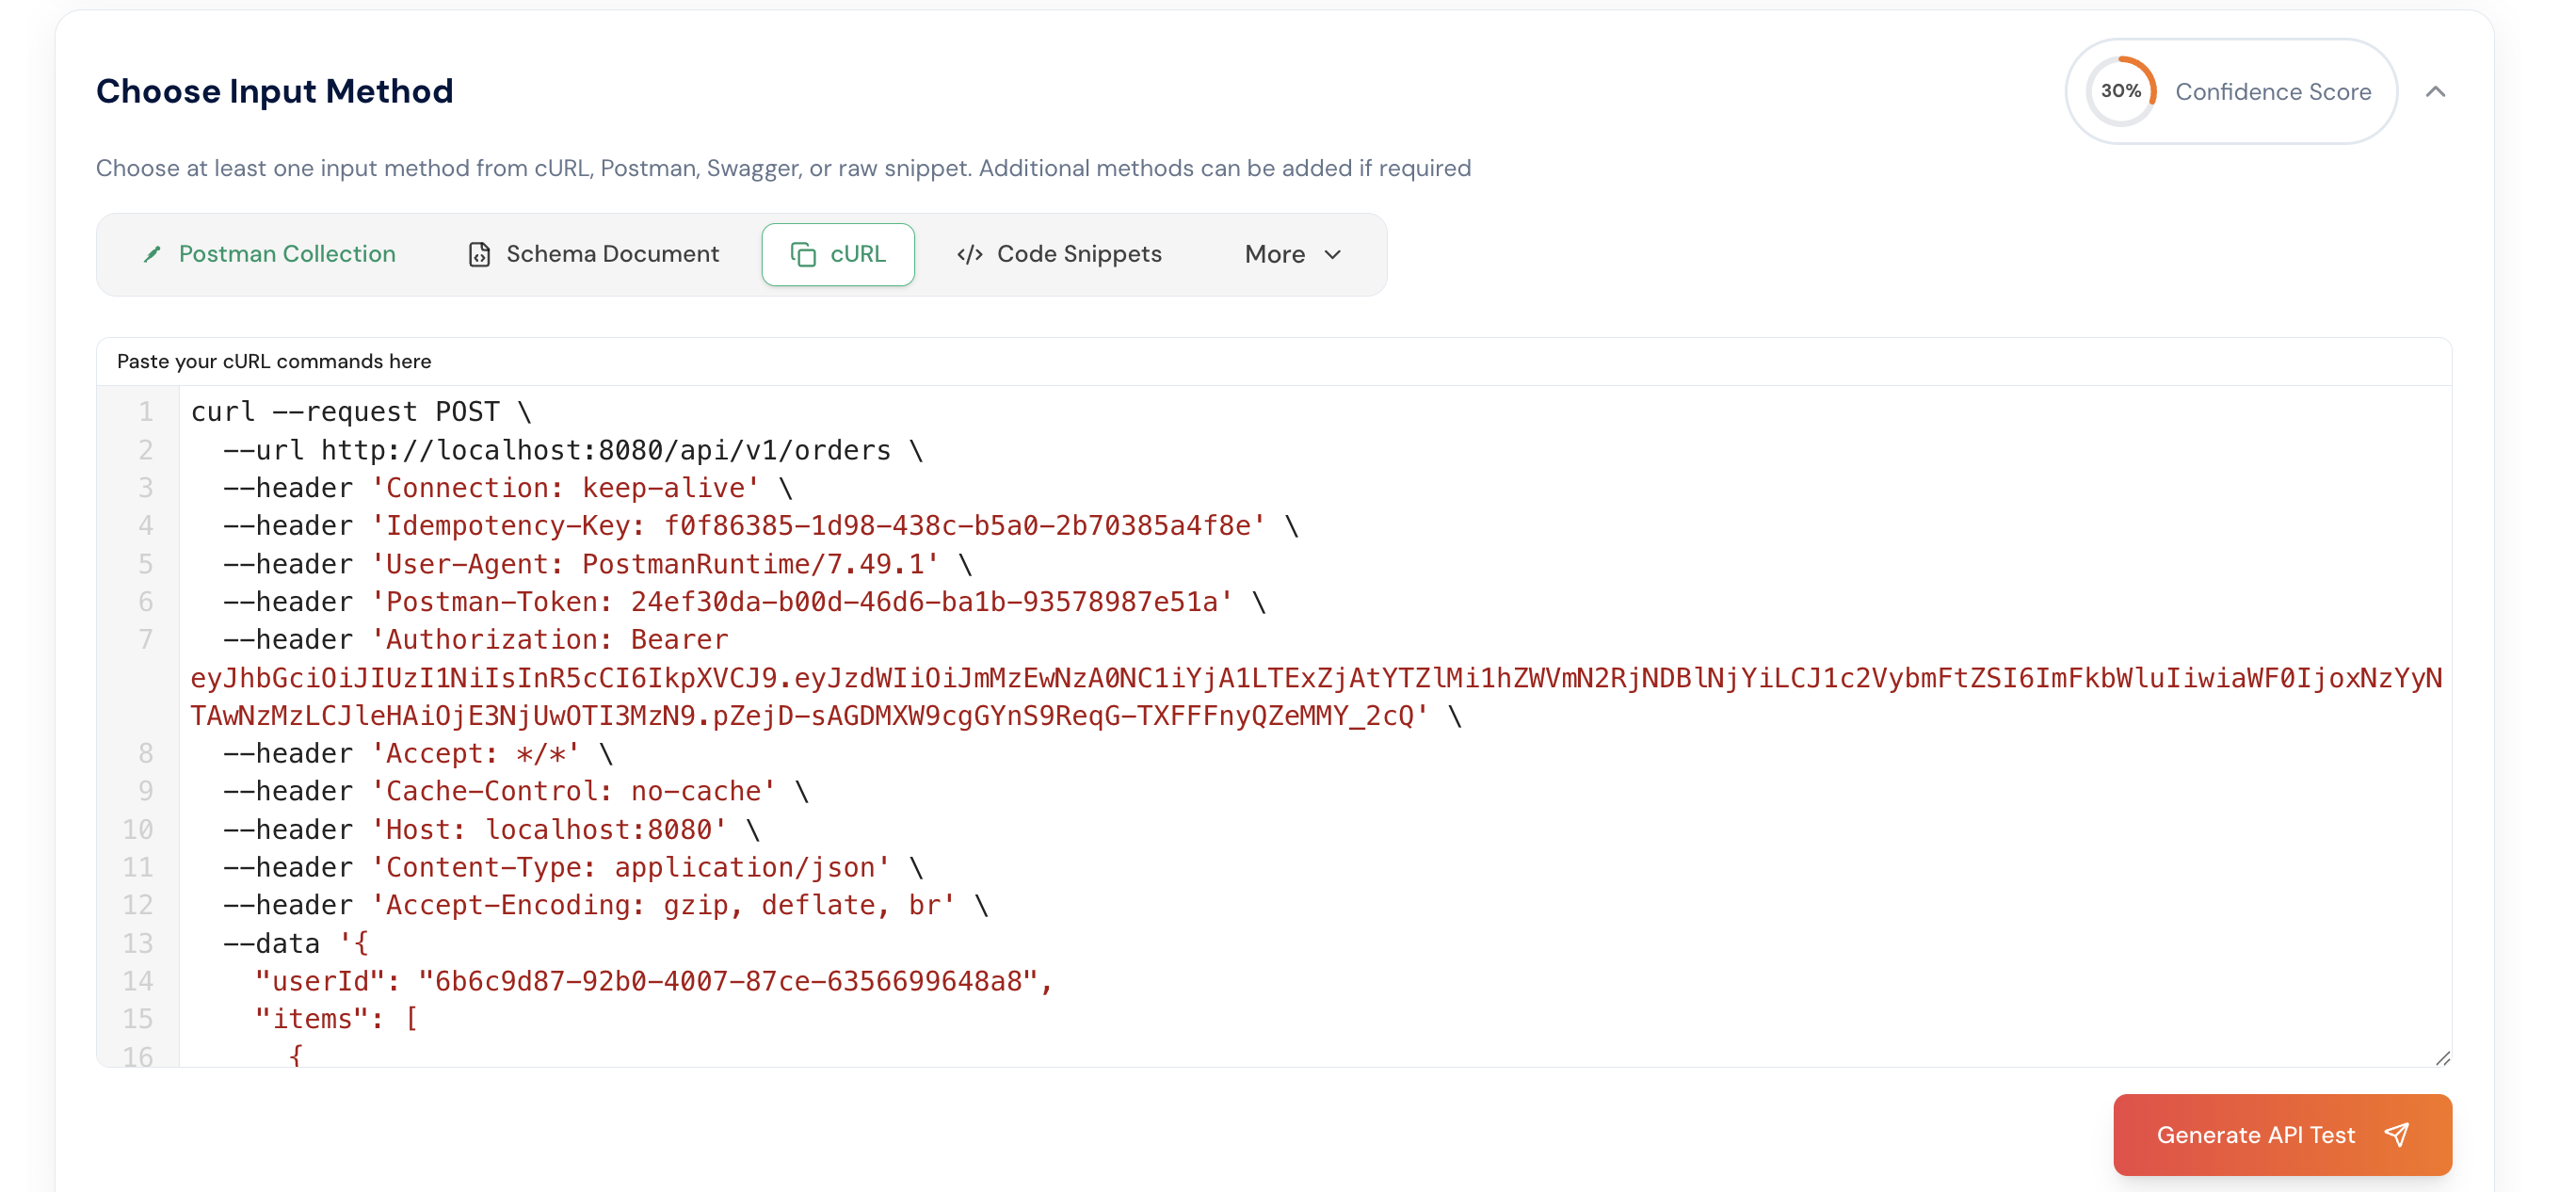
Also copy the curl commands:
# Create an order

curl --request POST --url http://localhost:8080/api/v1/orders --header 'Connection: keep-alive' --header 'Idempotency-Key: f0f86385-1d98-438c-b5a0-2b70385a4f8e' --header 'User-Agent: PostmanRuntime/7.49.1' --header 'Postman-Token: 24ef30da-b00d-46d6-ba1b-93578987e51a' --header 'Authorization: Bearer eyJhbGciOiJIUzI1NiIsInR5cCI6IkpXVCJ9.eyJzdWIiOiJmMzEwNzA0NC1iYjA1LTExZjAtYTZlMi1hZWVmN2RjNDBlNjYiLCJ1c2VybmFtZSI6ImFkbWluIiwiaWF0IjoxNzYyNTAwNzMzLCJleHAiOjE3NjUwOTI3MzN9.pZejD-sAGDMXW9cgGYnS9ReqG-TXFFFnyQZeMMY*2cQ' --header 'Accept: */_' --header 'Cache-Control: no-cache' --header 'Host: localhost:8080' --header 'Content-Type: application/json' --header 'Accept-Encoding: gzip, deflate, br' --data '{
"userId": "6b6c9d87-92b0-4007-87ce-6356699648a8",
"items": [
{
"productId": "11111111-1111-4111-8111-111111111111",
"quantity": 1
}
],
# ...
Paste the cURL commands in the cURL section.
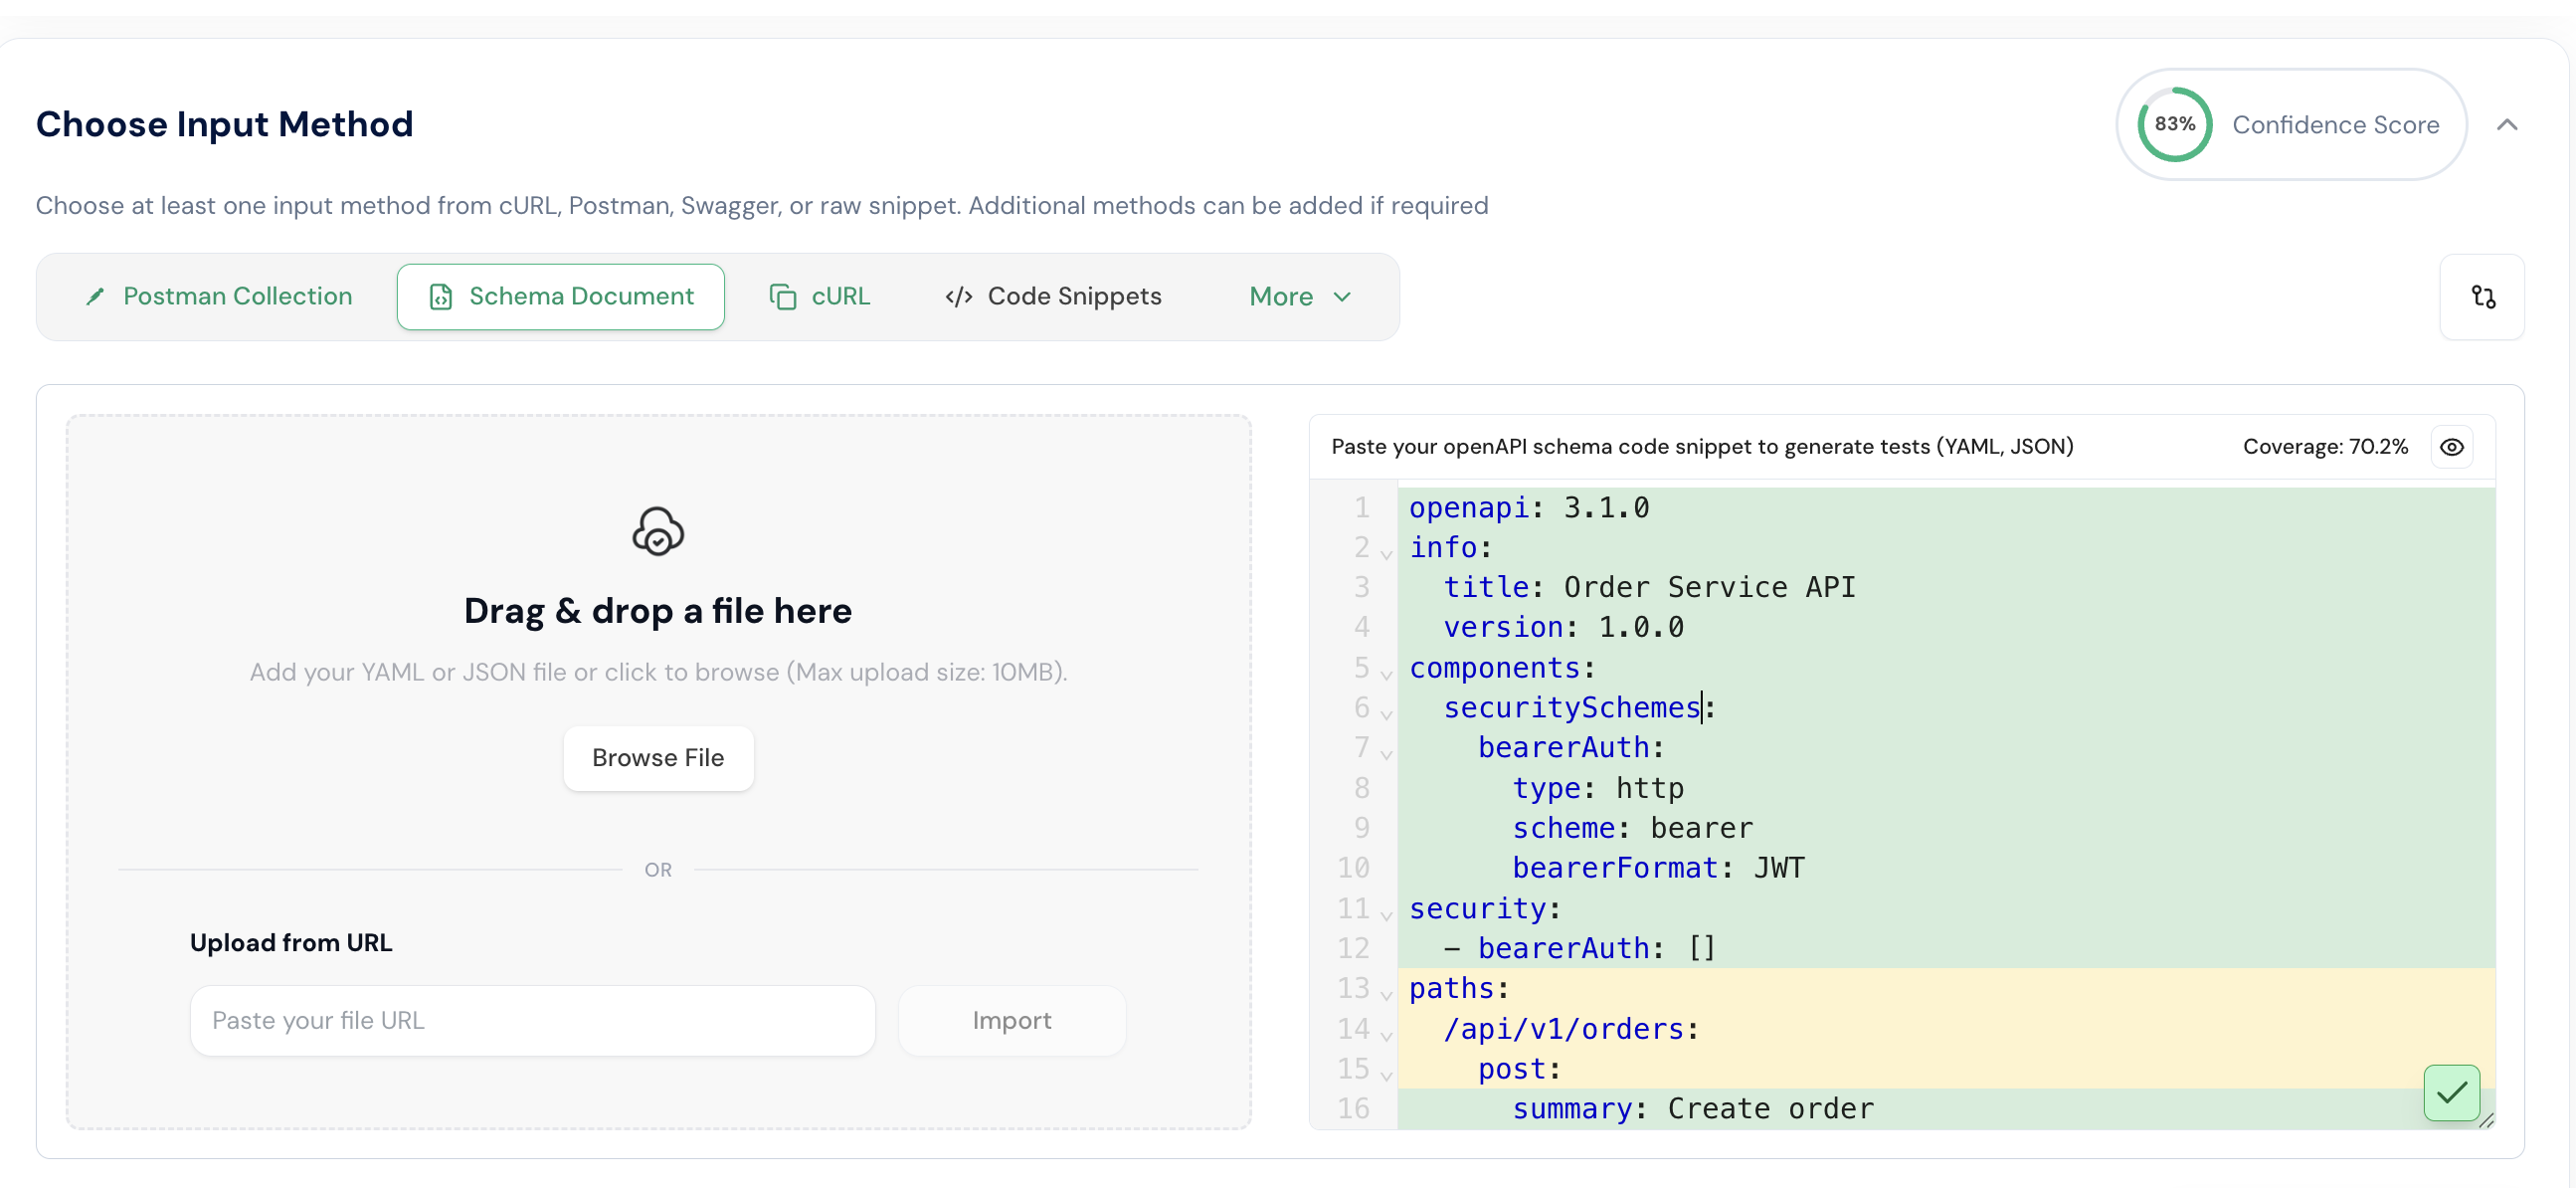
Also copy the openapi schema for the order service
openapi: 3.1.0
info:
title: Order Service API
version: 1.0.0
components:
securitySchemes:
bearerAuth:
type: http
scheme: bearer
bearerFormat: JWT
# ...
Also Paste the OpenAPI schema into the Schema Document section. Once completed, you will be able to view the schema coverage.
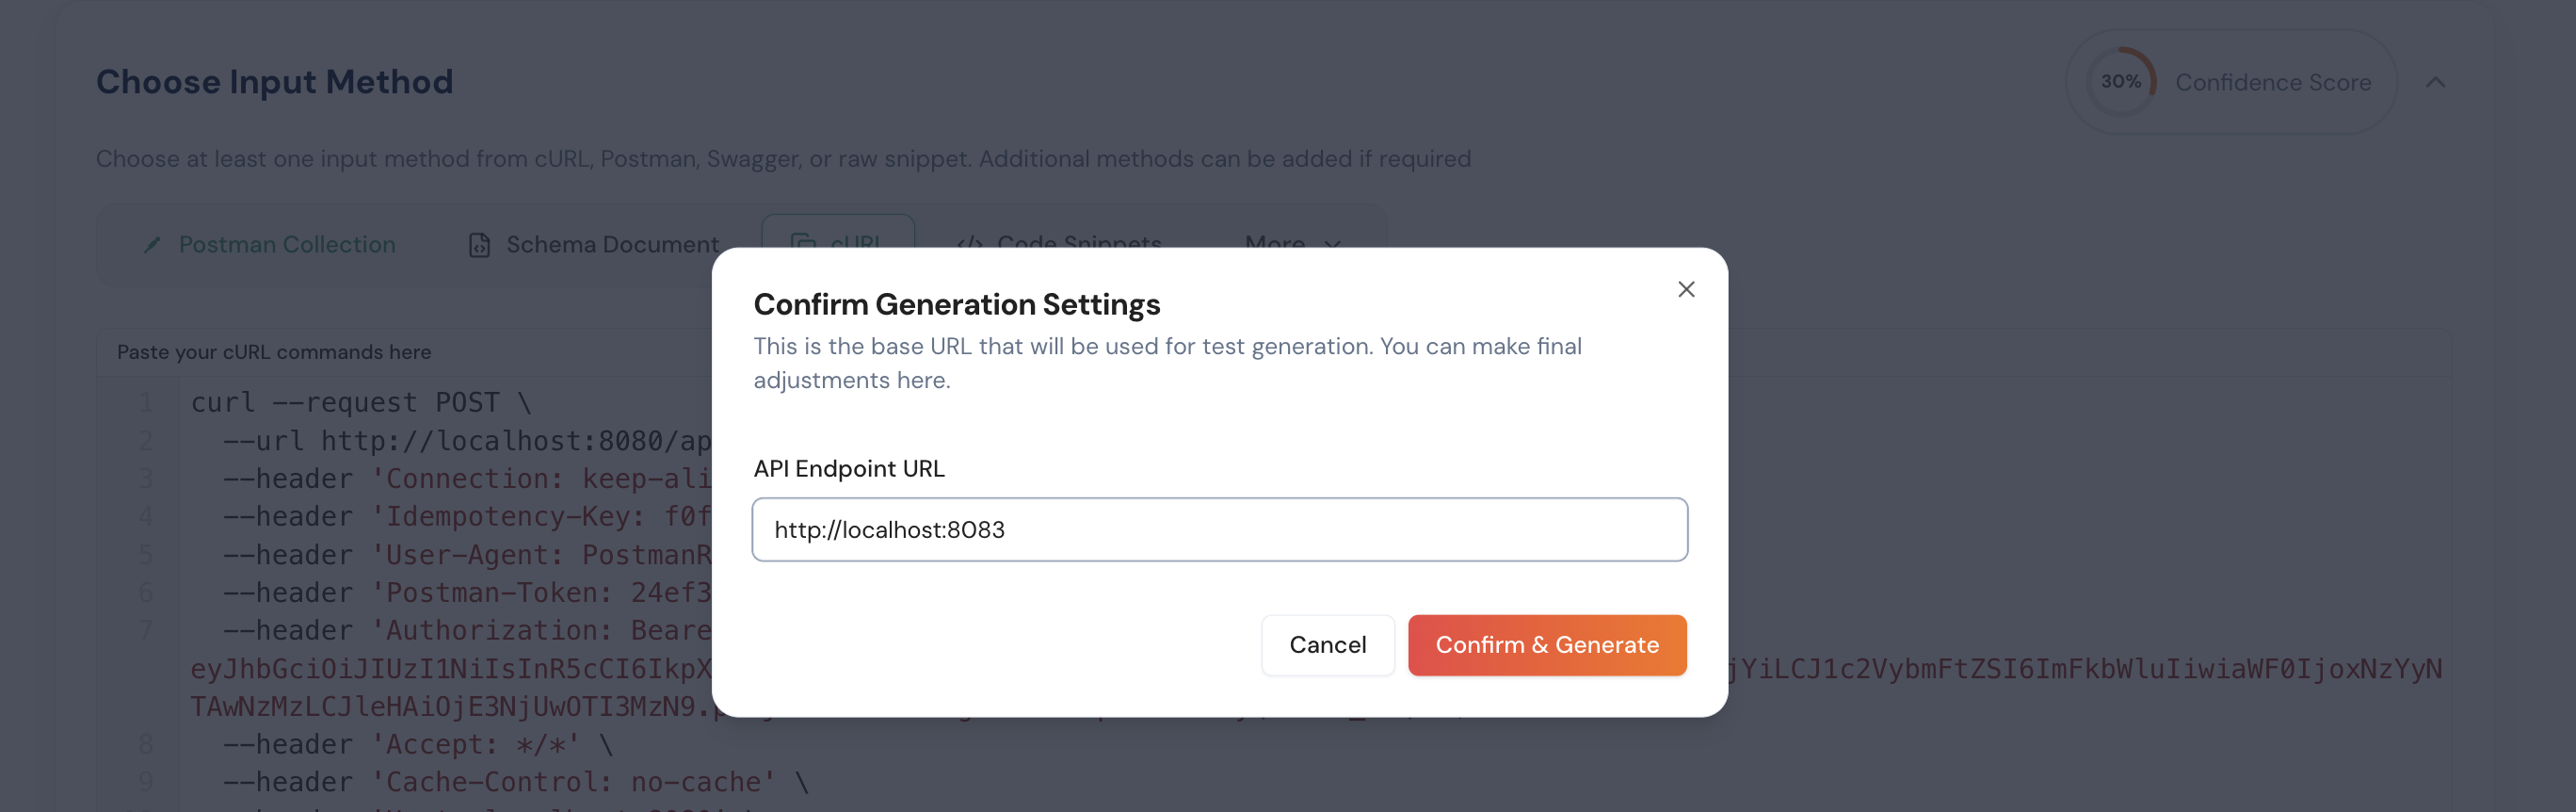
Step 4: After providing the OpenAPI schema, cURL commands, and Postman collection, click the Generate API Tests button. Then, review and confirm the generation settings. In this example, the port is changed to 8083, which means the application gateway will run on port 8083 to access all services.
Step 5: After completing the previous steps, click the Generate API Test button to automatically create test cases for your application.
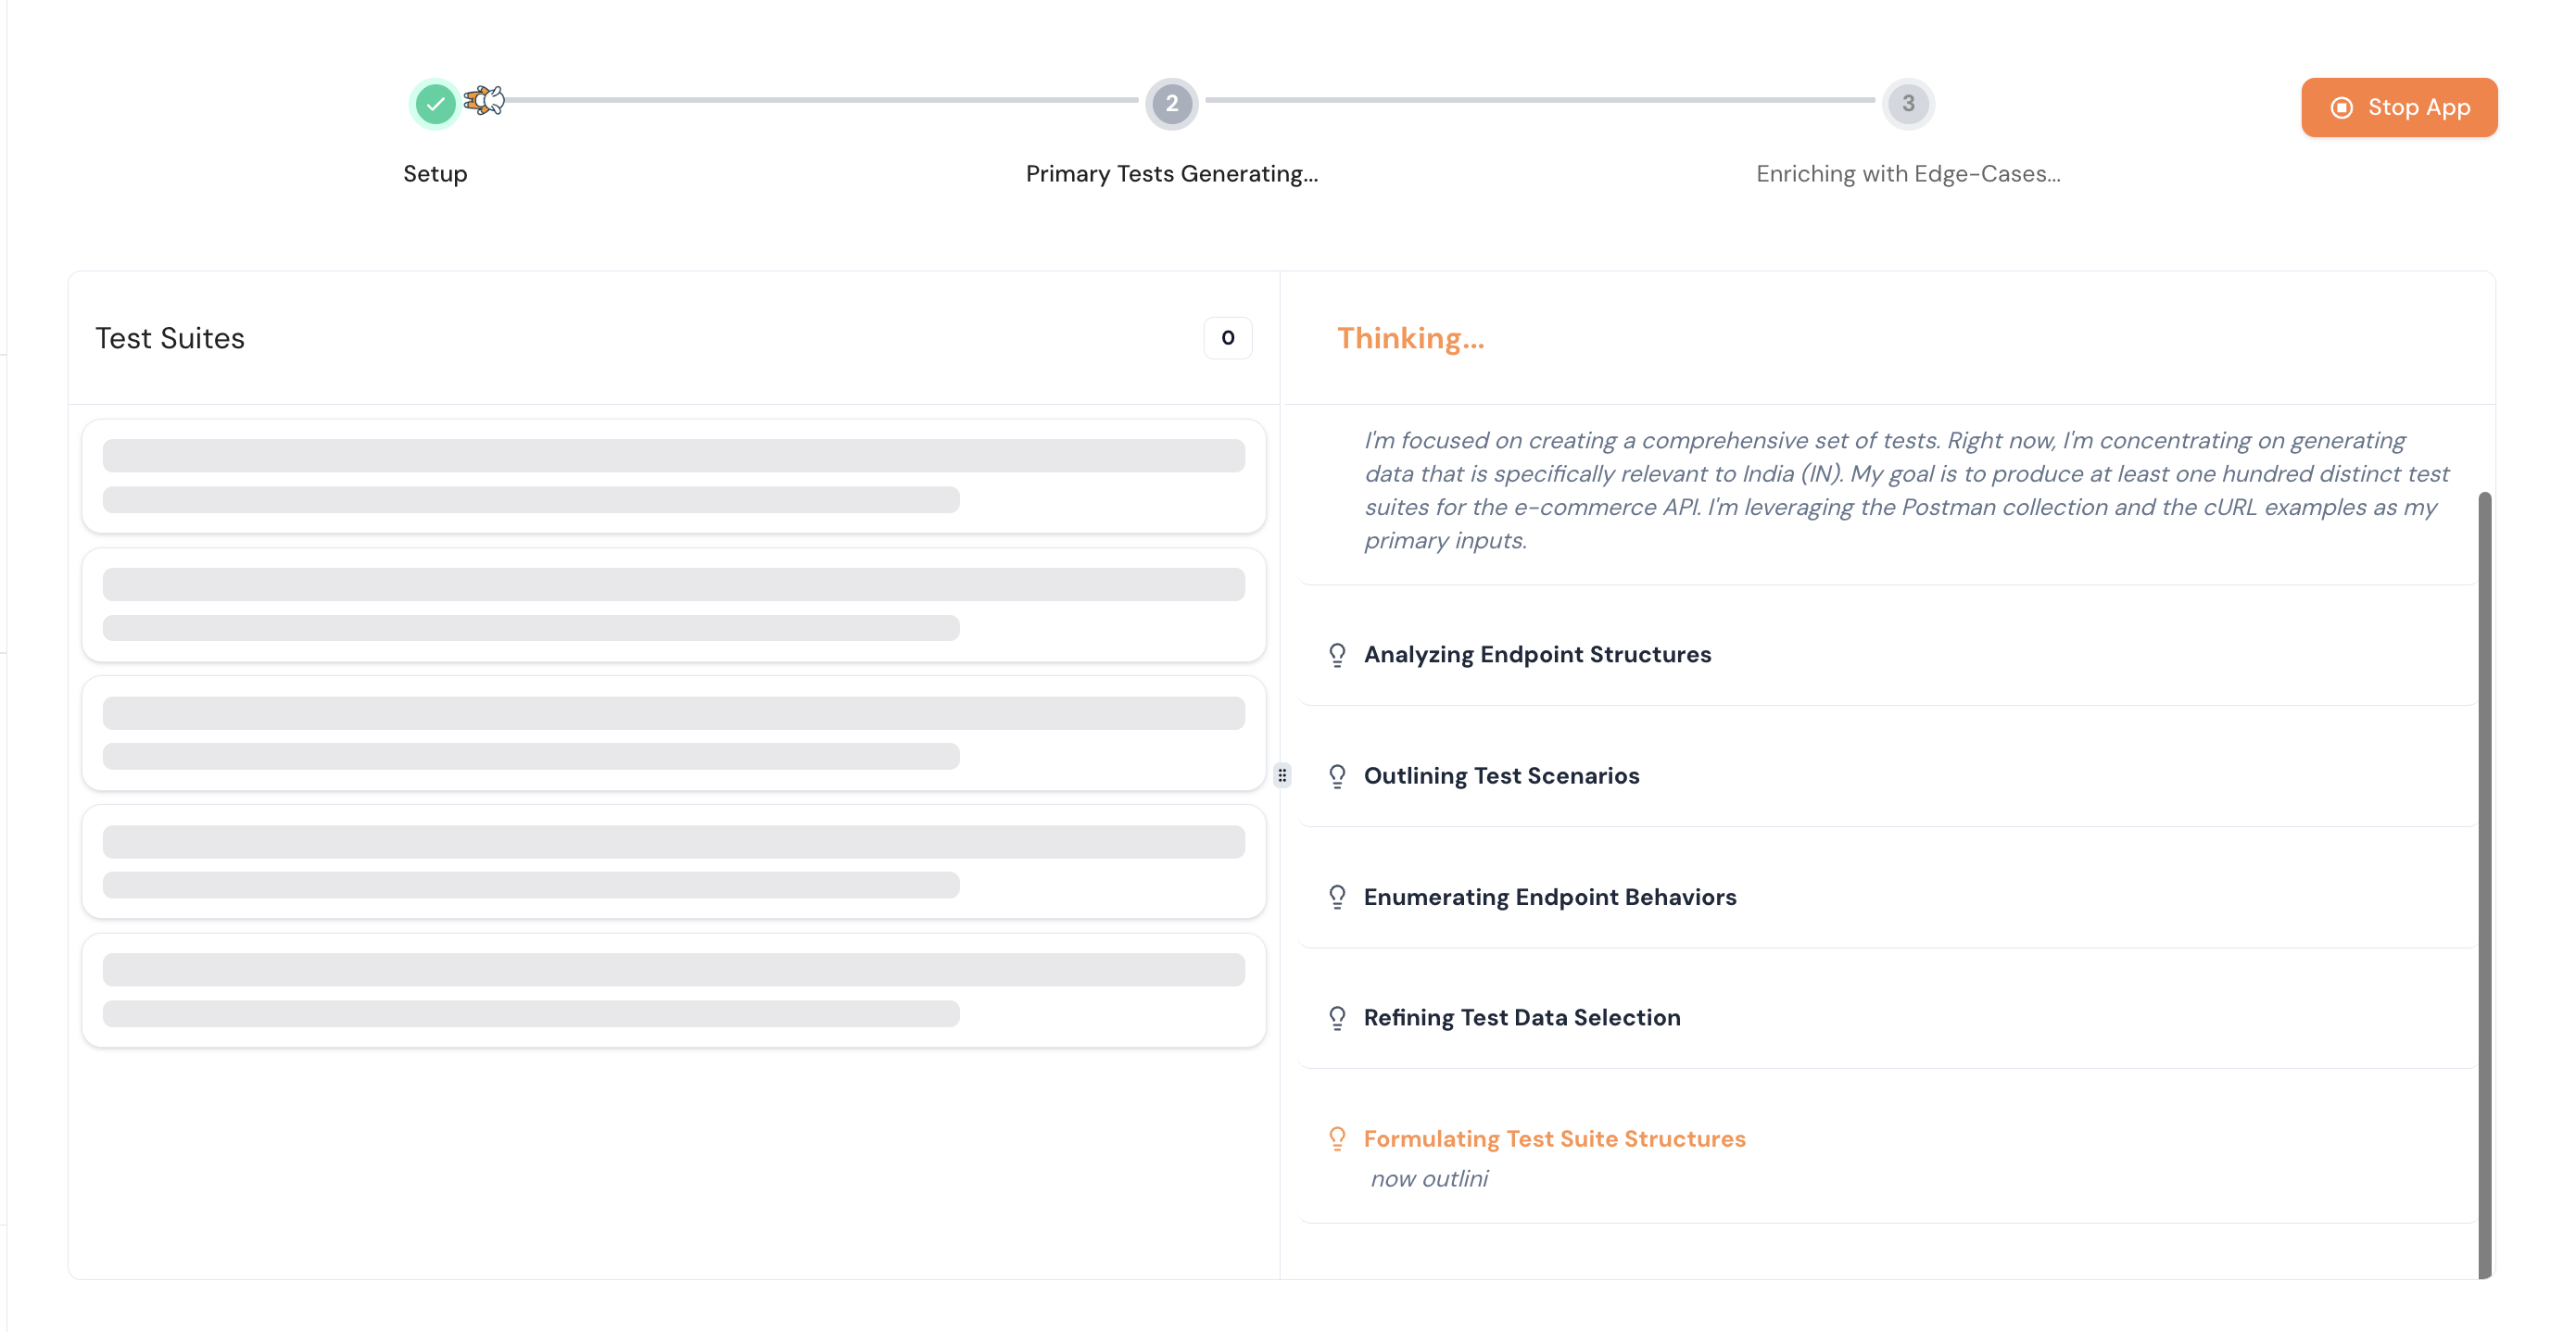
Step 6: You can see the test suites created by Keploy. Click on an individual test suite to view the request, response, and variables.
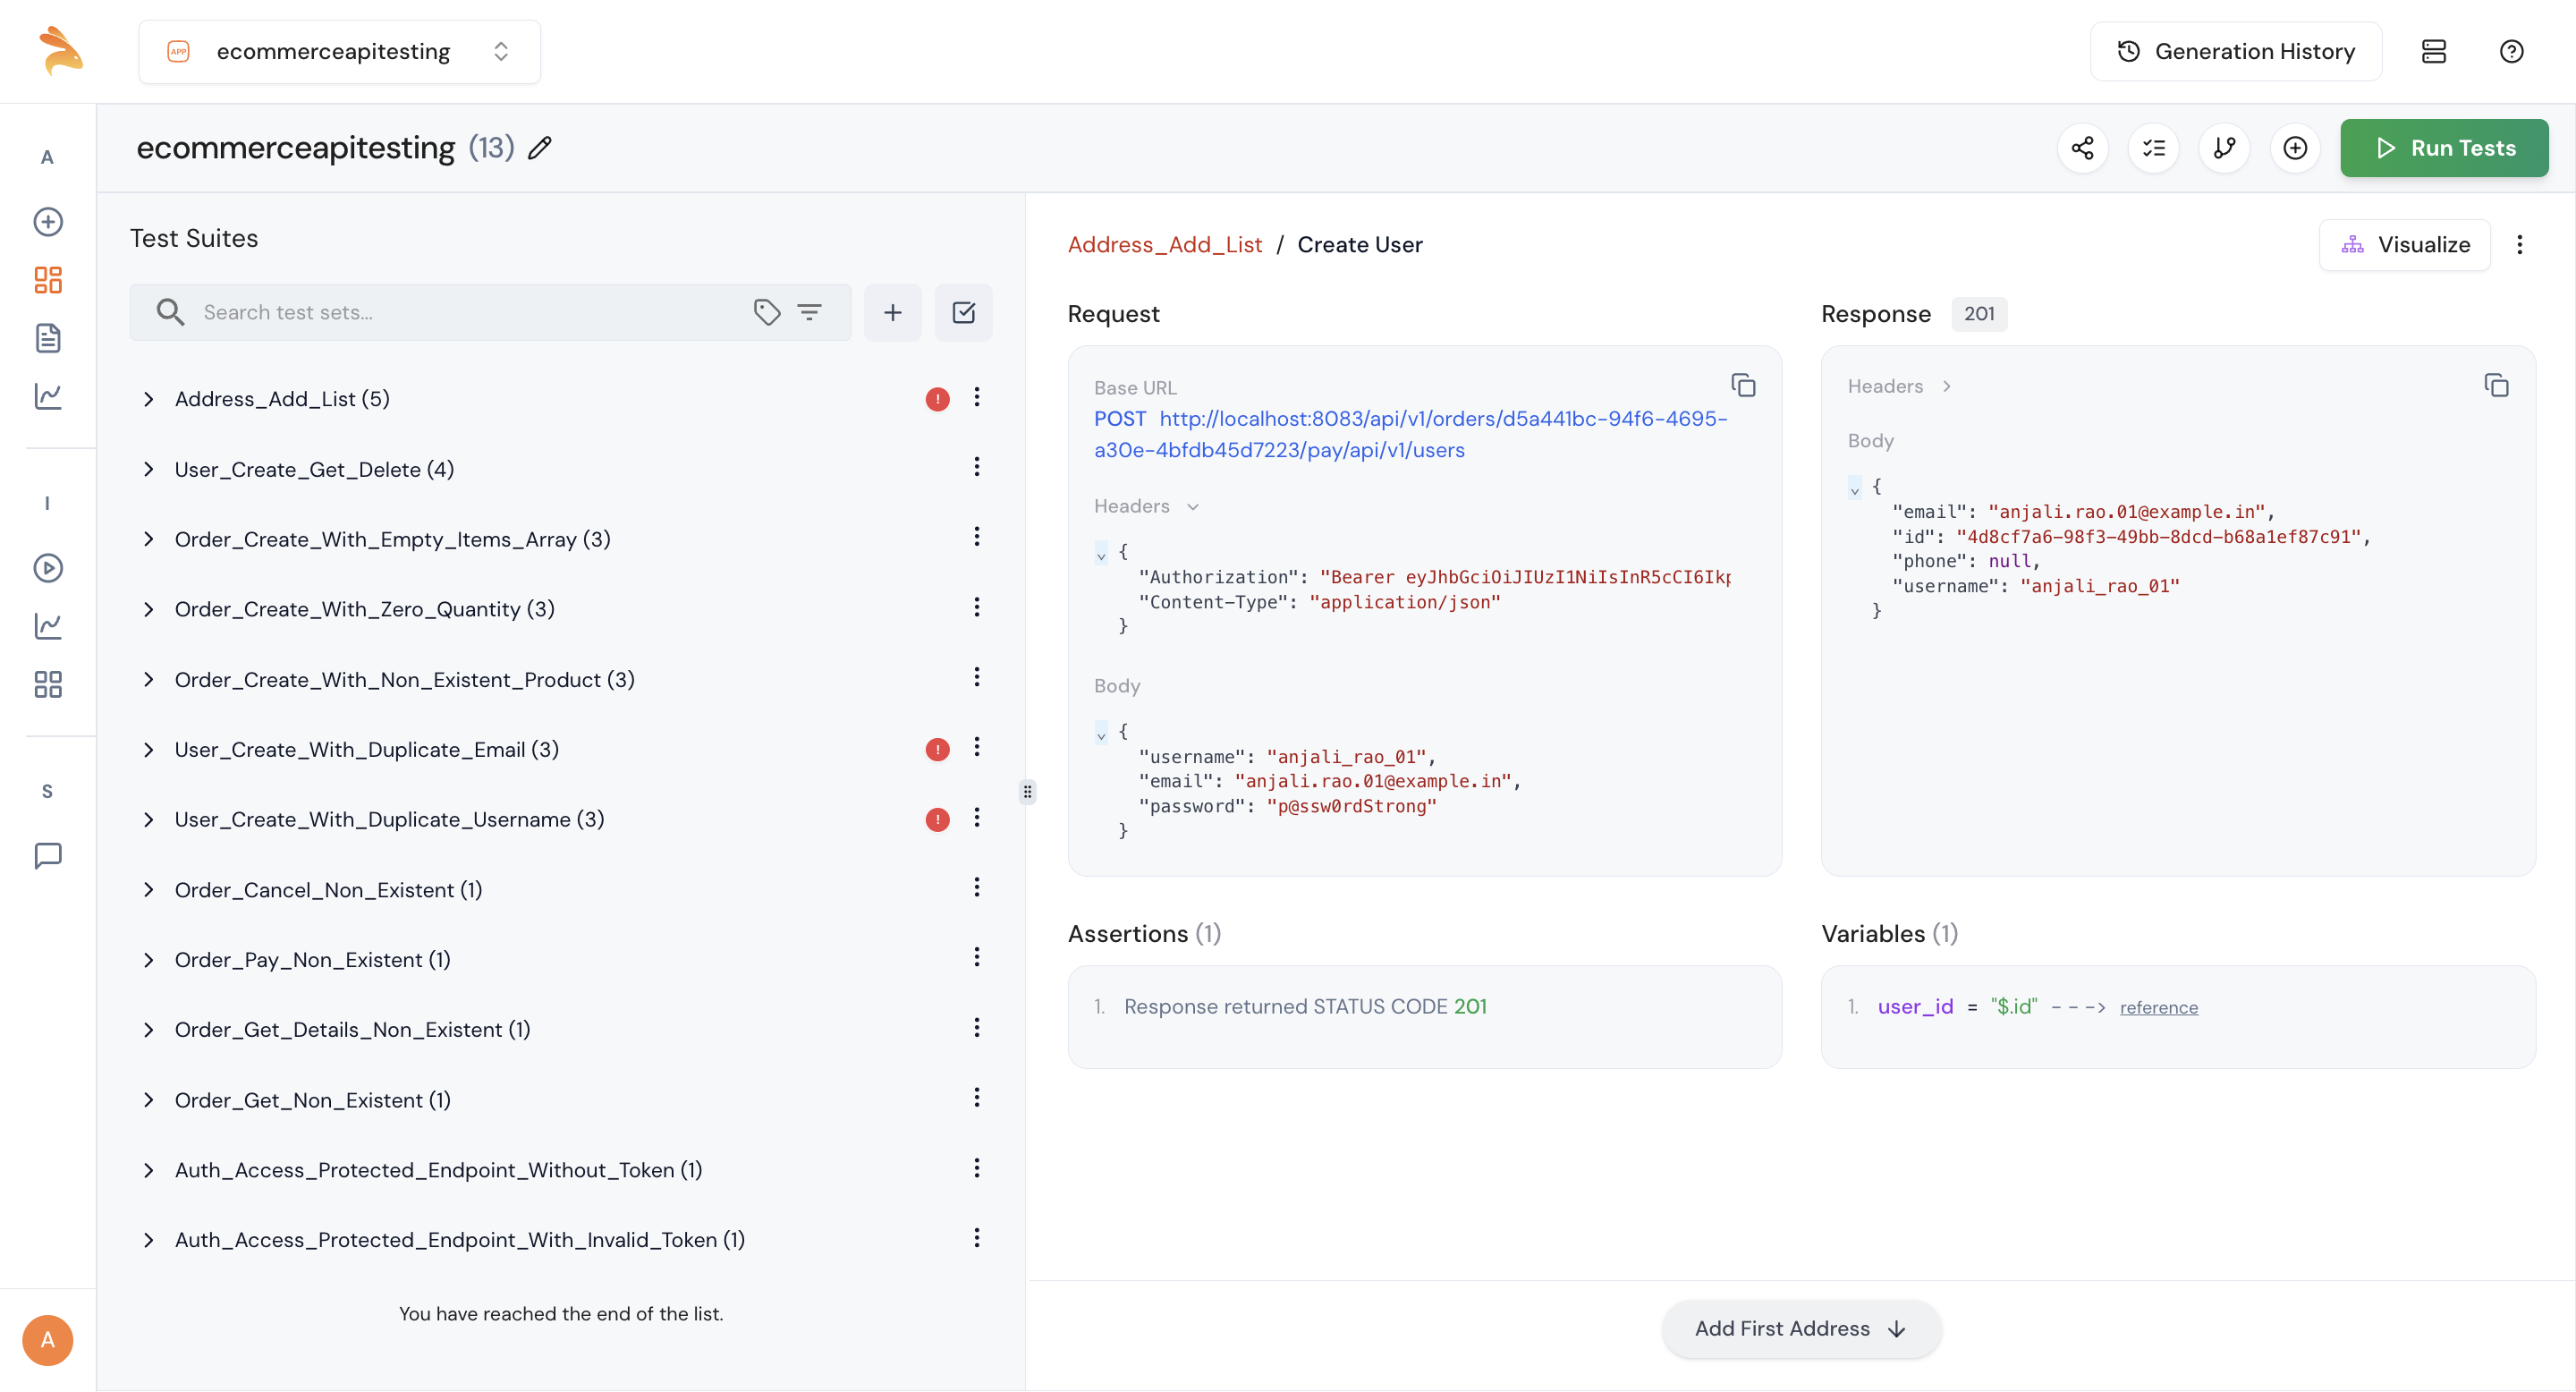
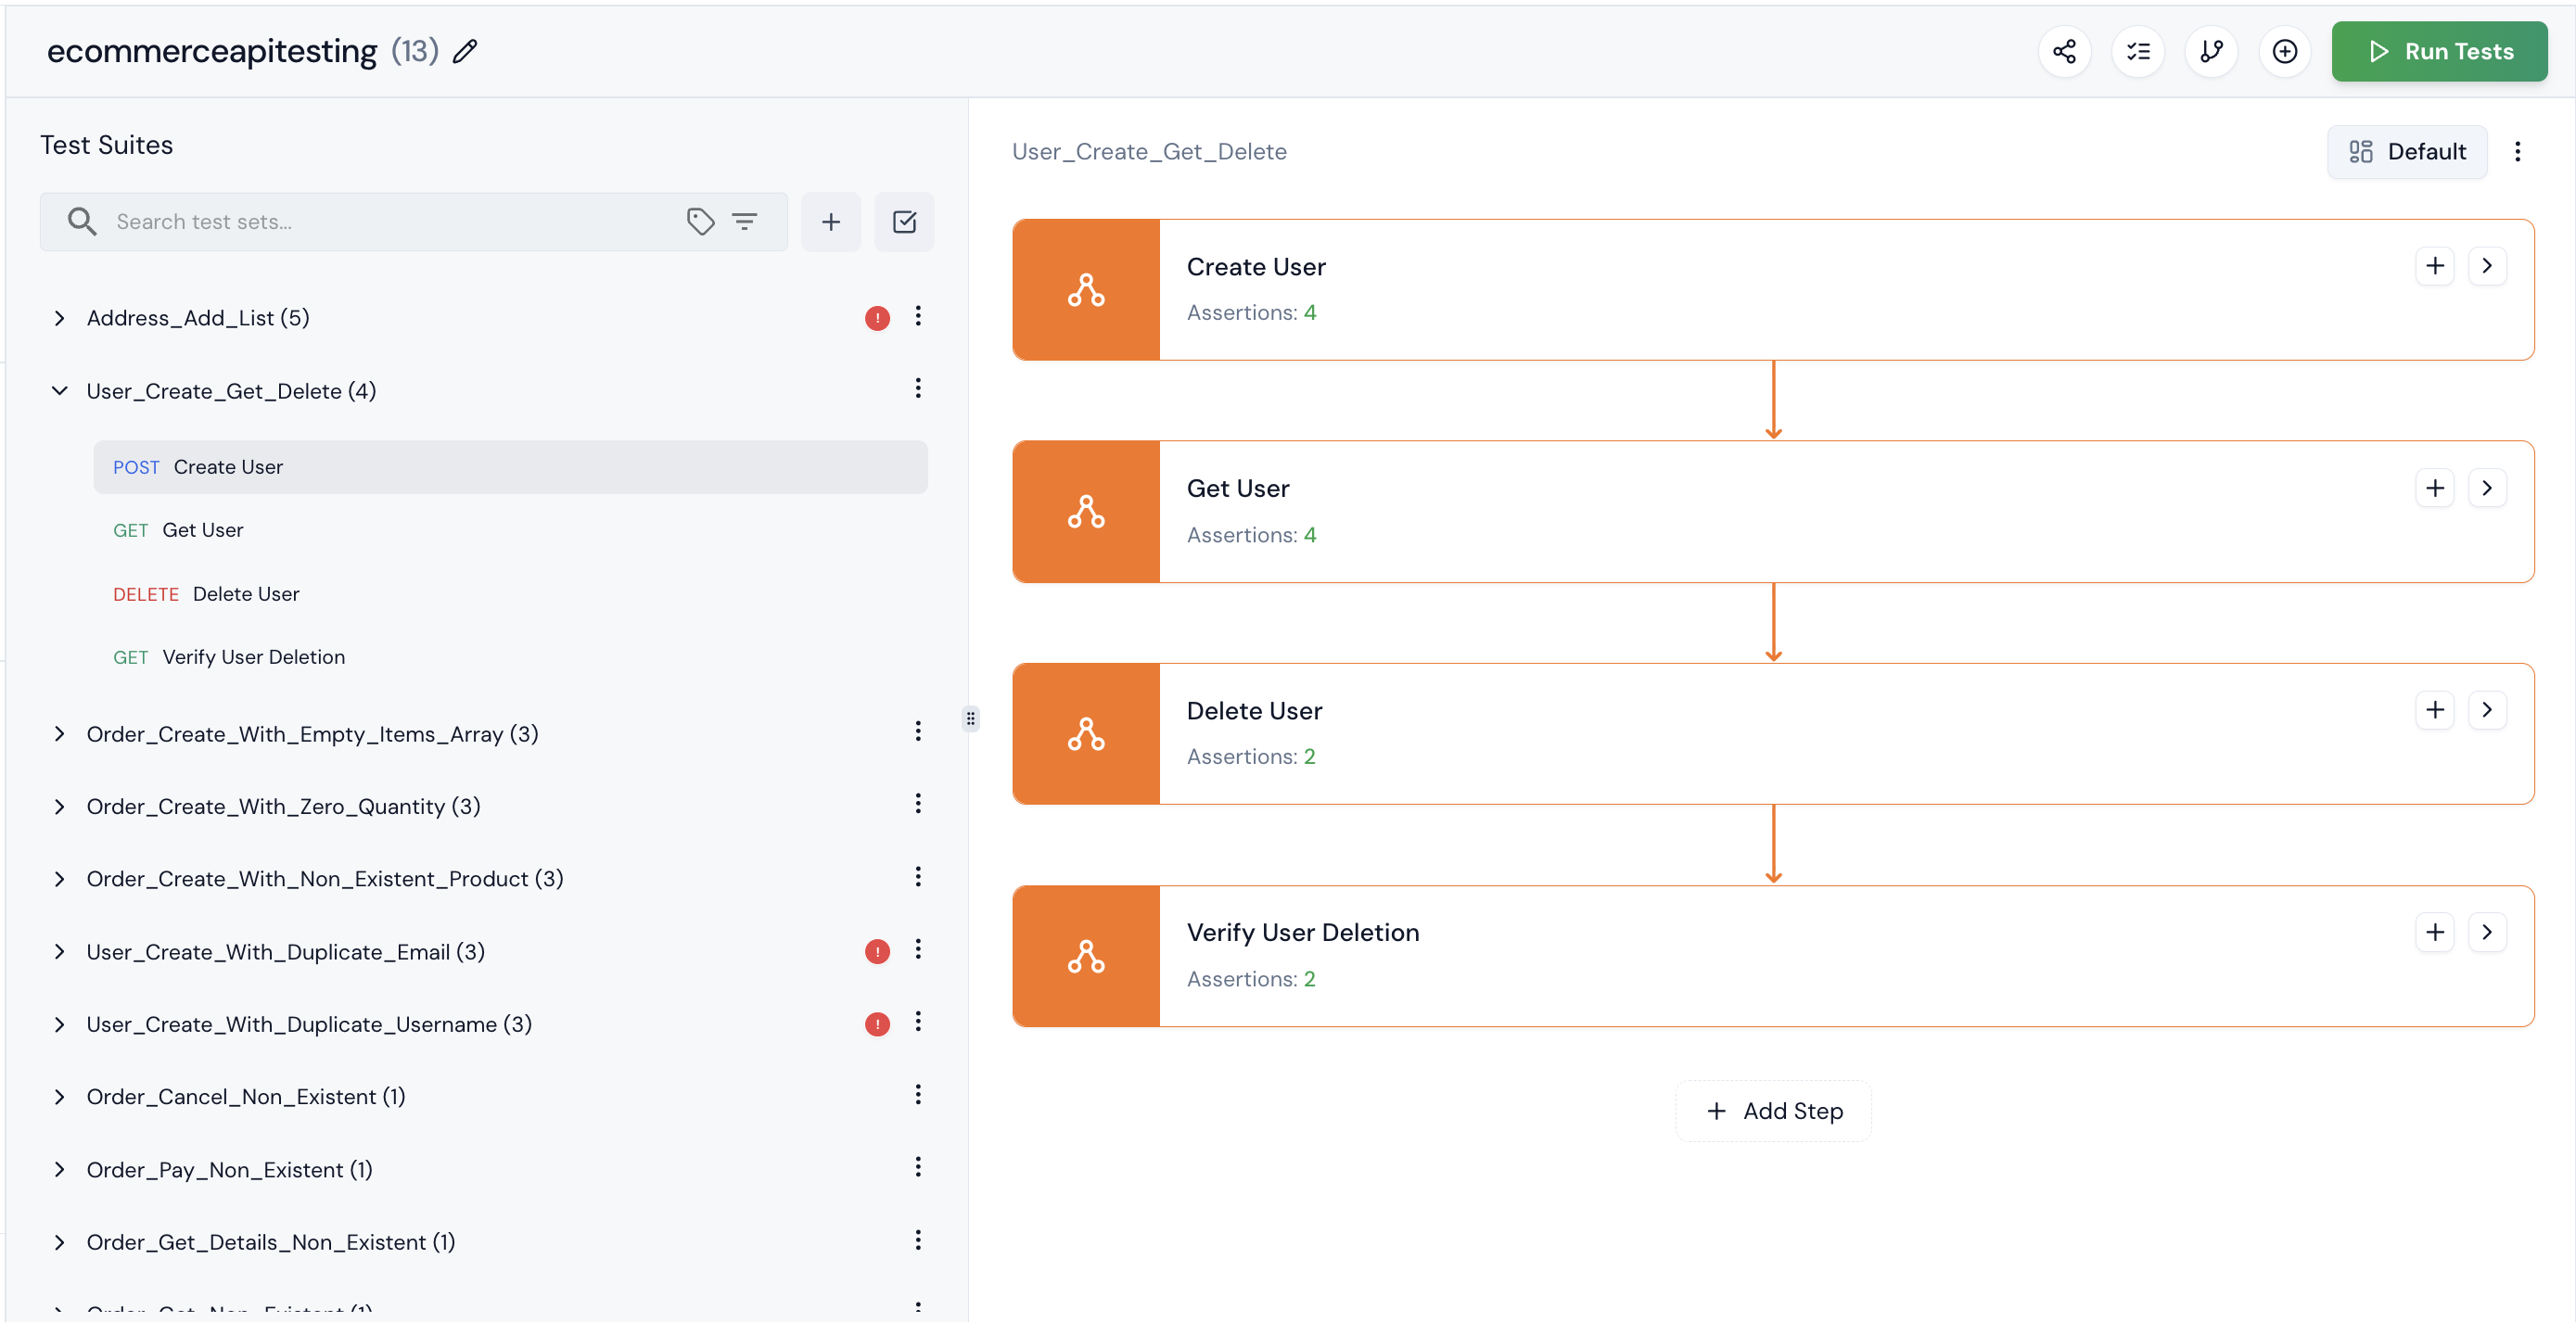
Step 7: To visualize the steps, click the Visualize button. This will display a visual representation of the test flow.
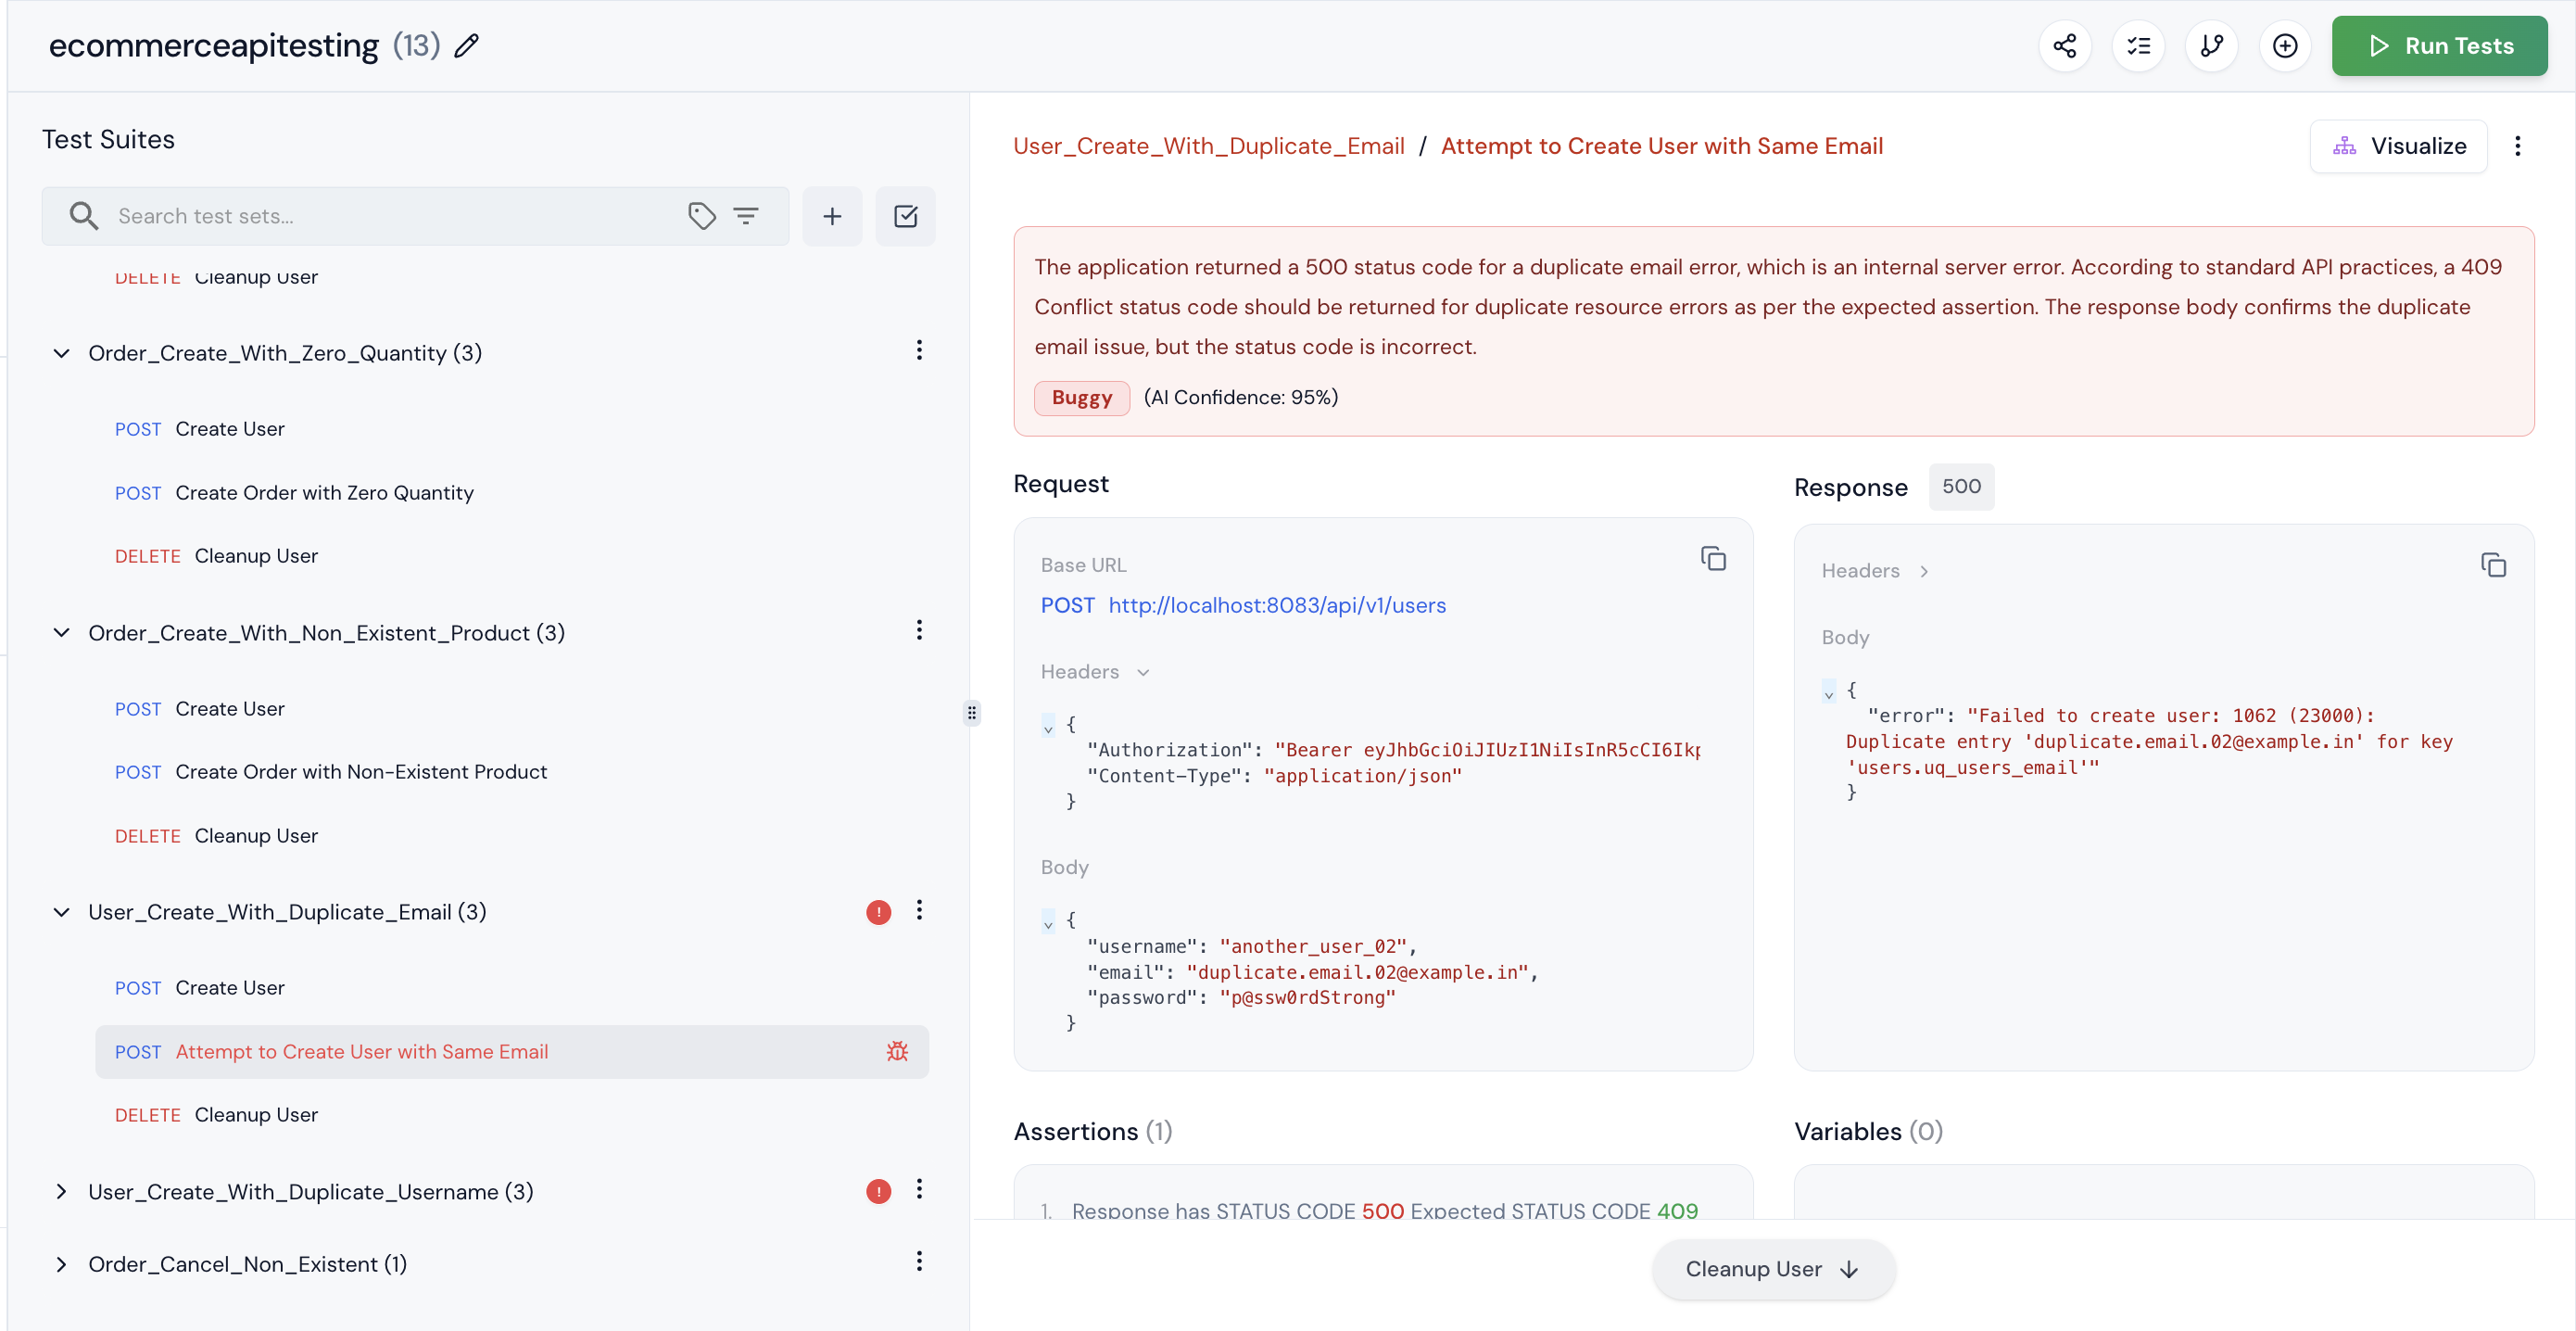
Step 8: One of the test suites is marked as buggy. This means our application has some issues that Keploy detected. If you’re sure it’s not actually buggy, you can mark it as ‘Not Buggy.
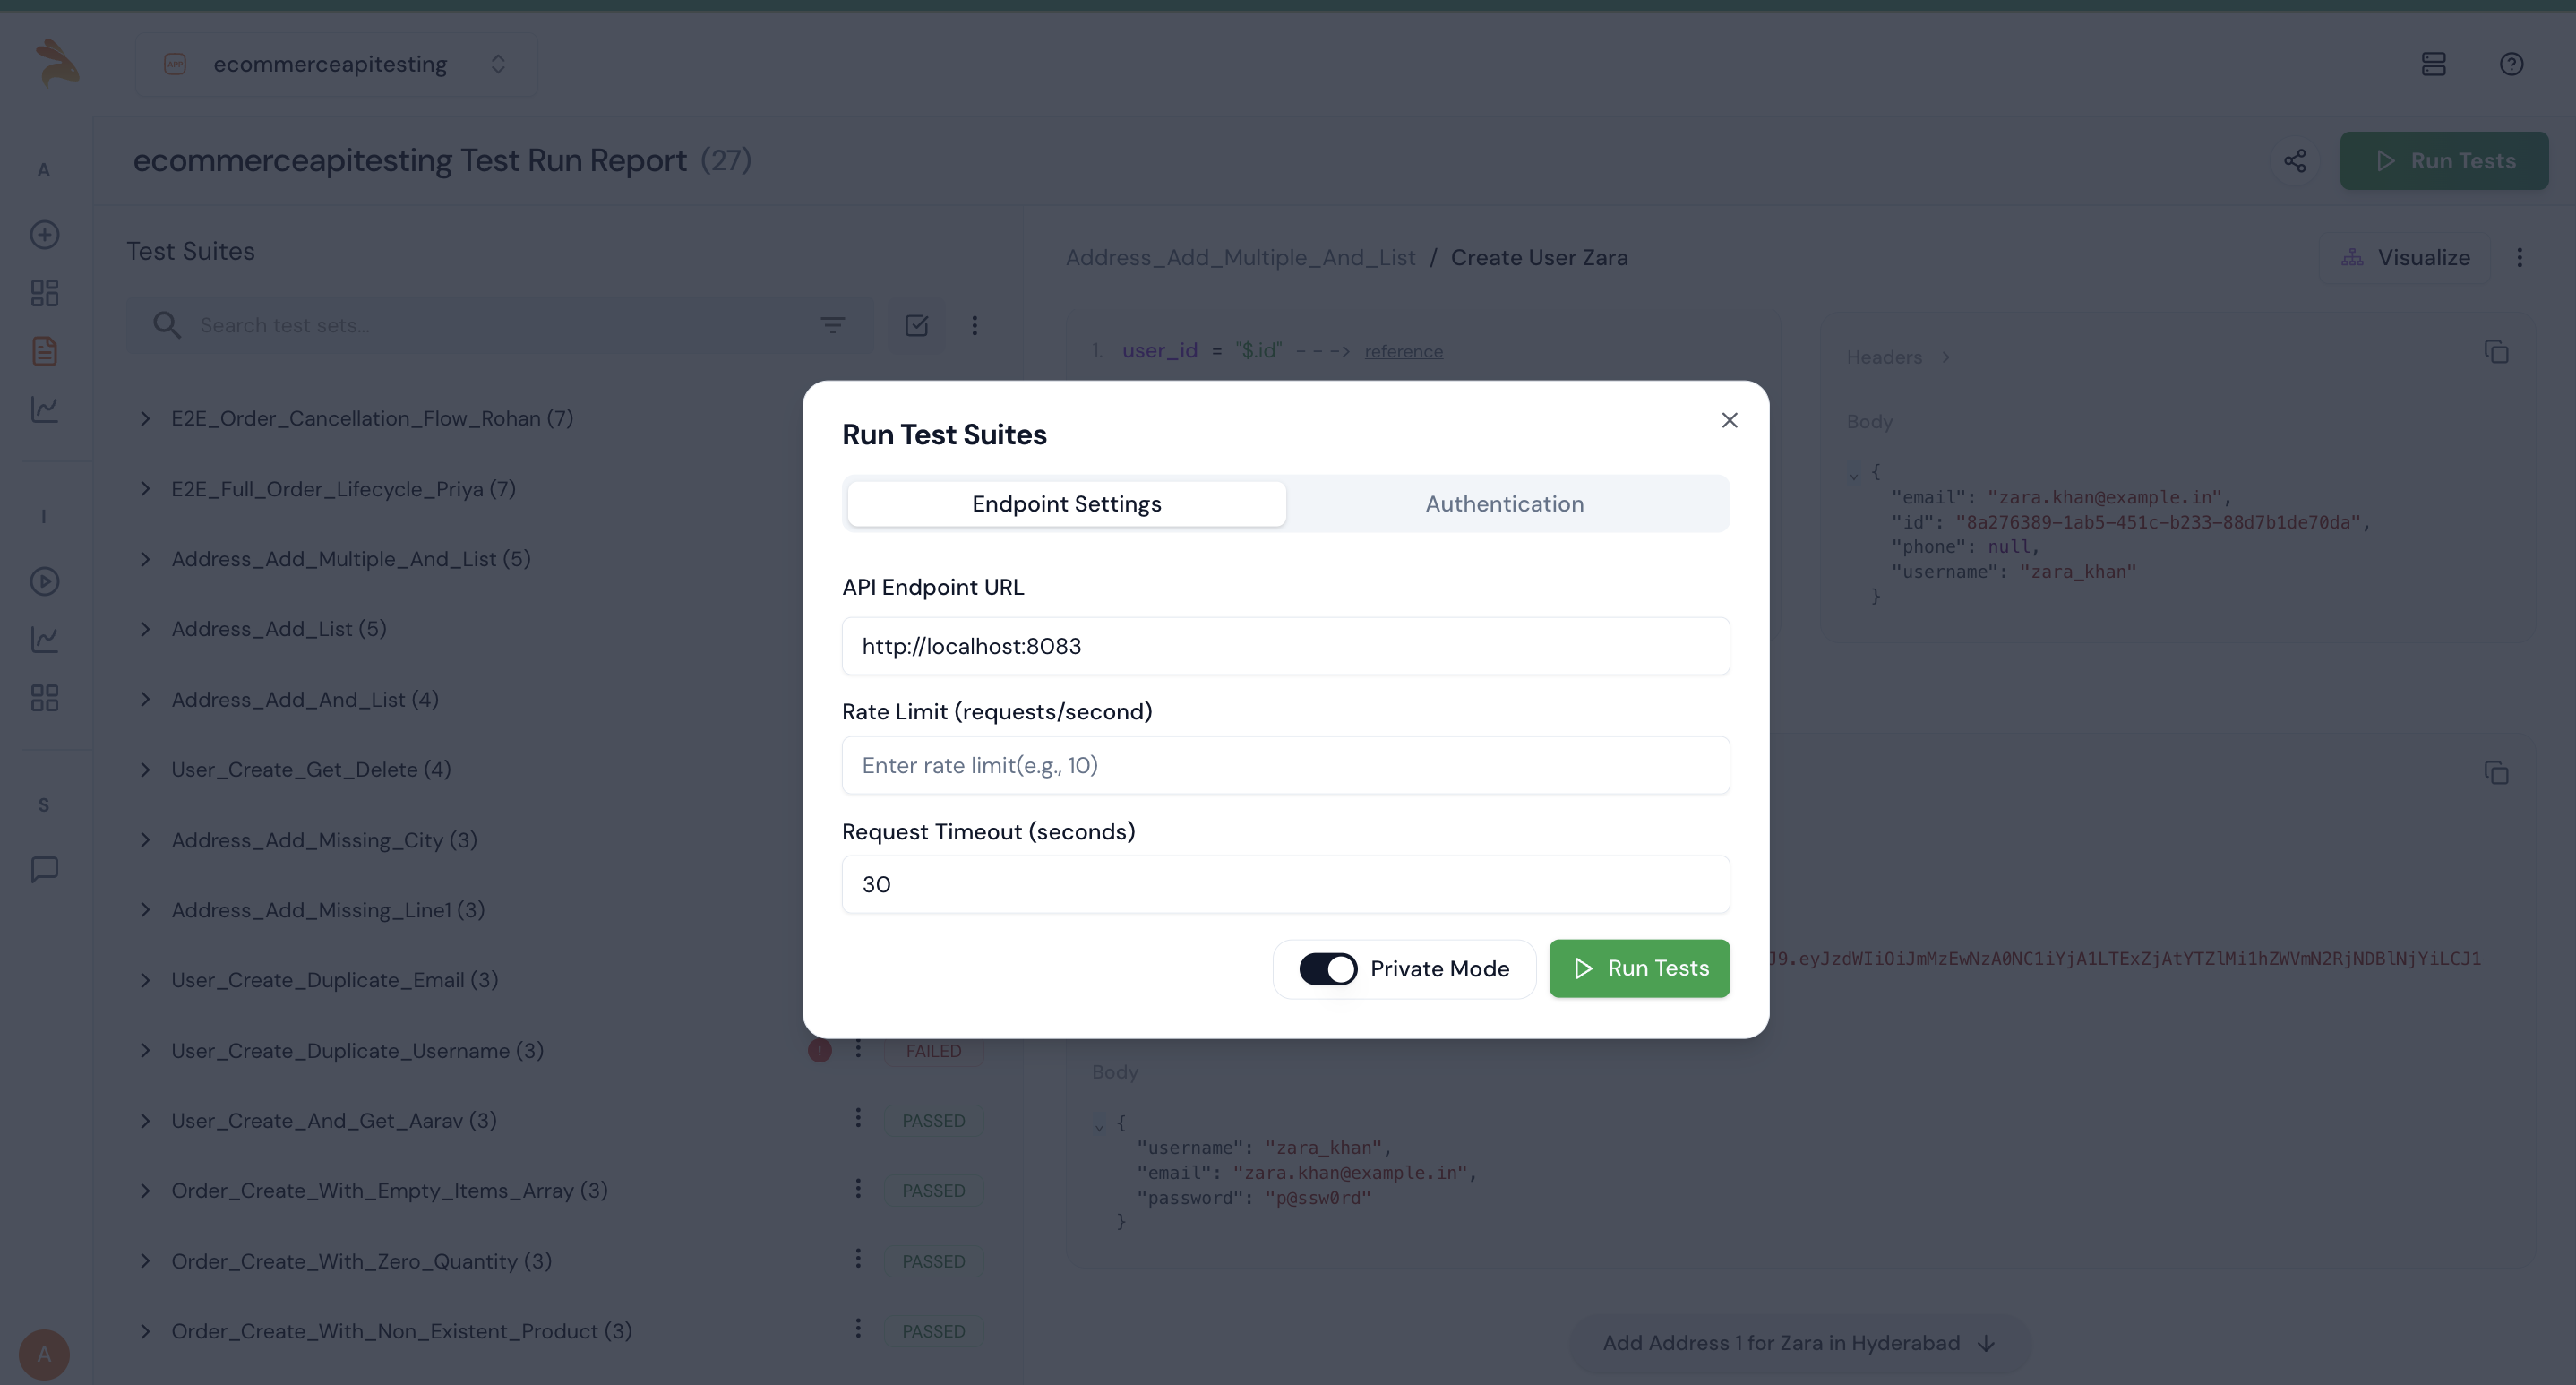
Step 9: After generating the test, click the Run Tests button to execute it. Ensure that Private Mode is turned on before running the tests.
Step 10: After completion, you’ll be able to see the executed test results.

Step 11: To view detailed reports, including test run count, pass/fail status, and other insights, go to the Test Report section.
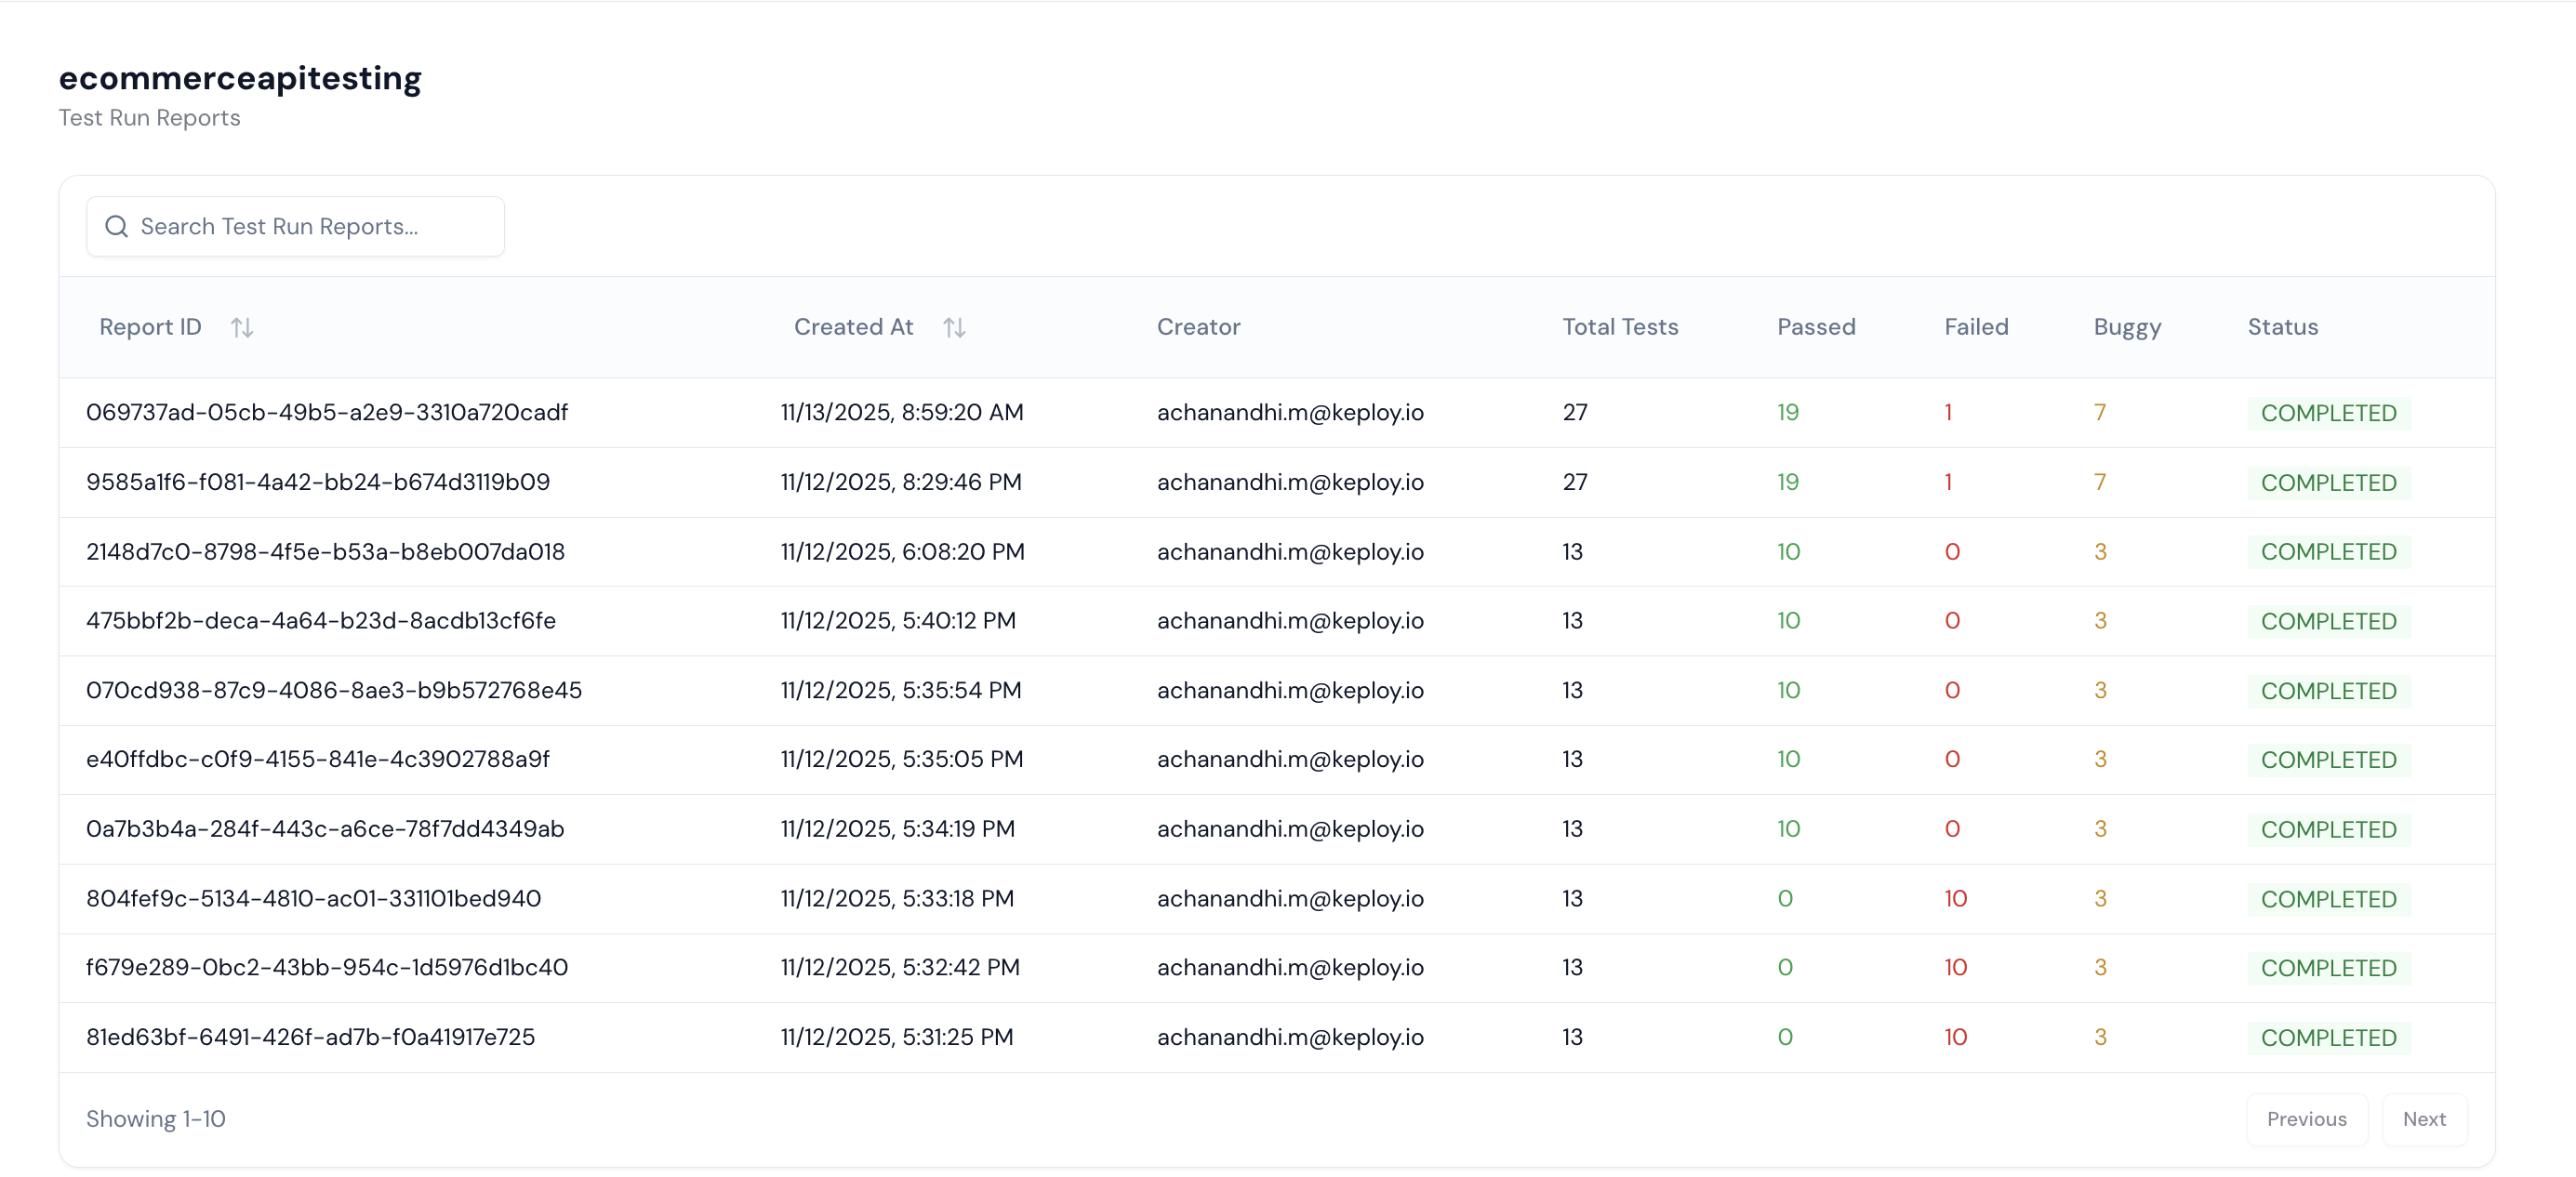
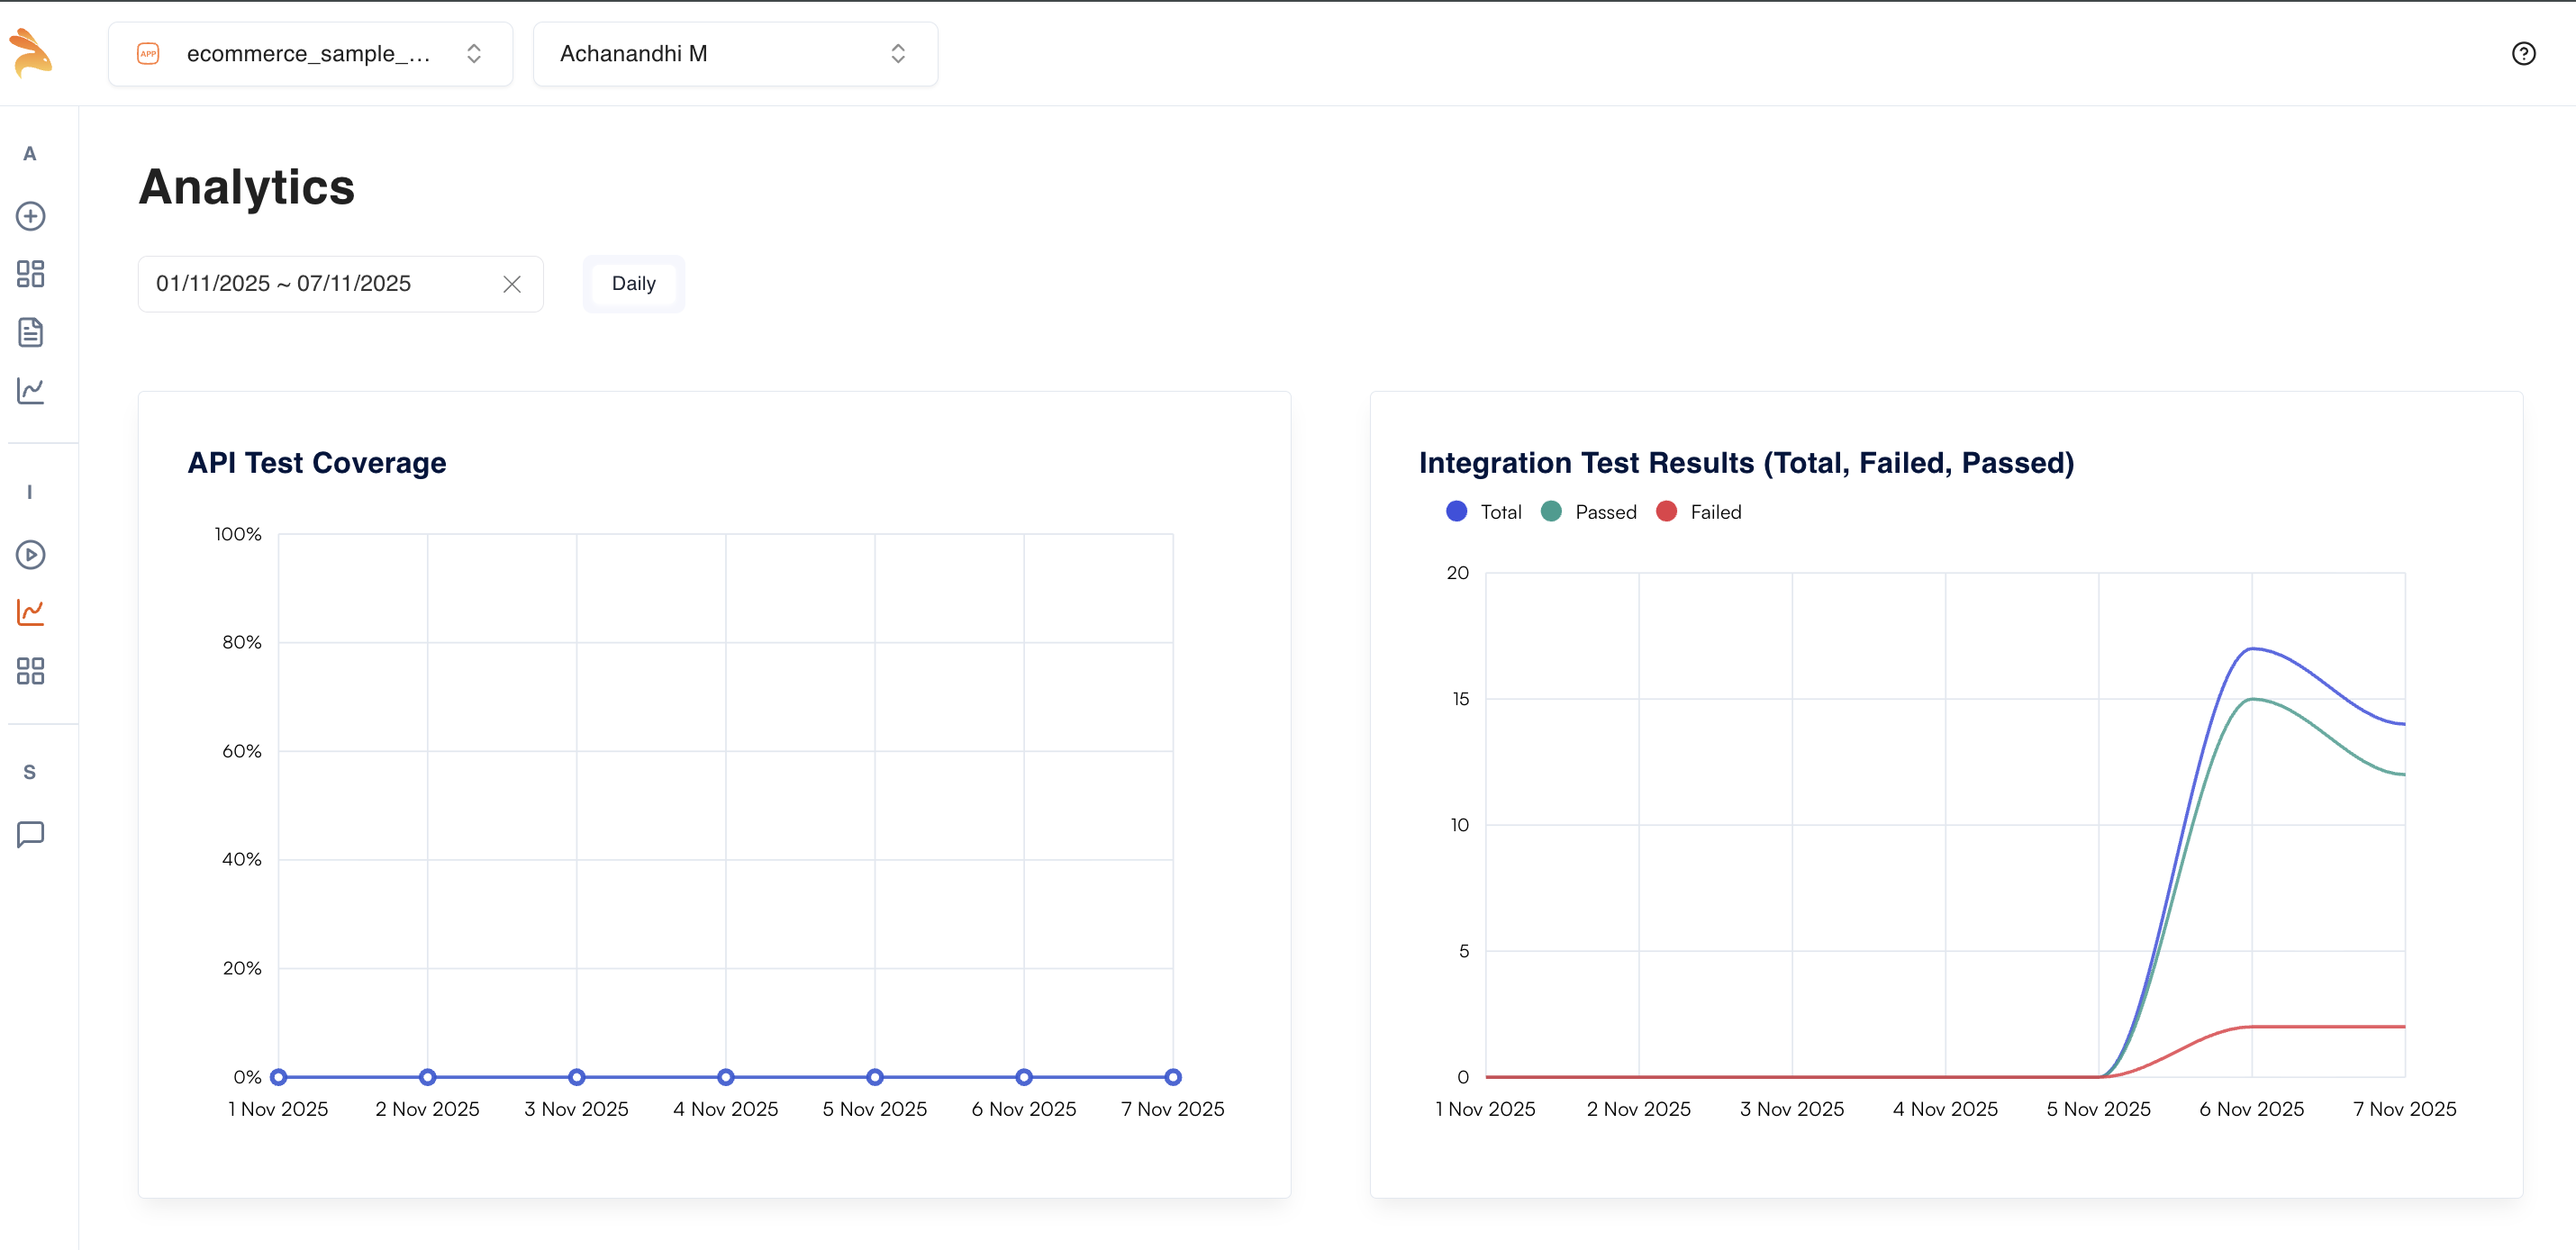
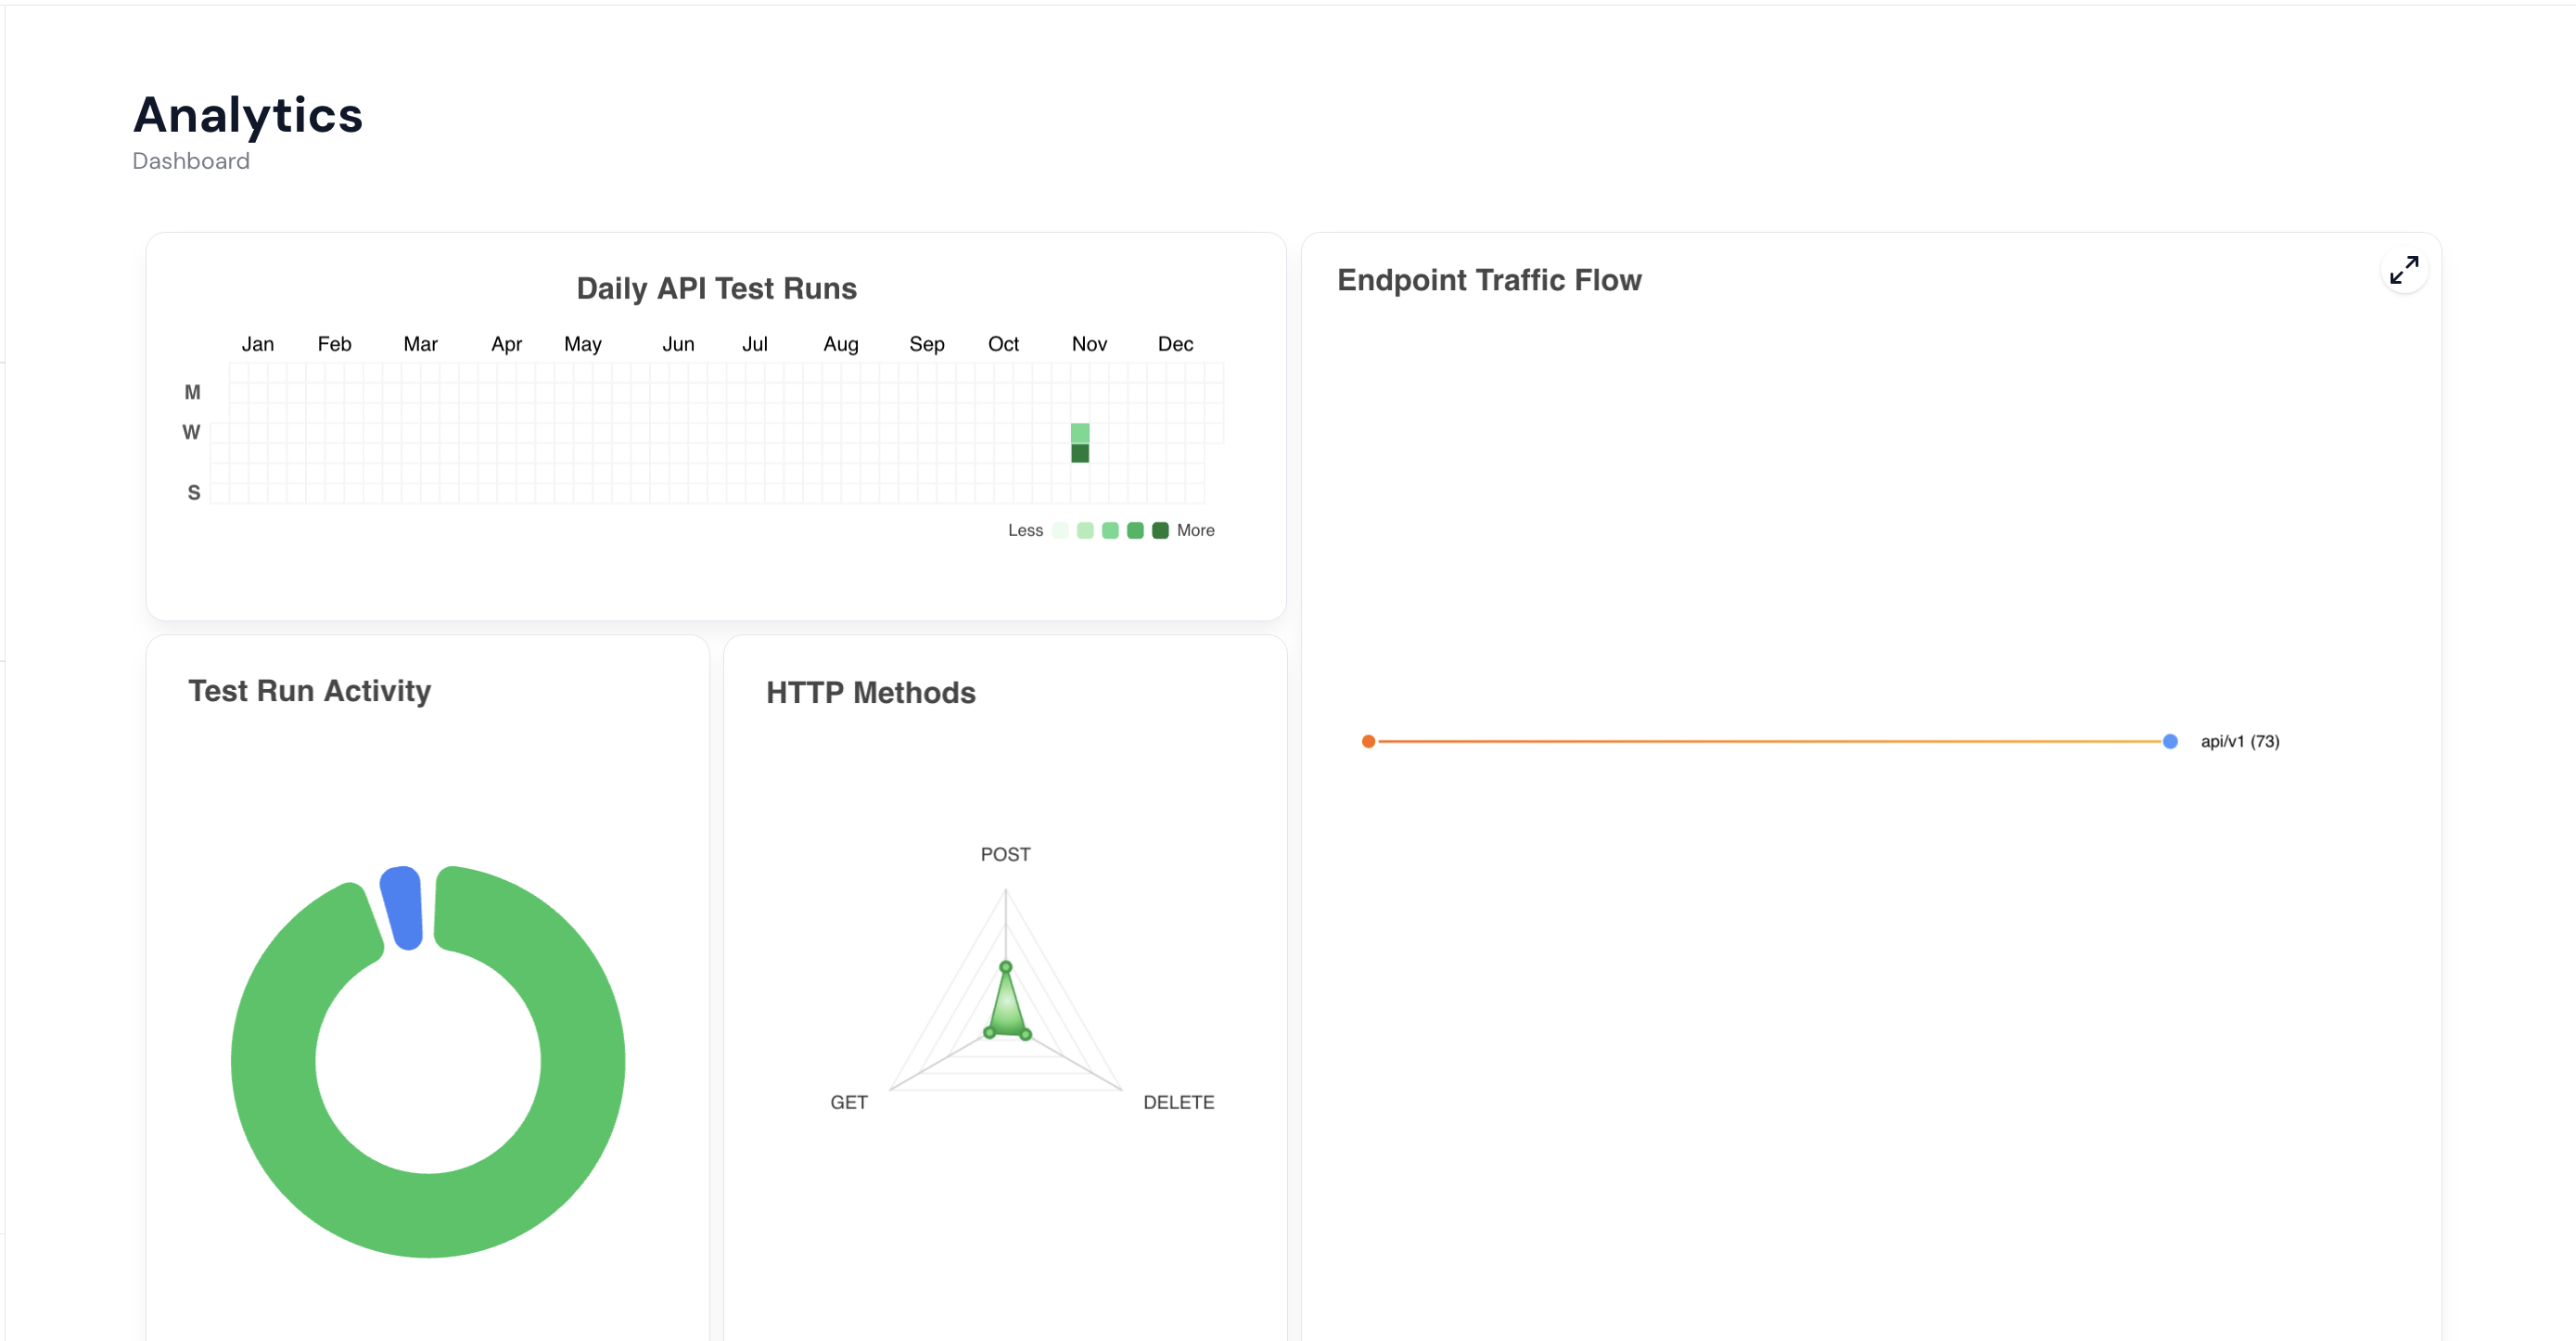
Step 12: To visualize analytics such as daily API test runs, test activity, and HTTP methods, navigate to the Dashboard section. It provides a complete overview of your testing insights.
Conclusion 🎉
Well done! You’ve seen how Keploy helps test your microservices without writing any code. You've generated test cases, run tests, and checked coverage—all with just a few steps.