Walkthrough: set up the Universal Mocker in VS Code
This walkthrough takes one project through the Keploy VS Code extension, from installing it to a green replay of your tests with their dependencies switched off. You also see a red test, stage the files to commit, and add the CI workflow.
Each step names what you select and what the extension shows. The steps are from version 3.1.1 of the extension, with Keploy 3.9.4, the CLI it downloads. For every setting and command, see the VS Code extension page.
The screenshots are from a real run of the extension on Linux. Two boxes marked Screenshot coming stand where two more go: the browser's sign-in page and your agent's chat. Each box says what the screen shows.
Before you begin
You need:
- VS Code 1.125 or later, on Linux (x86-64 or arm64) or on a Mac with Apple silicon. The requirements list the Linux versions that work. Windows support in the extension is coming.
- Claude Code or GitHub Copilot in VS Code, or Cursor's agent in Cursor.
- A project in a Git repository, with tests that call a database or an API. To follow along with a sample, create the package from Step 1 of the Go quickstart, commit it, and start its dependencies as its Step 2 shows.
- A free Keploy account. You sign in from the extension in Step 3.
Step 1: Install the extension
- In VS Code, open the Extensions view.
- Search for Keploy.
- Select Install on Keploy: API Testing, Mocks & Service
Virtualization. Its ID is
keploy.keployio. - Select the Keploy icon in the Activity Bar.
The Set up checklist opens. It lists each step of this walkthrough, and a step that isn't done runs the command that does it when you select it.
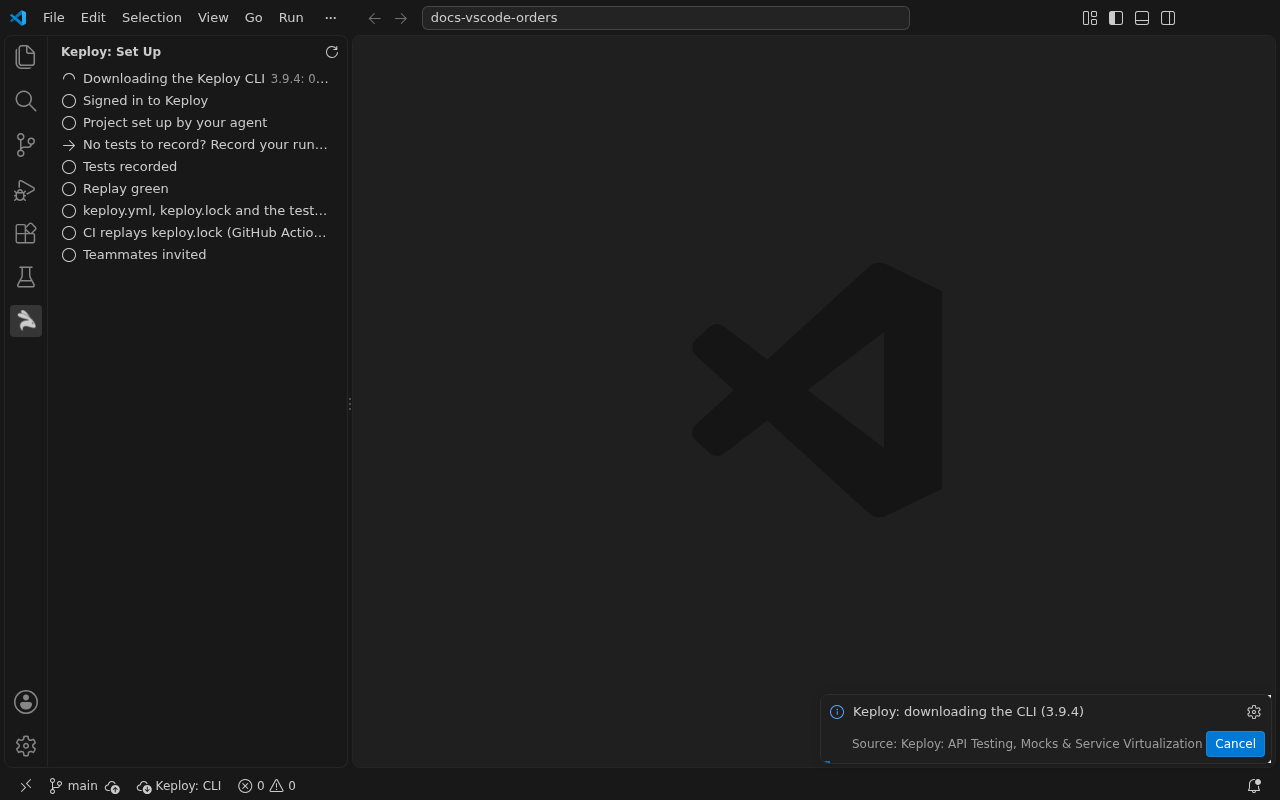
The extension also adds a guided tour to VS Code. To open it, run Welcome: Open Walkthrough from the Command Palette and choose Get started with Keploy.
Step 2: Let the extension download the Keploy CLI
The download starts by itself when the extension is installed. You don't have to do anything.
- A notification, Keploy: downloading the CLI (version), shows how much has arrived, such as 125.6 MB of 125.6 MB when it ends. To stop it, select Cancel.
- The status bar shows Keploy: CLI and the percentage.
- The CLI goes into
~/.keploy/bin, and the extension checks it against Keploy's published checksum before it installs it. No step needssudo.
When the download ends, the checklist ticks Keploy CLI installed.
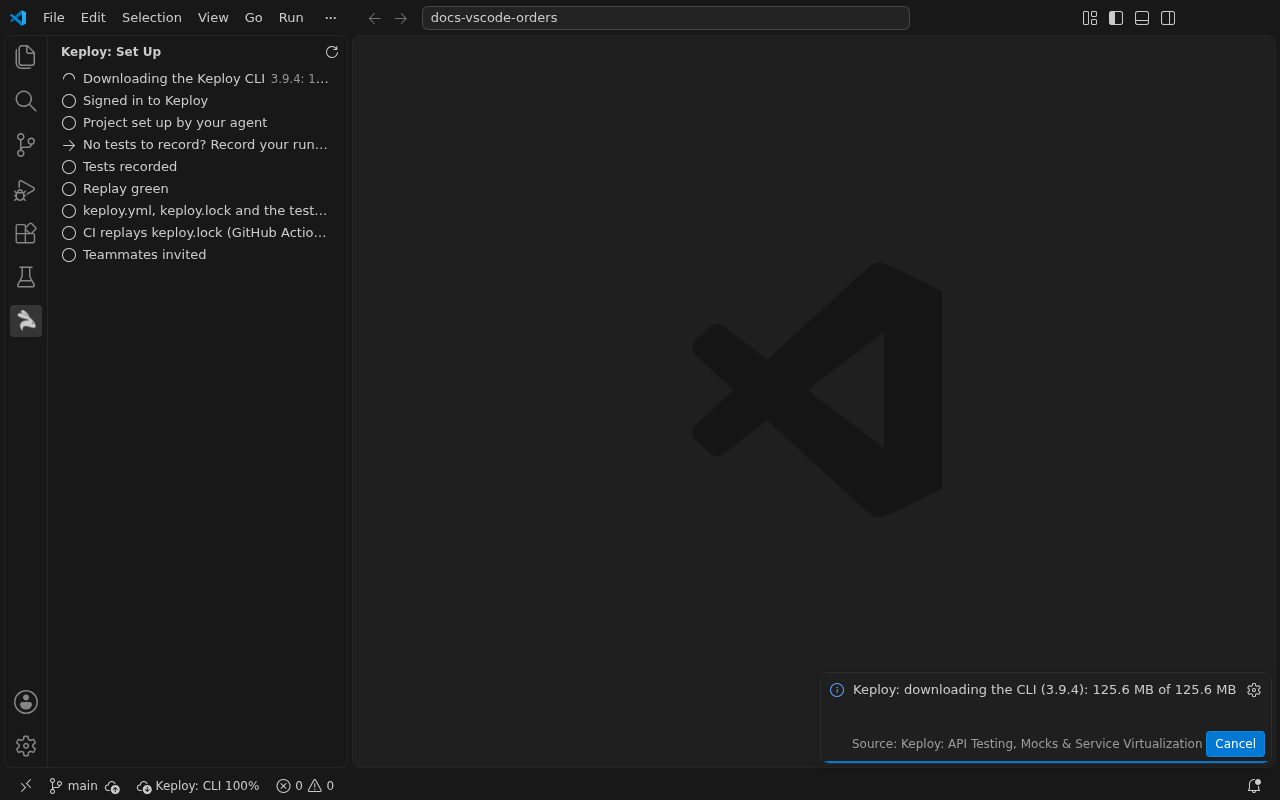
If you cancelled, run Keploy: Install or update the CLI to start the download again.
Step 3: Sign in
-
In the checklist, select Signed in to Keploy. Or run Keploy: Sign in from the Command Palette.
-
VS Code asks Do you want Code to open the external website? for
https://app.keploy.io/activate. Select Open.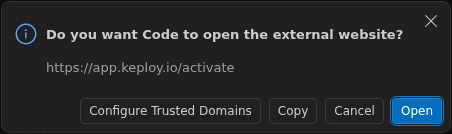
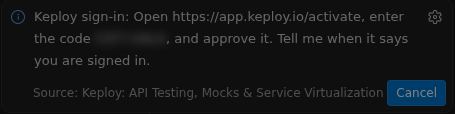
Your browser opens Keploy's sign-in page. In VS Code, a Keploy sign-in notification shows the page's address and a code:
Keploy sign-in: Open https://app.keploy.io/activate, enter the code XXXX-XXXX, and approve it. Tell me when it says you are signed in.The CLI writes this text for coding agents too, which is why it ends with "Tell me". In VS Code you don't need to do anything else: the notification waits for your approval.
-
In your browser, sign in, type the code the notification shows, and approve the sign-in. The page never fills the code in for you: typing it ties the approval to the sign-in VS Code started. Approve only a sign-in you started yourself.
VS Code says Keploy: you are signed in. The checklist ticks Signed in to Keploy.
If you don't approve in time, VS Code says Keploy: the sign-in was not approved in your browser in time. Select Try again for a new code.
The browser's page with the code typed in. The account's email is blurred.
The CLI stores the session, not the extension. Every keploy command reads
it, in VS Code's runs, in your terminal and in your agent's terminal.
Step 4: Hand the setup to your coding agent
-
In the checklist, select Project set up by your agent.
If VS Code asks whether you trust the folder, trust it: Keploy runs your project's own test command, so it needs a trusted workspace.
-
The extension installs Keploy's skill for this project, then opens your agent's chat with the setup task typed in. Claude Code is used when you have it, otherwise GitHub Copilot:
Agent Where the skill goes Where the task goes Claude Code .claude/skillsa new Claude Code conversation GitHub Copilot .github/instructions/keploy-mocking.instructions.mdthe chat, in agent mode Cursor's agent .cursor/rulesyour clipboard: paste it into the agent chat The task starts like this, with Claude Code:
Set up Keploy dependency mocking for this project's tests, following the keploy mock skill (.claude/skills).If the agent's chat doesn't open, VS Code says Keploy: agent did not open. The setup task is on your clipboard. Paste it into the agent's chat.
-
Send the task. Then let your agent work. It follows each step the CLI prints, starting with
KEPLOY_PROVEN=1 keploy mock status --json:- it sets
mock.commandinkeploy.ymlto your test command; - it adds the test-side hook the skill names for your framework, such as
keploytestfor Go; - it records your tests, with your dependencies running:
KEPLOY_PROVEN=1 keploy mock record --lock keploy.lock; - it replays them until the replay is green:
KEPLOY_PROVEN=1 keploy mock replay --lock keploy.lock.
On
mainormaster, the agent first switches to a work branch namedkeploy/<your folder's name>. It asks you before any step that changes more thankeploy.yml,keploy.lockand your test files. - it sets
The agent's chat with the setup task, and the checklist beside it with Project set up by your agent ticked.
To choose the agent yourself, run Keploy: Hand the setup to another agent.
Step 5: Record from VS Code
Your agent has recorded once. You can record again yourself, for example after you add a test. Your dependencies must be running.
-
Run Keploy: Record from the Command Palette.
-
If you're on
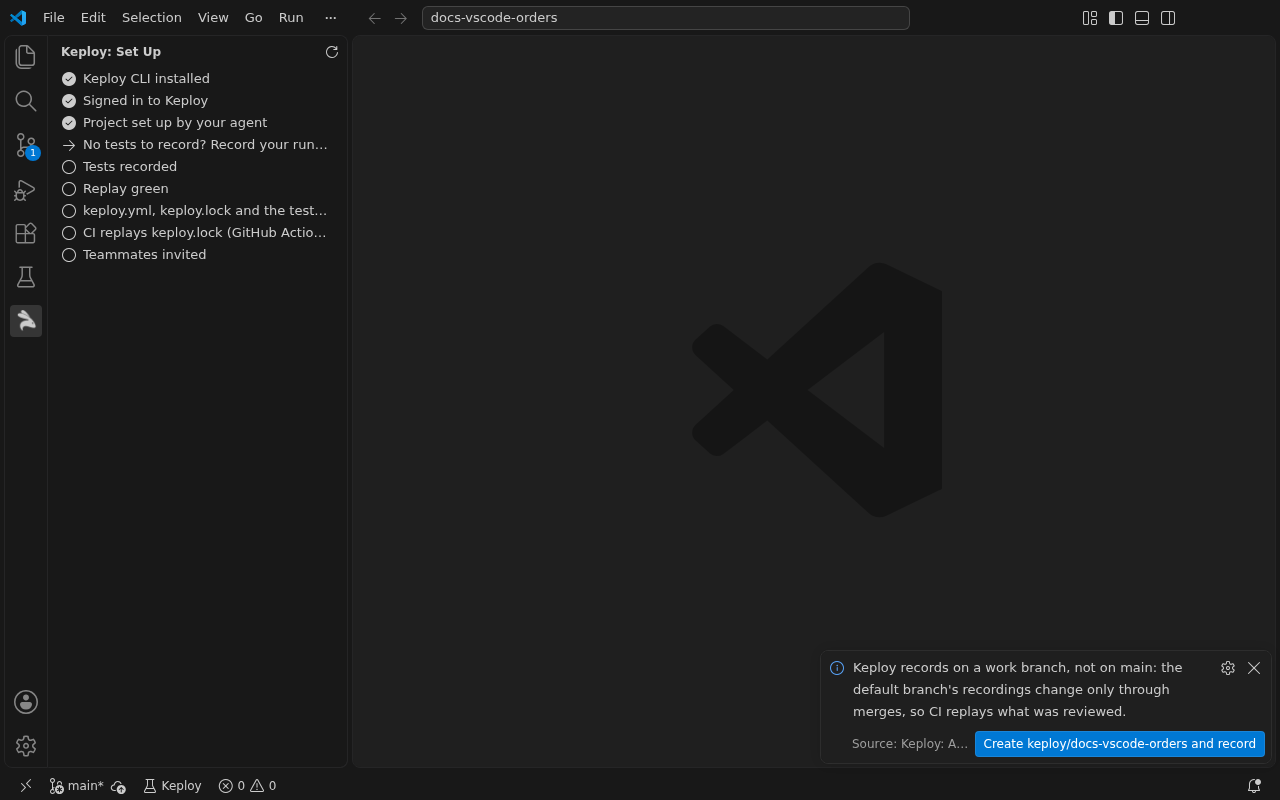
mainormaster, the extension says:Keploy records on a work branch, not on main: the default branch's recordings change only through merges, so CI replays what was reviewed.Select Create keploy/name and record to create the branch, switch to it and record there. Nothing runs if you close the message.
-
The record runs
keploy mock record --lock keploy.lockin a VS Code terminal, withKEPLOY_PROVEN=1. When it ends, the checklist says Recorded: n tests in Keploy Cloud, and the terminal ends like this:keploy: recorded from uncommitted changes in 2 file(s); the recording matches the code only once you commit them with keploy.lock
keploy: commit keploy.lock with your change
keploy: keploy.lock is not listed in Keploy Cloud: the pin of app <app id> is off, so its replays read Keploy branches, which a listed one could change; `KEPLOY_PROVEN=1 keploy mock pin on` turns it on, then `KEPLOY_PROVEN=1 keploy mock register` lists the lock
keploy: committed keploy/docs-vscode-orders and its skip lines (pinned in keploy.lock): 2 replayable, 0 quarantinedThe first two lines ask you to commit
keploy.lockwith your changes, which Step 8 does. The third line shows while the app's recording pin is off: Turn on the app's recording pin explains it.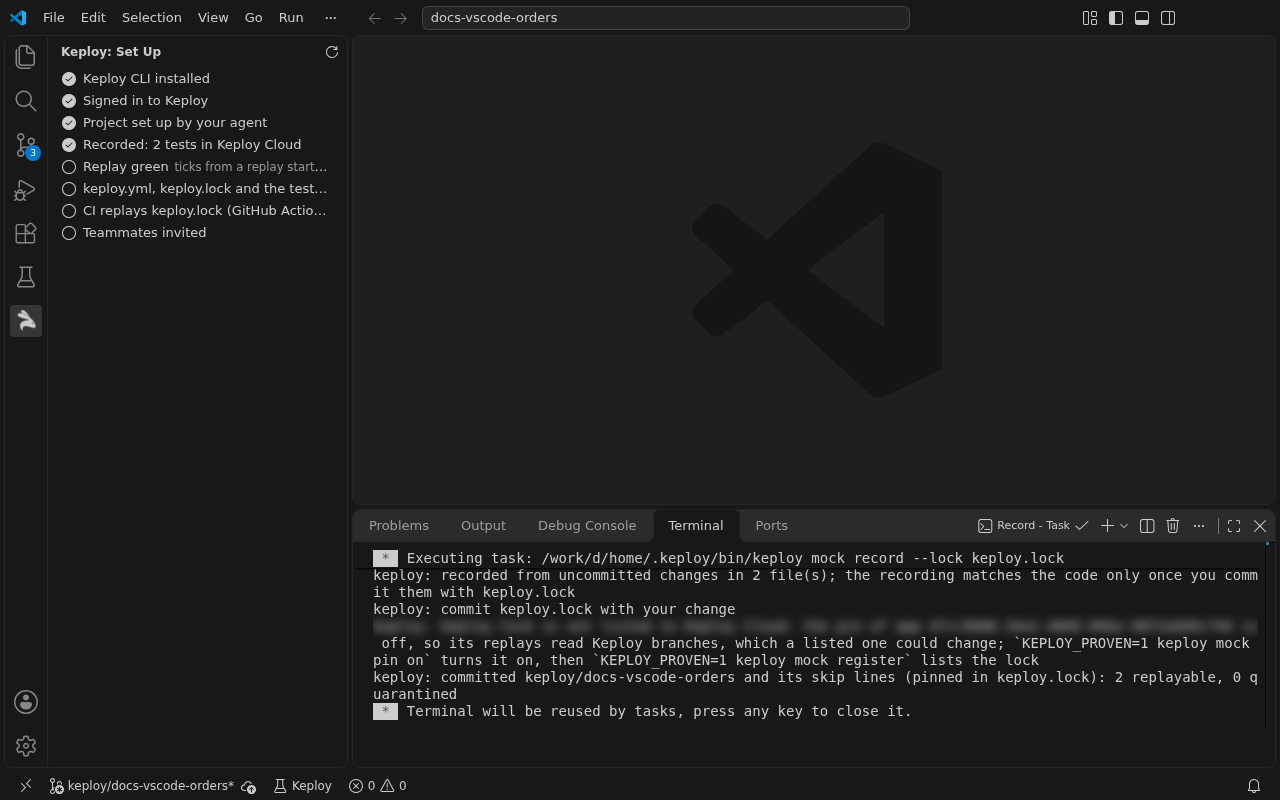
The record uploads the recording to Keploy Cloud and pins it in
keploy.lock. The keploy.yml and keploy.lock guide
explains the lock.
Step 6: Replay with the dependencies off
-
Stop your dependencies, such as the database and the API your tests call.
-
Run Keploy: Replay from the Command Palette, or select Replay green in the checklist while it isn't ticked.
The replay runs
keploy mock replayin a terminal, withKEPLOY_PROVEN=1. It readskeploy.lockand answers every call your tests make from the recording. -
When the replay exits 0 and no test failed, its terminal ends with
VERDICT passed, and the checklist ticks Replay green. Only a replay you start in VS Code ticks it, from Keploy: Replay or the Testing view: a replay in your agent's terminal doesn't.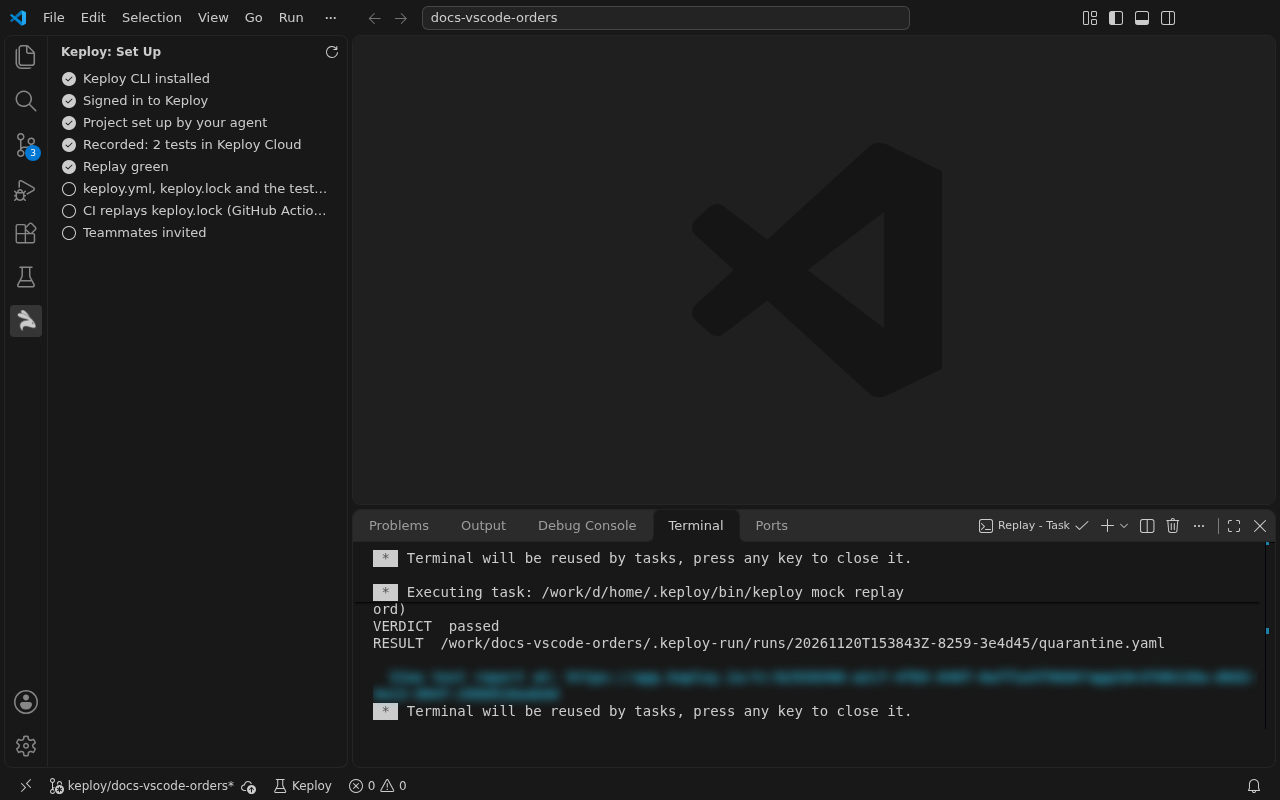
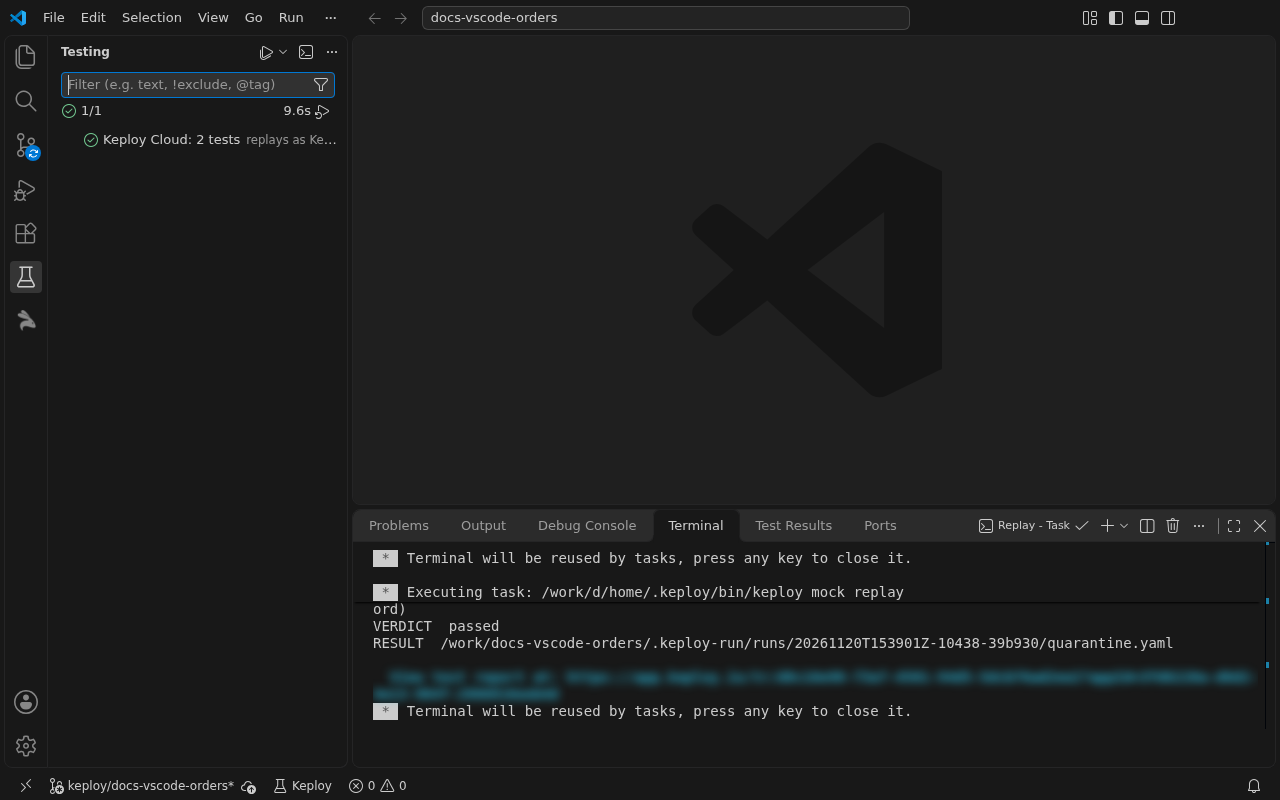
You can also replay from VS Code's Testing view. A project whose
recordings are in Keploy Cloud shows one row there, Keploy Cloud: n
tests, which replays as Keploy: Replay does. Run Test: Run All Tests
from the Command Palette, or select the row's run button, and the row turns
green or red. The view shows only the runs you start in it, not a Keploy:
Replay from the Command Palette. Recordings kept on your machine with
--local show one row per recording set instead, with its tests under it.
Step 7: See a red test
- Change one test so it fails, for example by changing the value it expects.
In the Go sample, change both
50s inTestTotalInUSDto51. - Run Keploy: Replay again.
The replay fails, and VS Code shows it in these places:
-
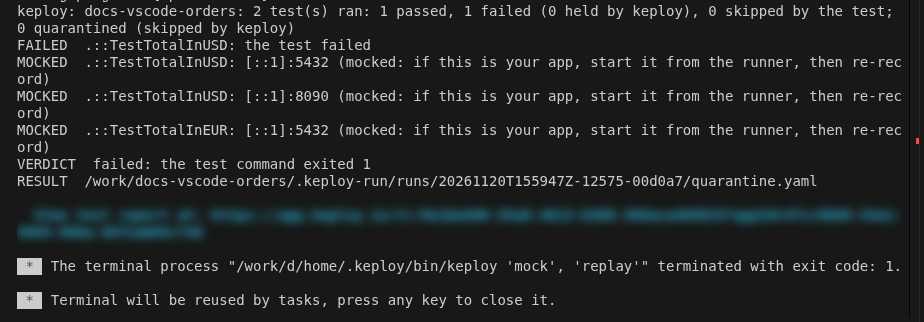
The replay's terminal ends with the result.
FAILEDnames the test that failed, andVERDICTgives the exit code of your test command:keploy: docs-vscode-orders: 2 test(s) ran: 1 passed, 1 failed (0 held by keploy), 0 skipped by the test; 0 quarantined (skipped by keploy)
FAILED .::TestTotalInUSD: the test failed
MOCKED .::TestTotalInUSD: [::1]:5432 (mocked: if this is your app, start it from the runner, then re-record)
MOCKED .::TestTotalInUSD: [::1]:8090 (mocked: if this is your app, start it from the runner, then re-record)
MOCKED .::TestTotalInEUR: [::1]:5432 (mocked: if this is your app, start it from the runner, then re-record)
VERDICT failed: the test command exited 1Your test's own failure message is above these lines, in your test command's output.
-
The Testing view, for a replay you run from it: the Keploy Cloud row turns red.
-
The Test Results view, for the same run: select the red row to see its message. It ends with the
FAILEDandVERDICTlines:keploy mock replay exited 1, and its report says a test failed: see its terminal.
FAILED .::TestTotalInUSD: the test failed
VERDICT failed: the test command exited 1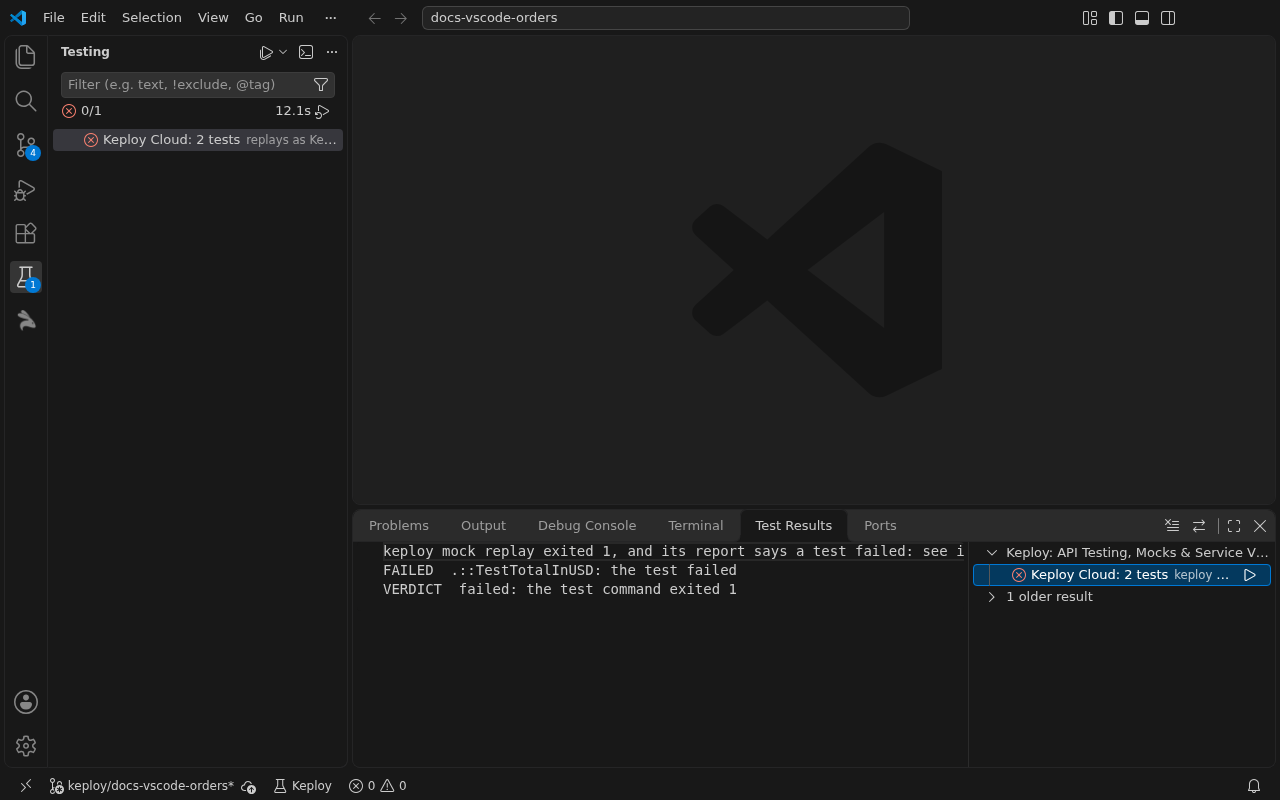
The extension shows no diff view of its own. The difference is in your test's failure message, as when you run the tests without Keploy.
A test can also fail because it makes a call the recording doesn't have. Then the terminal names that call and says what to do, as Step 5 of the Go quickstart shows.
Change the test back, and replay again to see it green.
Step 8: Stage the files to commit
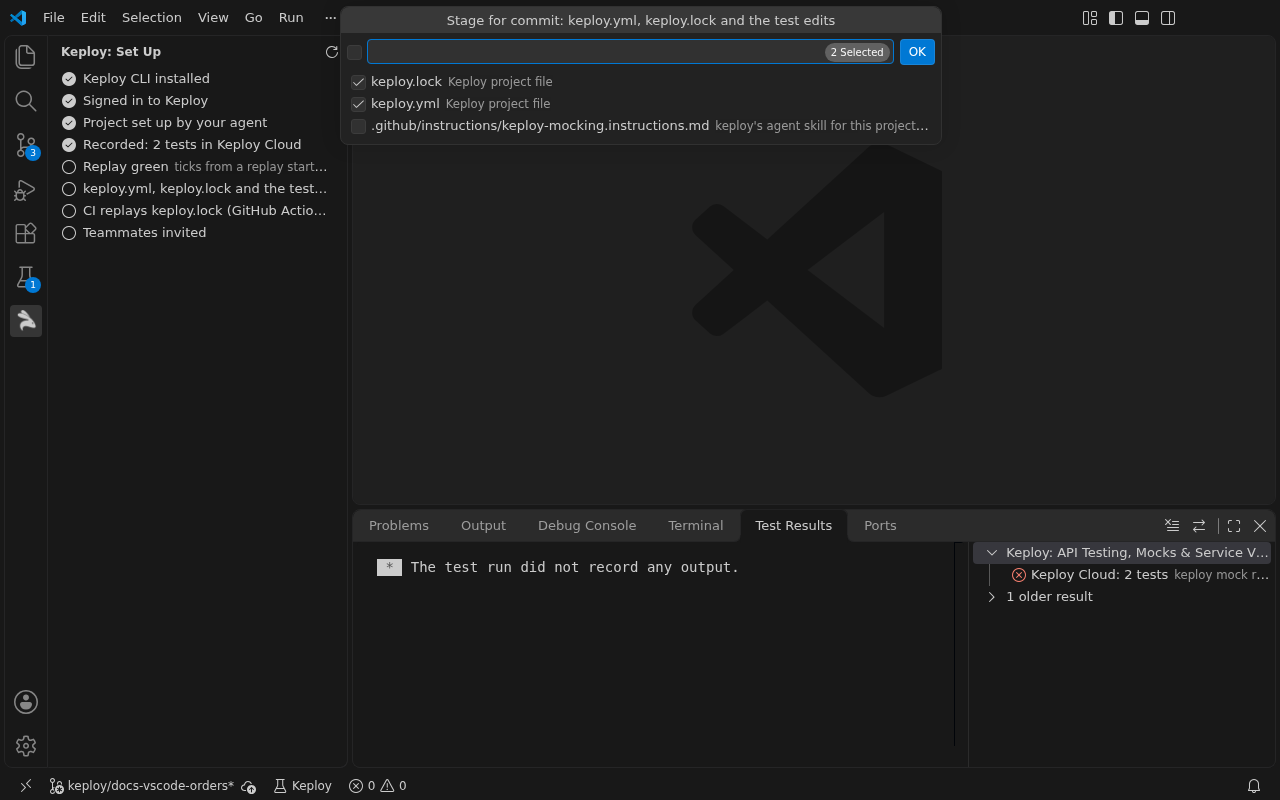
- In the checklist, select keploy.yml, keploy.lock and the test edits staged.
- In the list that opens, check the files.
keploy.yml,keploy.lockand the files that changed after your agent started are picked. Keploy's skill for the project is listed unpicked: pick it to share the setup with your team. - Select OK.
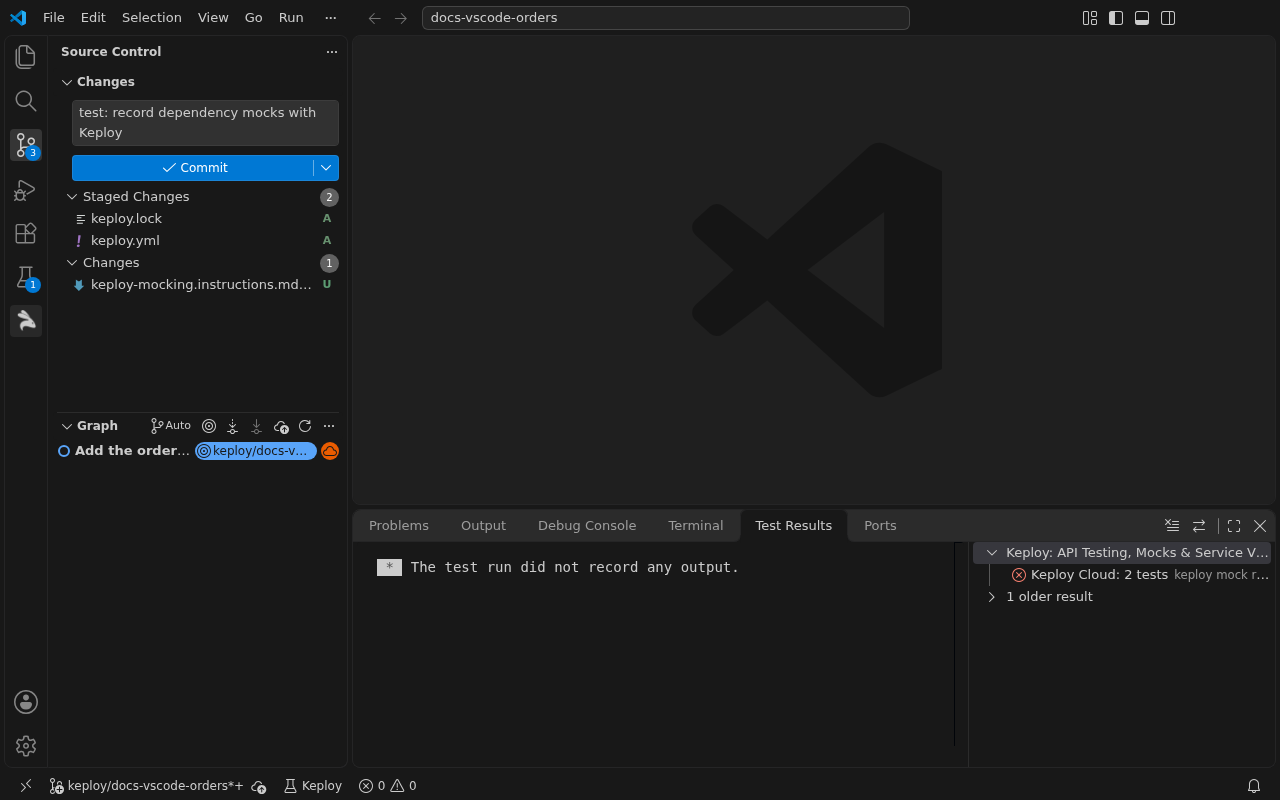
Source Control opens with the files staged. When its message box is empty,
the extension puts test: record dependency mocks with Keploy in it. Review
the changes, then commit. The extension never commits for you, and never changes .gitignore.
Step 9: Replay in CI
For a Go or Node project in a GitHub repository:
-
In the checklist, select CI replays keploy.lock (GitHub Actions).
The extension writes
.github/workflows/keploy.yml. It never writes over a file that is already there. On every pull request and every push to main, the workflow runskeploy mock replay --lock keploy.lock --on-miss failwithKEPLOY_PROVEN=1. -
The workflow needs one repository secret,
KEPLOY_API_KEY: a read-only CI key. Ask your Keploy admin for one. The notification's Open the CI key page button opens the page where the admin makes it. -
Store the key as the repository's secret. Run this in a terminal, and paste the key when it asks:
gh secret set KEPLOY_API_KEYThe notification's Copy the secret command button copies this command. Selecting either button closes the notification.
-
Commit the workflow with
keploy.ymlandkeploy.lock, and push.
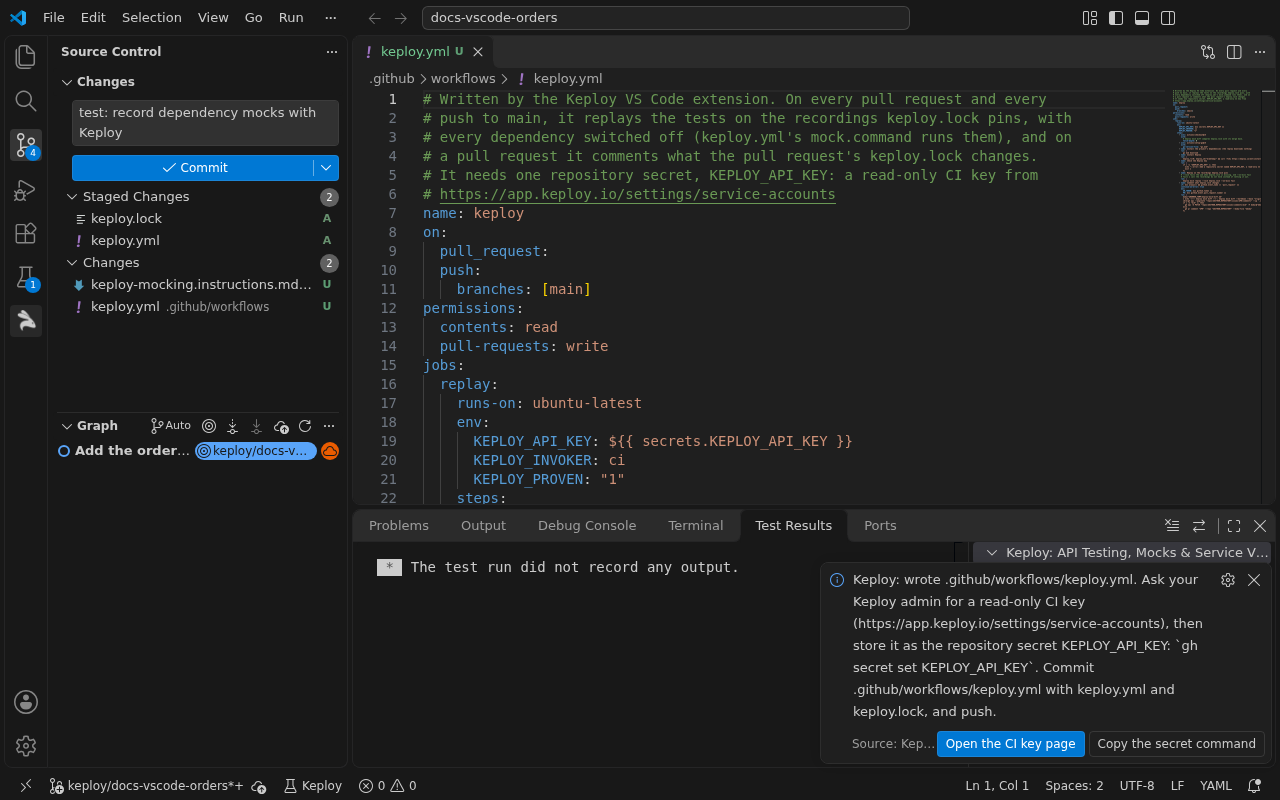
For any other project or CI, the extension writes no workflow and says so. The Other CI systems section shows the replay step to add yourself.
Step 10: Invite your team
Select Teammates invited in the checklist. The Keploy app's Add User page opens, where an admin adds your teammates.
A teammate who clones the repository signs in and replays. The replay reads the
committed keploy.yml and keploy.lock, and downloads the recordings the lock
pins.
Next steps
- The VS Code extension: every command, setting and platform note, and troubleshooting.
- VS Code quickstart: record and replay a sample from the extension without a coding agent, with the real output of each step.
- Go quickstart: the same record and replay in a terminal, with the real output of each step.
- Partial re-record: re-record one changed test without running the whole suite again.
- Troubleshooting: what a failing record or replay prints, and how to fix it.