Using Docker 🐳
A sample url shortener app to test Keploy integration capabilities using Mux and MySQL.
Don’t have Keploy installed yet?
Before running this sample, make sure Keploy is installed on your system.
👉 Go to Installation GuideClone a sample URL shortener app 🧪
git clone https://github.com/keploy/samples-go.git && cd samples-go/mux-mysql
go mod download
We will be using Docker compose to run the application as well as MySQL on Docker container.
Start MySQL Instance
docker run -p 3306:3306 --rm --name mysql --network keploy-network -e MYSQL_ROOT_PASSWORD=my-secret-pw -d mysql:latest
Capture the Testcases
Build the Docker image of our application:
docker build -t url-short .
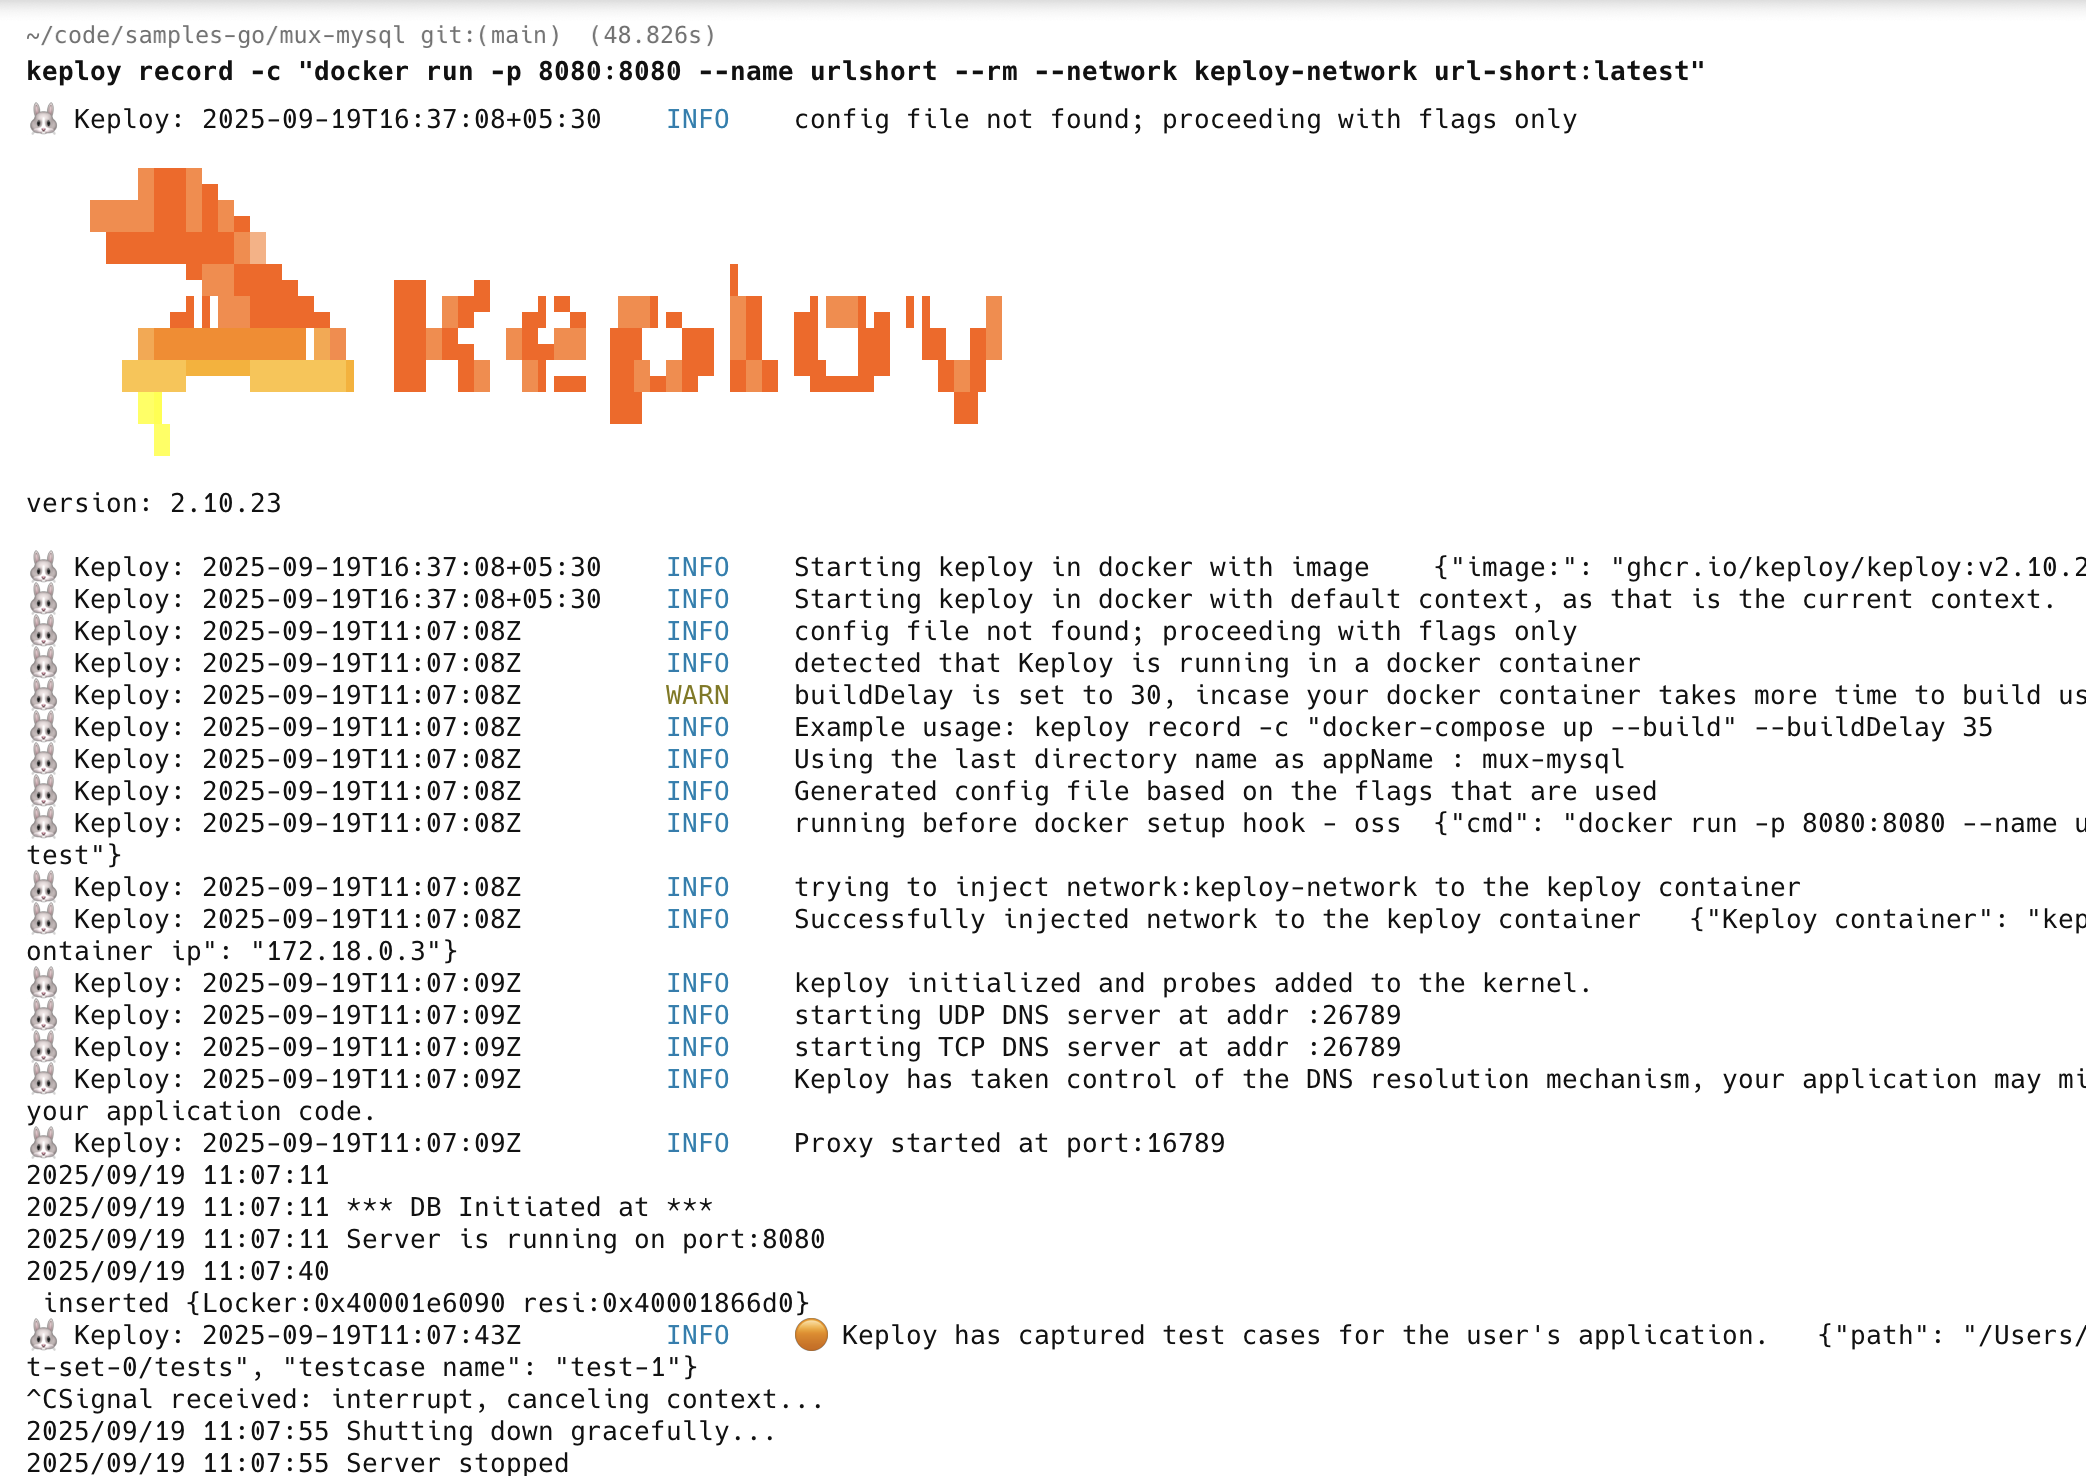
Once we have our Docker image ready, this command will start recording API calls using eBPF:
keploy record -c "docker run -p 8080:8080 --name urlshort --rm --network keploy-network url-short:latest"
Make API Calls using Postman or cURL command. Keploy with capture those calls to generate the test-suites containing testcases and data mocks.
Generate testcases
To generate test cases we just need to make some API calls. You can use Postman or simply curl.
Generate shortened url
curl --request POST \
  --url http://localhost:8080/create \
  --header 'content-type: application/json' \
  --data '{
  "link": "https://github.com"
}'
this will return the shortened url. The ts would automatically be ignored during testing because it'll always be different.
{
  "message":"Converted",
  "link":"http://localhost:8080/links/1",
  "status":true
}
Access all shortened URLs
curl http://localhost:8080/all
Now both these API calls were captured as editable testcases and written to keploy/tests folder. The keploy directory would also have mocks file that contains all the outputs of MySQL operations. Here's what the folder structure look like:
Now, let's see the magic! ✨💫 Want to see if everything works as expected?
Run the test cases
Run the test mode (in the project directory, not the Keploy directory):
keploy test -c "docker run -p 8080:8080 --name urlshort --rm --network keploy-network url-short:latest" --delay 10
Output should look like this:
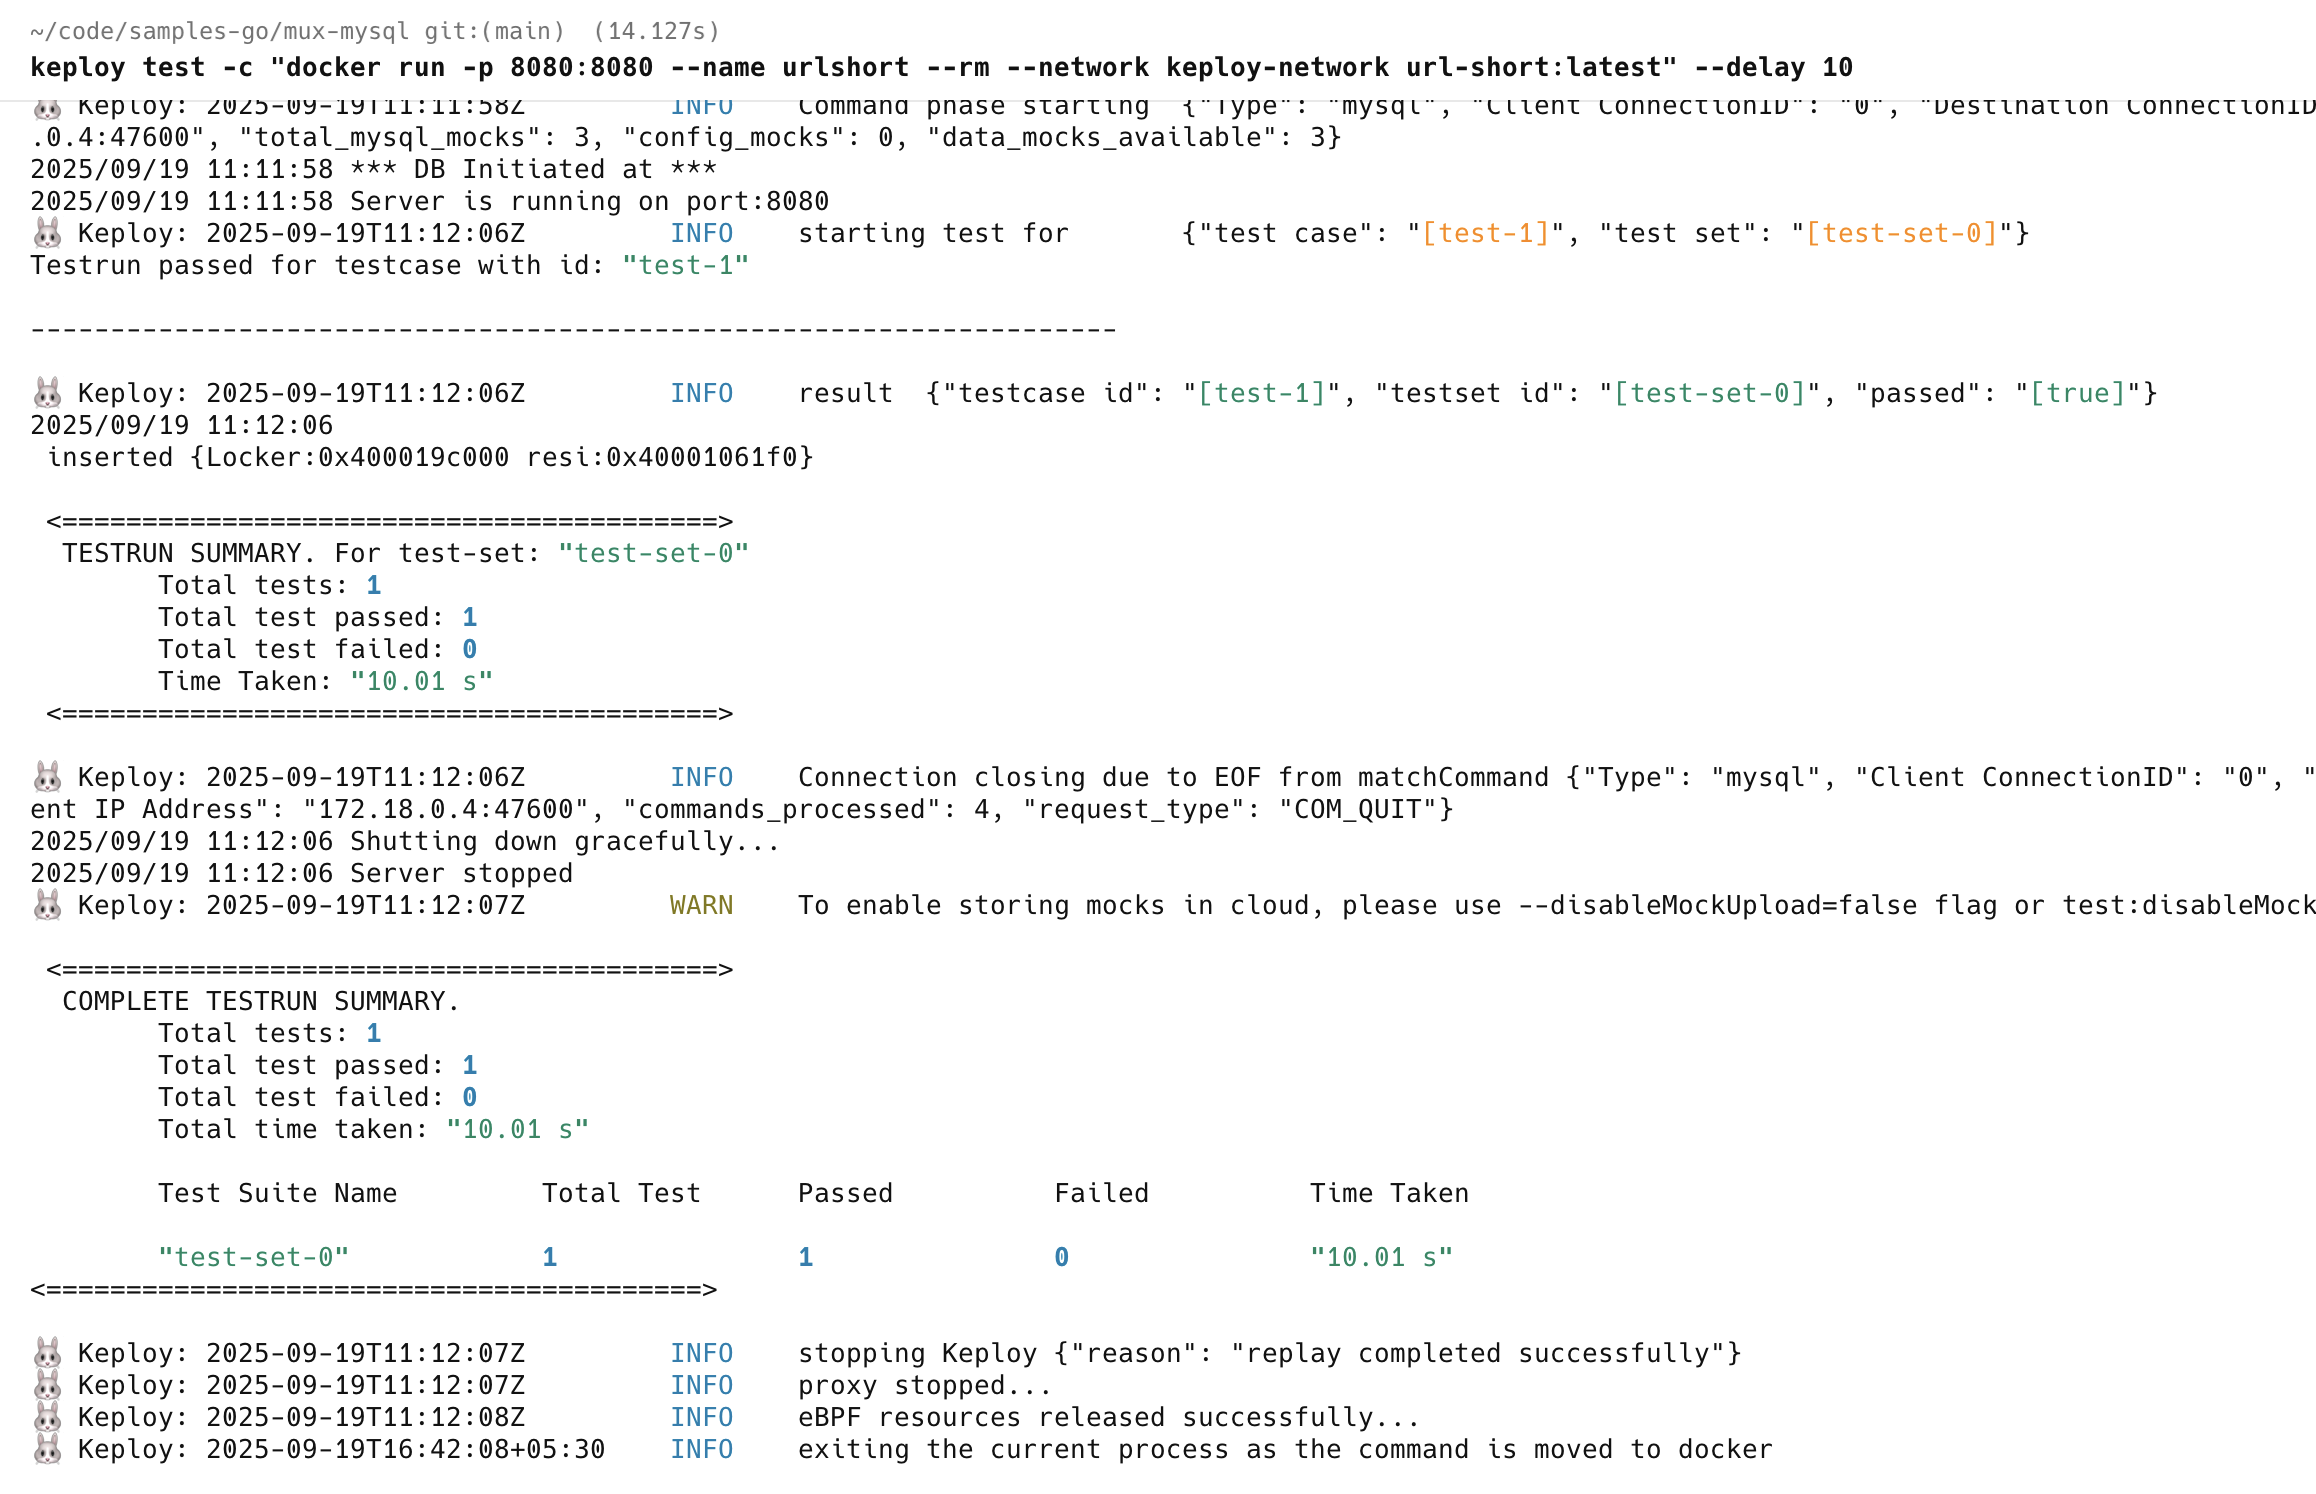
No need to set up fake databases/APIs like MySQL or write mocks manually. Keploy automatically mocks them and the application thinks it's talking to MySQL. 😄
Wrapping it up 🎉
Congrats on the journey so far! You've seen Keploy's power, flexed your coding muscles, and had a bit of fun too! Now, go out there and keep exploring, innovating, and creating! Remember, with the right tools and a sprinkle of fun, anything's possible.😊🚀
Happy coding! ✨👩💻👨💻✨
Running App Locally on Linux/WSL 🐧
A Sample url shortener app to test Keploy integration capabilities using Mux and MySql.
Don’t have Keploy installed yet?
Before running this sample, make sure Keploy is installed on your system.
👉 Go to Installation GuideClone a sample URL shortener app 🧪
git clone https://github.com/keploy/samples-go.git && cd samples-go/mux-mysql
go mod download
We’ll run our sample application locally, with the database running inside a Docker container. Ready? Let’s get the party started! 🎉
Start the MySQL instance
docker run -p 3306:3306 --rm --name mysql -e MYSQL_ROOT_PASSWORD=my-secret-pw -d mysql:latest
Now, we will create the binary of our application:-
export ConnectionString="root:my-secret-pw@tcp(localhost:3306)/mysql"

go build -o main
Capture the Testcases
sudo -E PATH=$PATH keploy record -c "./main"
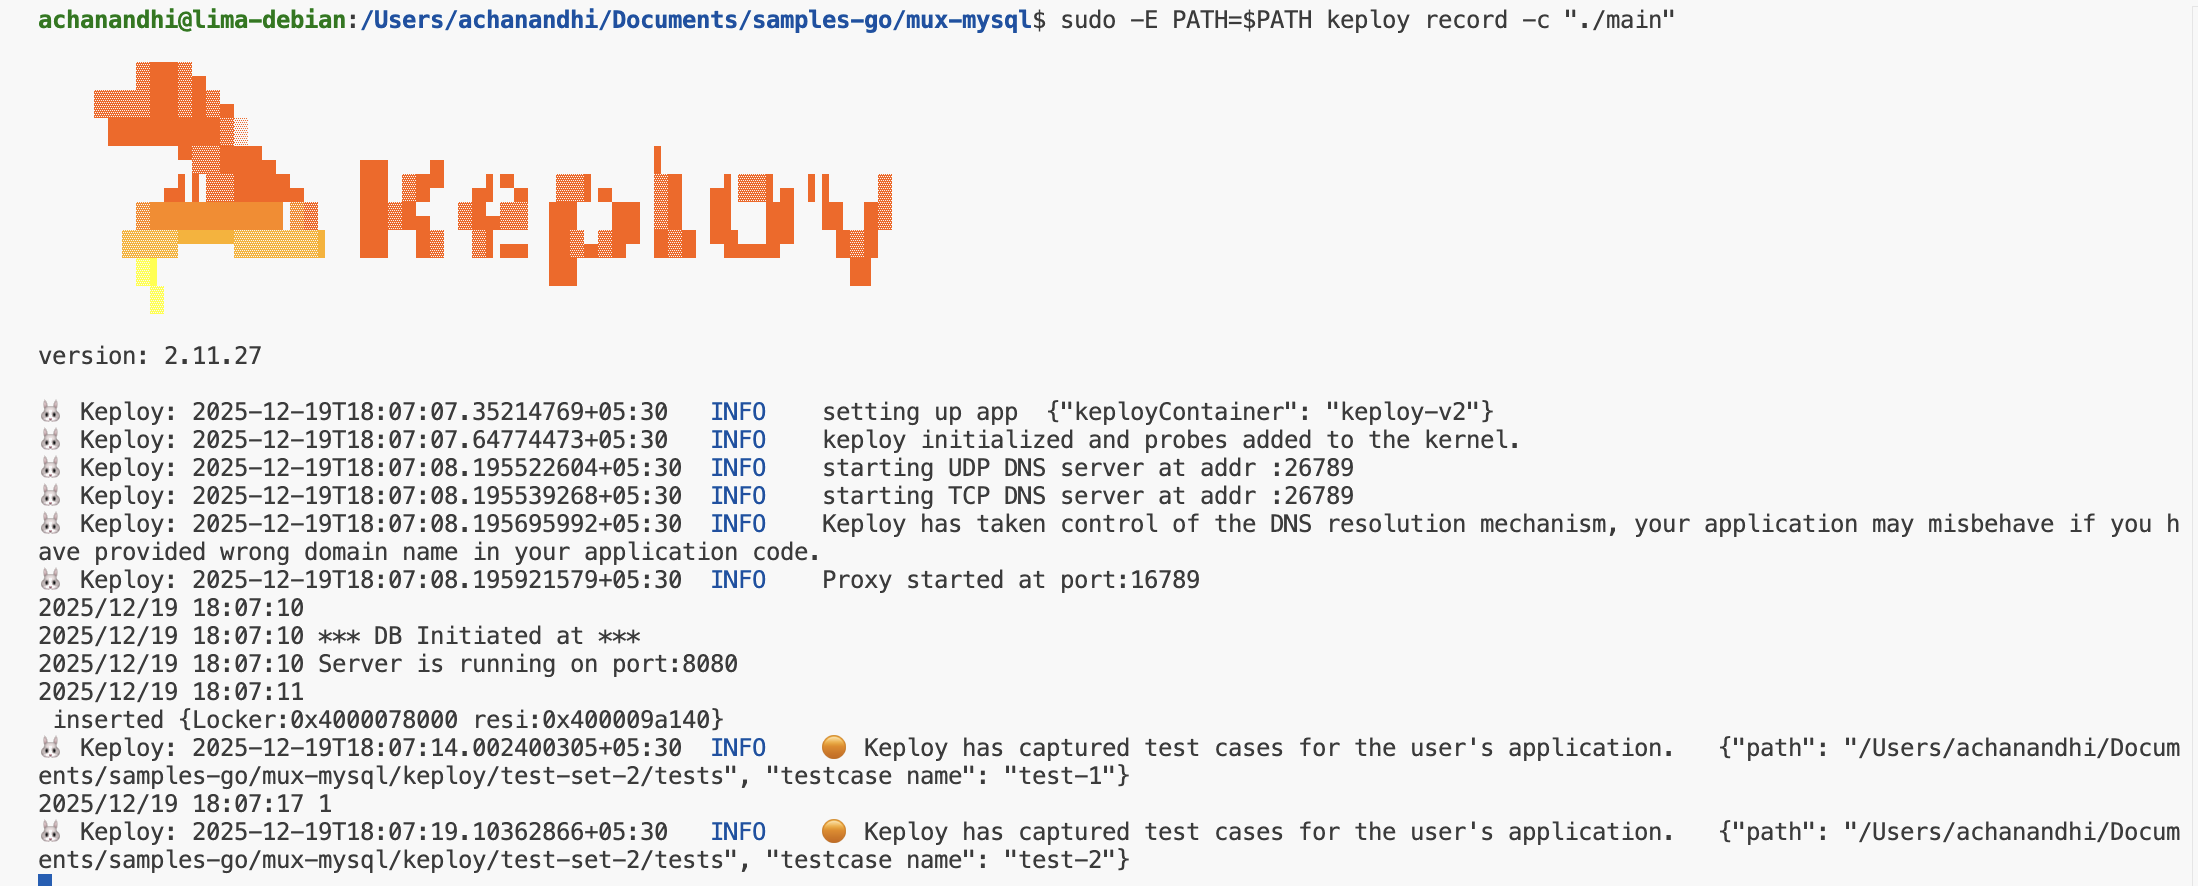
Generate testcases
To generate test cases we just need to make some API calls. You can use Postman, Hoppscotch, or simply curl.
Generate shortened url
curl --request POST \
  --url http://localhost:8080/create \
  --header 'content-type: application/json' \
  --data '{
  "link": "https://google.com"
}'
this will return the shortened url.
{
  "message": "Converted",
  "link": "http://localhost:8080/links/1",
  "status": true
}
Redirect to original url from shortened url
curl http://localhost:8080/links/1
Now, let's see the magic! 🪄💫 Both these API calls were captured as a test case and should be visible on the Keploy CLI. You should see a keploy folder with the test cases and data mocks created.
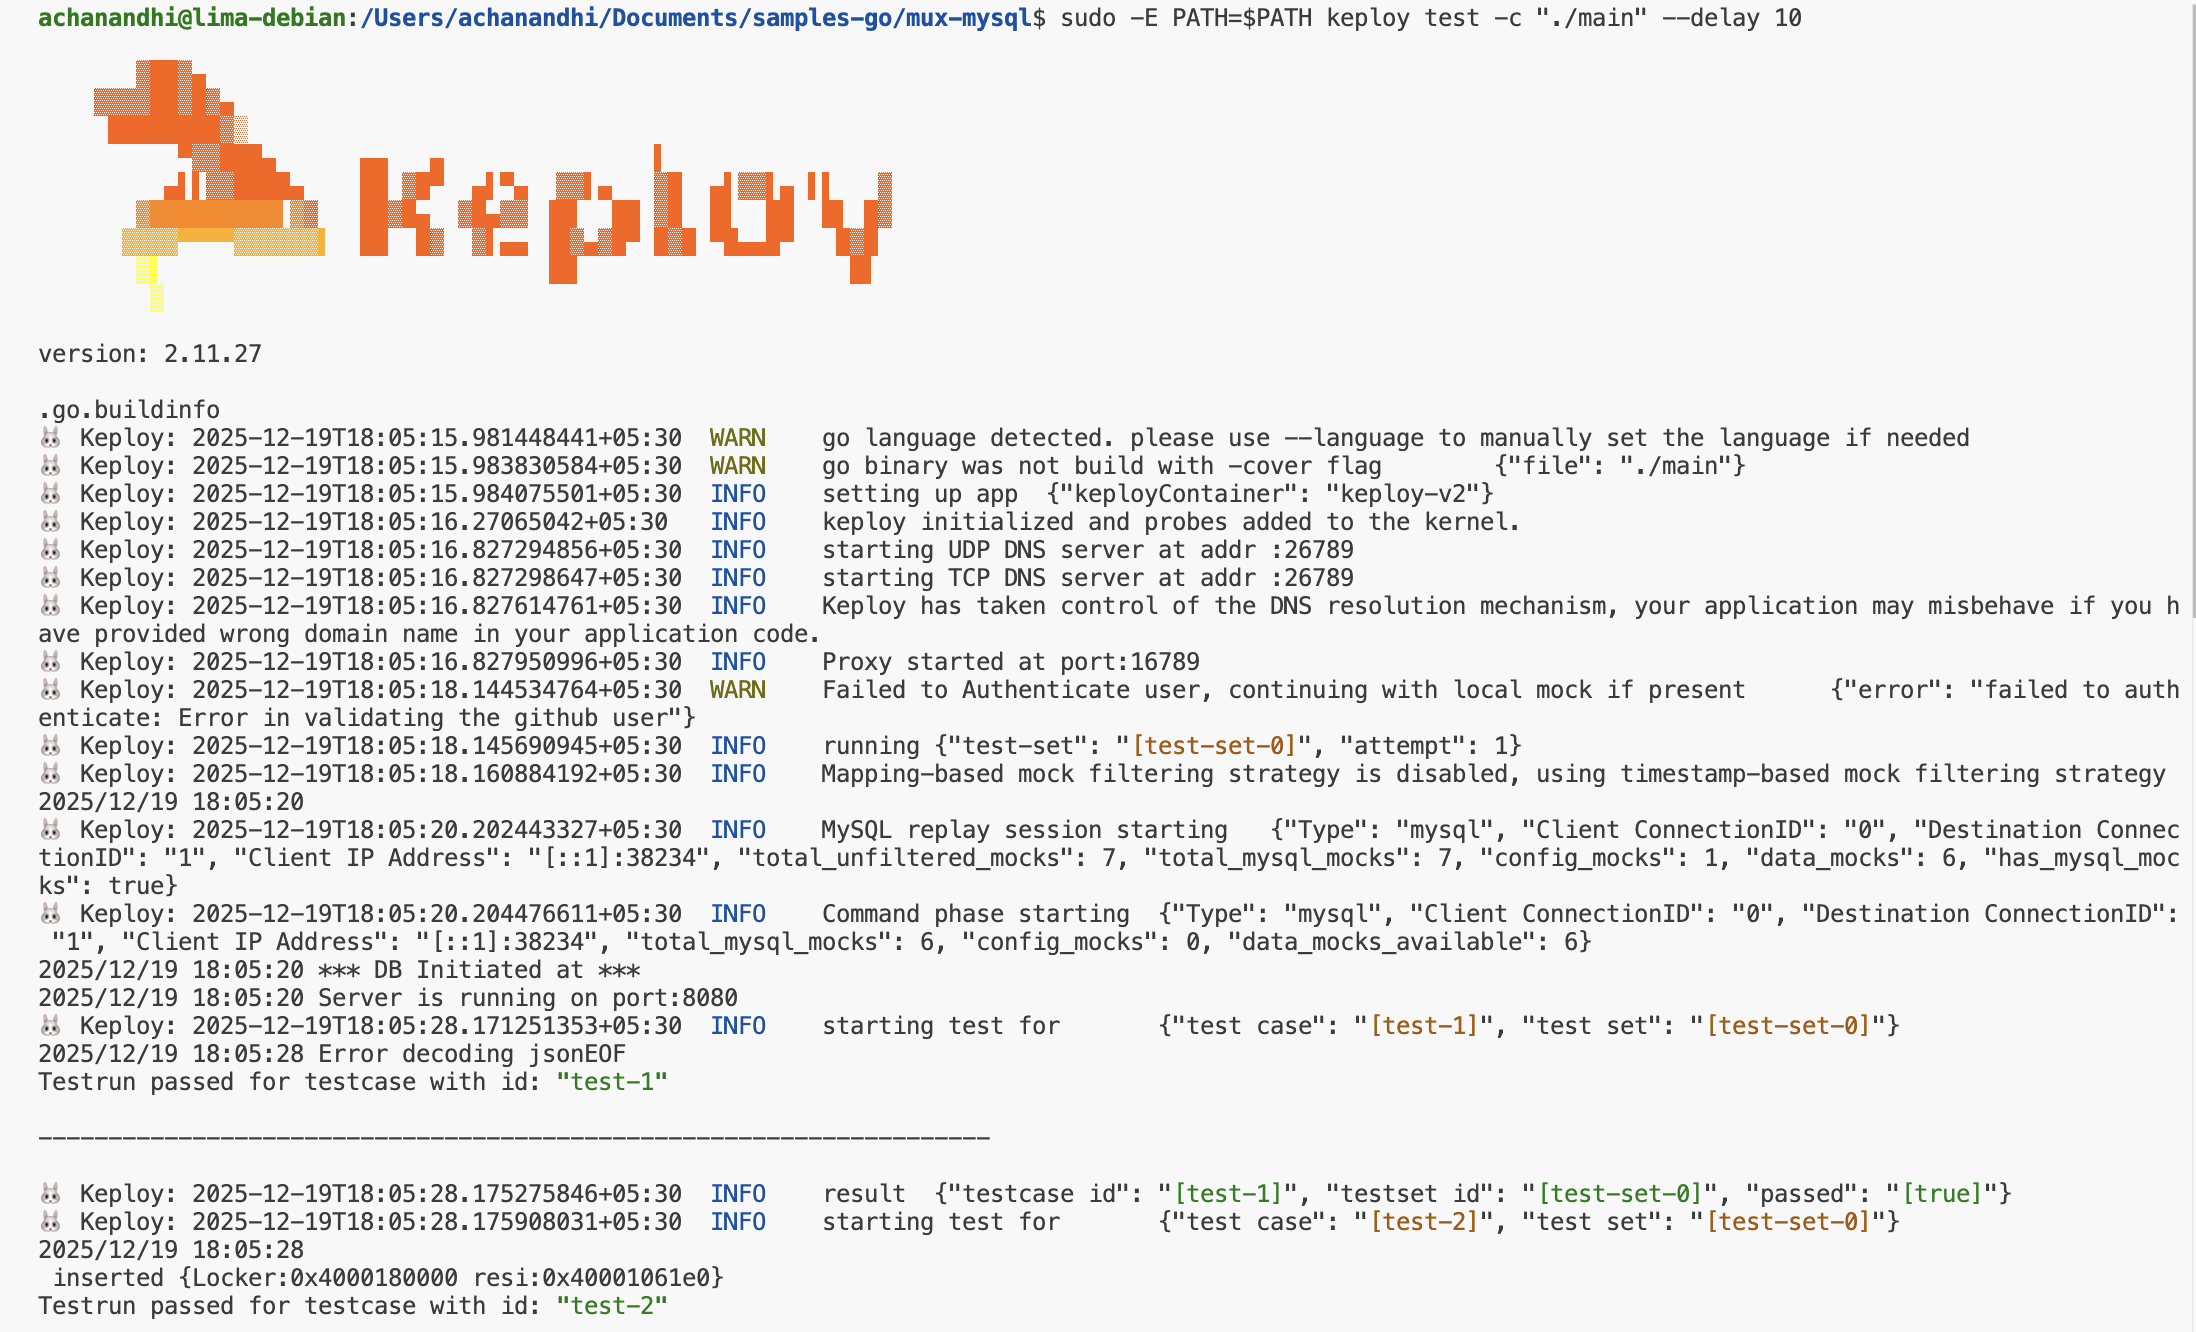
Run the captured test cases
Now that we have our test case captured, run the test file.
sudo -E PATH=$PATH keploy test -c "./main" --delay 10
No need to set up dependencies like MySQL or write mocks for your testing. The application thinks it's talking to MySQL. 😄
We will get output something like this:
Wrapping it up 🎉
Congrats on the journey so far! You've seen Keploy's power, flexed your coding muscles, and had a bit of fun too! Now, go out there and keep exploring, innovating, and creating! Remember, with the right tools and a sprinkle of fun, anything's possible.😊🚀