Kubernetes Setup
This guide walks you through creating a local Kind Kubernetes cluster and connecting it to Keploy using a NodePort (example: 30080) so you can live record and replay traffic for Pods.
[!NOTE] This documentation covers local Kind cluster setup. Documentation for hosted cluster setup is coming soon.
How Keploy works on Kubernetes
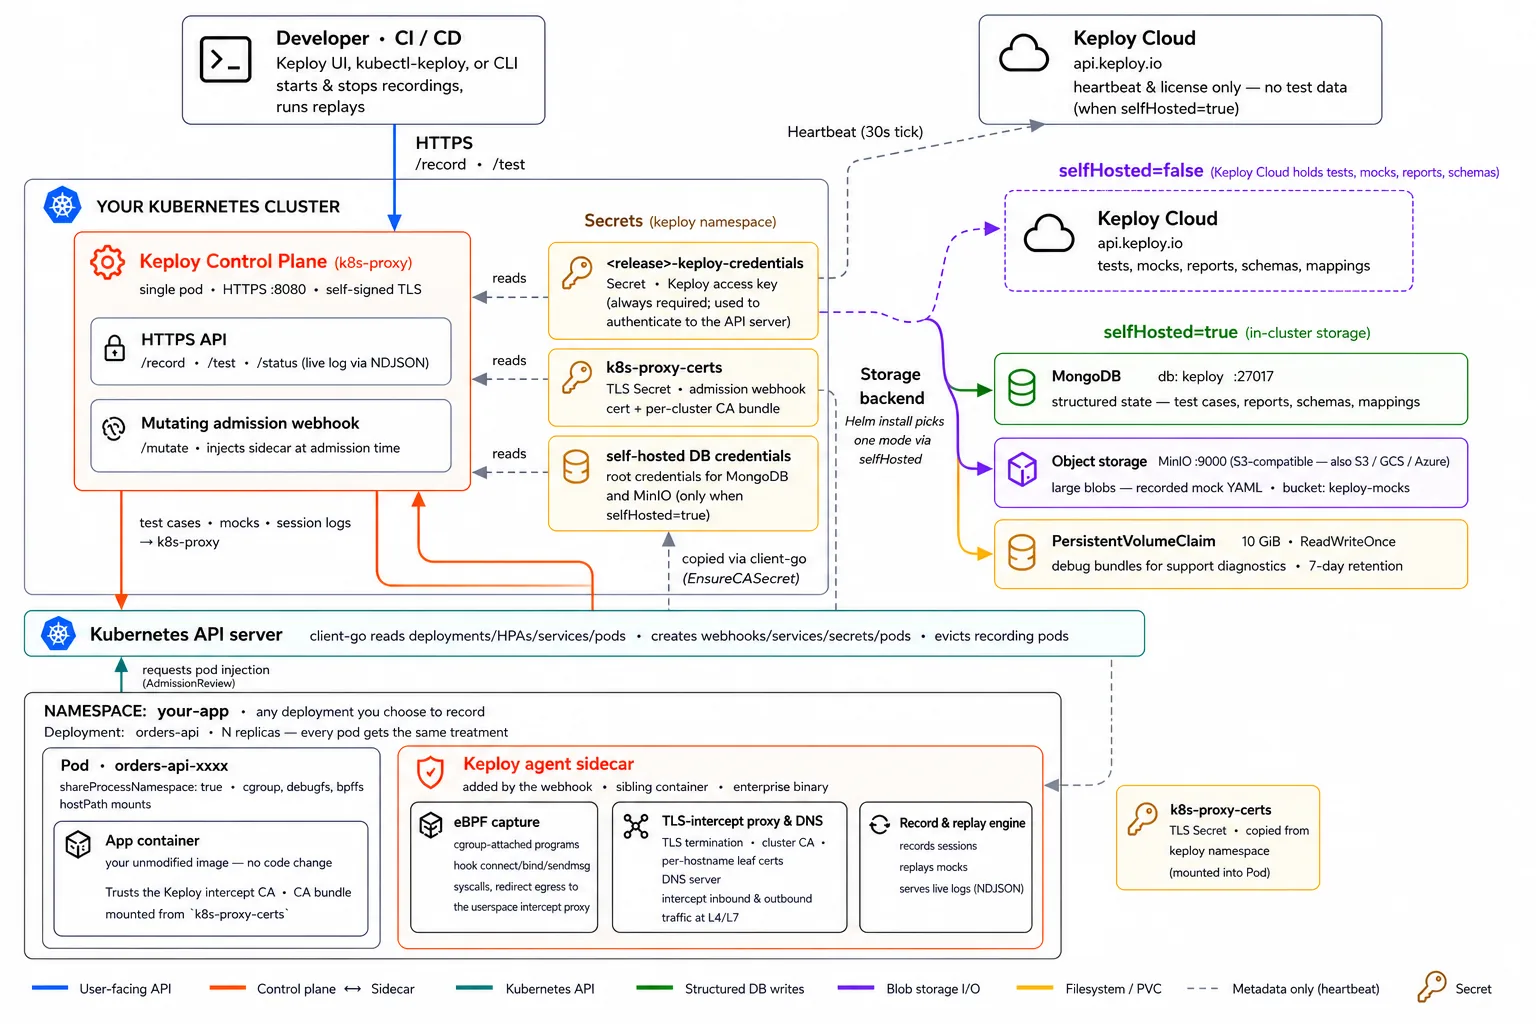
Prerequisites
Ensure you have the following before you begin:
- Keploy account on the Enterprise plan (with an access key)
- kubectl configured to access your Kubernetes cluster
- Helm installed
- Kind installed
1) Create a Local Kind Cluster (with NodePort Mapping)
1.1 Install Kind
Install Kind using the official instructions:
https://kind.sigs.k8s.io/docs/user/quick-start/#installing-from-release-binaries
1.2 Create Kind Cluster Config (NodePort: 30080)
Create a file named kind-cluster.yaml with the following contents:
kind: Cluster
apiVersion: kind.x-k8s.io/v1alpha4
nodes:
  - role: control-plane
    extraPortMappings:
      - containerPort: 30080
        hostPort: 30080
        protocol: TCP
1.3 Create the Cluster
Run:
kind create cluster --config kind-cluster.yaml
1.4 Verify the Cluster is Ready
Confirm the cluster components are running:
kubectl get pods --all-namespaces
Expected output should look similar to:
NAMESPACE            NAME                                              READY   STATUS    RESTARTS   AGE
kube-system          coredns-7d764666f9-r82lr                          1/1     Running   0          42s
kube-system          coredns-7d764666f9-rsjsv                          1/1     Running   0          42s
kube-system          etcd-local-k8s-control-plane                      1/1     Running   0          49s
kube-system          kindnet-c59v6                                     1/1     Running   0          42s
kube-system          kube-apiserver-local-k8s-control-plane            1/1     Running   0          49s
kube-system          kube-controller-manager-local-k8s-control-plane   1/1     Running   0          48s
kube-system          kube-proxy-xkch5                                  1/1     Running   0          42s
kube-system          kube-scheduler-local-k8s-control-plane            1/1     Running   0          49s
local-path-storage   local-path-provisioner-67b8995b4b-csn49           1/1     Running   0          42s
✅ Your local Kind cluster is ready.
2) Connect the Cluster to Keploy (NodePort Setup)
2.1 Create Cluster Entry in Keploy
- Go to: https://app.keploy.io/clusters
- Click Connect New Cluster
- Enter:
- Cluster Name
- Ingress URL: Use
http://localhost:30080
[!NOTE] This setup has been tested with Google Chrome. Browsers treat
localhostas a secure context, which allows features that would otherwise require HTTPS. If you use an IP address instead, HTTPS would be required with a properly signed TLS certificate.If your cluster is running on a VM, see SSH Port Forwarding to access it via
localhostfrom your laptop.
- Click Connect
2.2 Install Keploy via Helm
Keploy UI will provide a Helm command. Ensure you set:
proxy.insecure.enabled=true(important for local NodePort)service.type=NodePortservice.nodePort=30080ingressUrlmatches what you entered in the UI (e.g.,http://localhost:30080)
Example command:
helm upgrade --install k8s-proxy oci://docker.io/keploy/k8s-proxy-chart --version <LATEST_VERSION> \
  --namespace keploy \
  --create-namespace \
  --set accessKey="<YOUR_KEY>" \
  --set clusterName="doc-test-2" \
  --set apiServerUrl="https://api.keploy.io" \
  --set service.type=NodePort \
  --set ingressUrl="http://localhost:30080" \
  --set service.nodePort=30080 \
  --set environment="prod" \
  --set proxy.insecure.enabled=true
2.3 Optional: SSH Port Forwarding (Access Keploy NodePort from Your Laptop)
If your Kubernetes cluster is running inside a VM and you want to use Chrome on your local machine to reach the Keploy NodePort (e.g., 30080), you can tunnel the port over SSH.
This is useful when:
- The NodePort is reachable from the VM, but not directly from your laptop due to NAT / firewall rules, or
- You want to avoid exposing the NodePort to your LAN.
Example: Forward Local 30080 → VM 30080
Run this on your local machine:
ssh -N \
  -L 30080:<VM_IP>:30080 \
  <username>@<VM_IP> -i /path/to/your/ssh/key
After this is running, you should be able to open the NodePort via:
http://localhost:30080
…and use that value for ingressUrl in the Keploy UI / Helm values.
Troubleshooting: channel ... open failed: connect failed: Connection refused
If you see something like:
channel 2: open failed: connect failed: Connection refused
It typically means the VM could not connect to the target IP:port from its own network namespace.
Common fixes:
-
Verify the NodePort is actually listening on the VM:
sudo ss -lntp | grep 30080 || true
sudo netstat -lntp | grep 30080 || true -
Confirm the Keploy NodePort service is created and uses the expected port:
kubectl -n keploy get svc
kubectl -n keploy get svc k8s-proxy -o yaml | sed -n '1,160p' -
If the NodePort is only bound on localhost inside the VM, forward to
127.0.0.1instead:ssh -N \
-L 30080:127.0.0.1:30080 \
<username>@<VM_IP> -i /path/to/your/ssh/key -
If you're running Kind inside Docker on the VM, ensure your Kind config includes the
extraPortMappingsand thathostPort: 30080is mapped correctly (as shown in this document).
[!TIP] If the VM's IP changes or you want the command to fail fast, add
-o ExitOnForwardFailure=yes.
3) Verify Keploy Pods Are Running
Check all namespaces:
kubectl get pods --all-namespaces
You should see Keploy components in the keploy namespace, similar to:
NAMESPACE            NAME                                              READY   STATUS    RESTARTS   AGE
keploy               k8s-proxy-65f4d8fd9-cmbmn                         1/1     Running   0          72s
keploy               k8s-proxy-minio-74849875b7-4w76s                  1/1     Running   0          72s
keploy               k8s-proxy-mongodb-6548798d96-2llzt                1/1     Running   0          72s
kube-system          coredns-7d764666f9-r82lr                          1/1     Running   0          8m7s
...
4) Confirm Cluster Visibility in Keploy UI
- Go back to: https://app.keploy.io/clusters
- Open your connected cluster
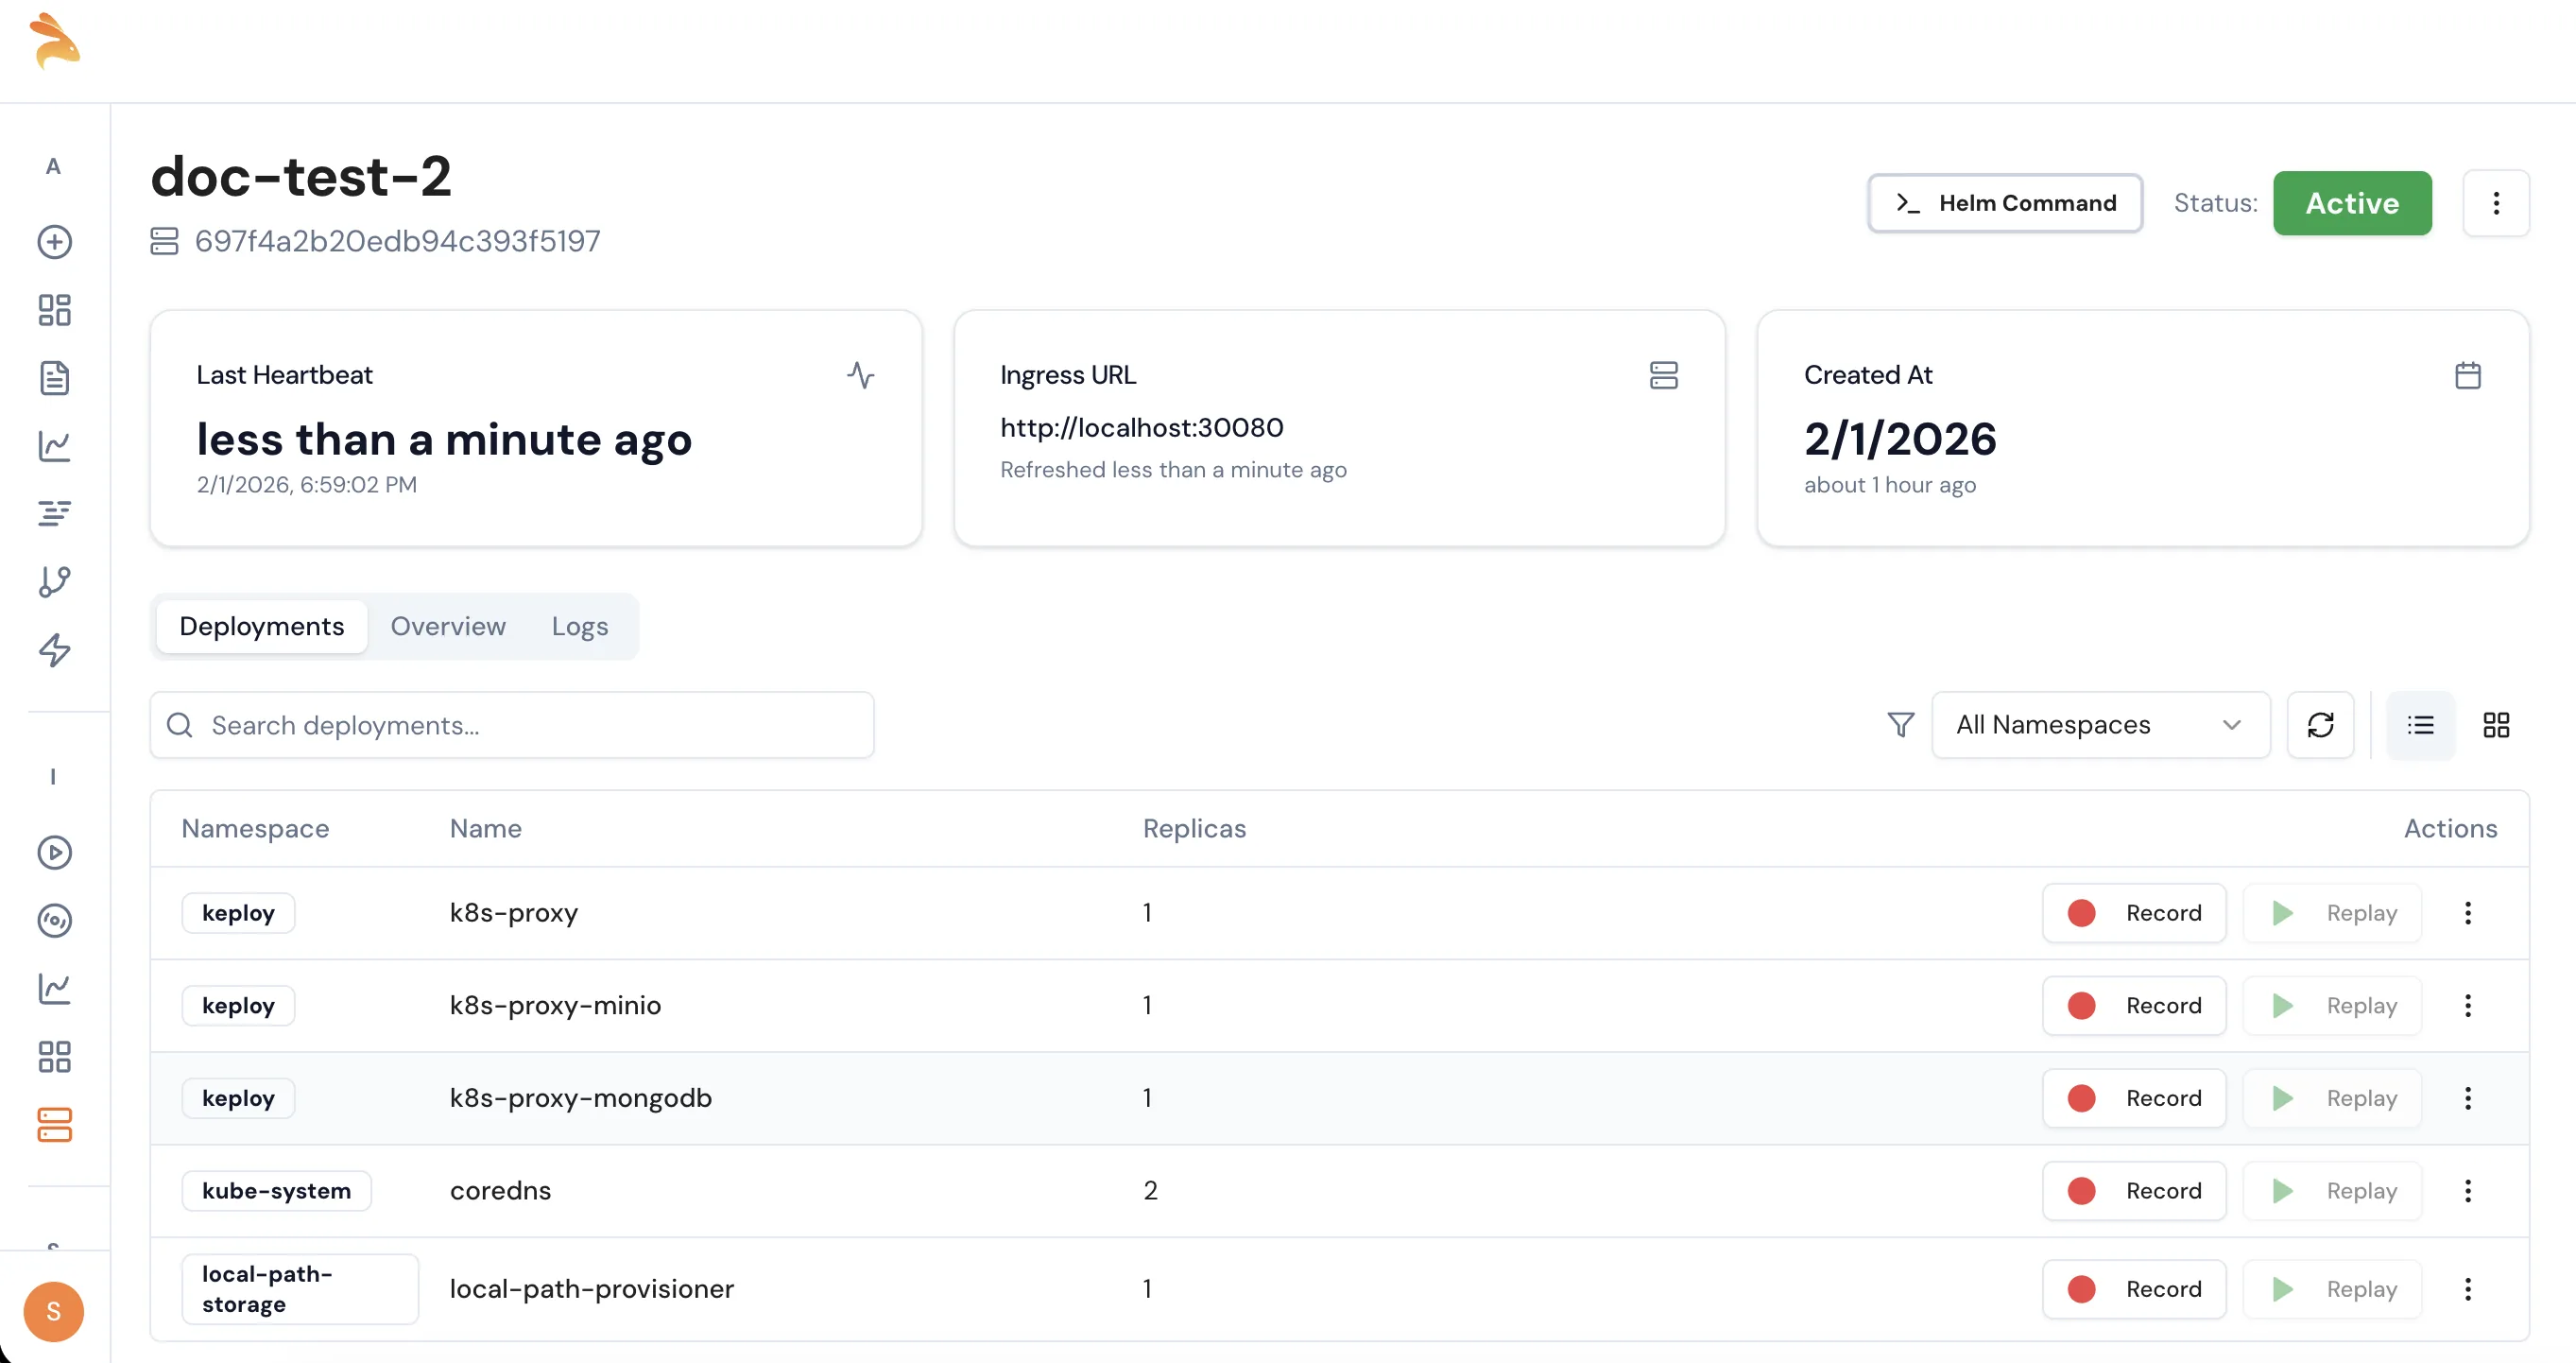
- Verify your deployments are visible
✅ Once deployments are visible, you can start recording on any Pod and later replay.
GitOps Deployment
If you use a GitOps tool to manage your Kubernetes cluster, you can deploy Keploy's k8s-proxy declaratively instead of using helm upgrade manually. The sections below cover ArgoCD and Flux CD.
The GitOps examples use a Kubernetes Secret for the access key. Create it before proceeding:
kubectl -n keploy create secret generic keploy-credentials \
  --from-literal=access-key="<YOUR_ACCESS_KEY>"
Ingress with TLS Passthrough (Optional)
Keploy's k8s-proxy serves HTTPS natively on its backend port. If you want to route external traffic through an ingress controller instead of a direct NodePort, you need one that supports TLS passthrough—forwarding the encrypted connection directly to the k8s-proxy without terminating it.
This section uses Contour as an example. You can use any ingress controller that supports TLS passthrough (e.g. NGINX Ingress with ssl-passthrough, Traefik, HAProxy). If you're using a direct NodePort or LoadBalancer service, skip this section.
Install Contour
kubectl apply -f https://projectcontour.io/quickstart/contour.yaml
Wait for it to be ready:
kubectl -n projectcontour rollout status deployment/contour
kubectl -n projectcontour rollout status daemonset/envoy
Patch Envoy for Kind/VM Clusters
Kind only maps specific ports to the host. Since TLS passthrough uses Envoy's HTTPS listener (port 443), you need to assign it to the mapped NodePort:
kubectl patch svc envoy -n projectcontour --type='json' -p='[
  {"op": "replace", "path": "/spec/type", "value": "NodePort"},
  {"op": "replace", "path": "/spec/ports/0/nodePort", "value": 30081},
  {"op": "replace", "path": "/spec/ports/1/nodePort", "value": 30080}
]'
This puts the HTTPS listener on NodePort 30080 (mapped to the host) and the HTTP listener on 30081.
[!TIP] For cloud clusters (EKS/GKE/AKS), skip this patch. The default LoadBalancer type works—your cloud provider assigns an external IP automatically.
Verify Contour
kubectl get pods -n projectcontour
kubectl get svc  -n projectcontour
Expected output:
NAME      TYPE       CLUSTER-IP    EXTERNAL-IP   PORT(S)                      AGE
envoy     NodePort   10.96.65.35   <none>        80:30081/TCP,443:30080/TCP   2m
Create the HTTPProxy for TLS Passthrough
If you're using Contour as your ingress controller, create an HTTPProxy resource to route traffic to the k8s-proxy via TLS passthrough.
Create a file named k8s-proxy-httpproxy.yaml:
apiVersion: projectcontour.io/v1
kind: HTTPProxy
metadata:
  name: k8s-proxy-ingress
  namespace: keploy
spec:
  virtualhost:
    fqdn: <YOUR_INGRESS_HOST>
    tls:
      passthrough: true
  tcpproxy:
    services:
      - name: k8s-proxy
        port: 8080
Replace <YOUR_INGRESS_HOST> with the hostname that resolves to your cluster. This must match the host used in keploy.ingressUrl.
Apply it:
kubectl apply -f k8s-proxy-httpproxy.yaml
Deploy with ArgoCD
If you already use ArgoCD to manage your applications, adding Keploy requires just an ArgoCD Application YAML for the k8s-proxy Helm chart. No changes to your existing app code or manifests.
Install ArgoCD
Skip this if ArgoCD is already installed on your cluster.
kubectl create namespace argocd
kubectl apply -n argocd -f https://raw.githubusercontent.com/argoproj/argo-cd/stable/manifests/install.yaml
kubectl -n argocd rollout status deployment/argocd-server
Get the admin password:
kubectl -n argocd get secret argocd-initial-admin-secret \
  -o jsonpath="{.data.password}" | base64 -d; echo
Access the ArgoCD UI:
kubectl -n argocd port-forward svc/argocd-server 8443:443 &
Open https://localhost:8443 in your browser. Login with username admin and the password from above.
Create the ArgoCD Application for k8s-proxy
Create a file named keploy-k8s-proxy.yaml:
apiVersion: argoproj.io/v1alpha1
kind: Application
metadata:
  name: keploy-k8s-proxy
  namespace: argocd
  finalizers:
    - resources-finalizer.argocd.argoproj.io
spec:
  project: default
  source:
    chart: k8s-proxy-chart
    repoURL: registry-1.docker.io/keploy
    targetRevision: "3.3.10"
    helm:
      values: |
        replicaCount: 1
        environment: "staging"
        selfHosted: false
        fullnameOverride: "k8s-proxy"

        keploy:
          existingSecret: "keploy-credentials"
          existingSecretKey: "access-key"
          clusterName: "<YOUR_CLUSTER_NAME>"
          apiServerUrl: "https://api.keploy.io"
          ingressUrl: "https://<YOUR_INGRESS_HOST>:30080"

        service:
          type: ClusterIP

        mongodb:
          enabled: false
        minio:
          enabled: false
  destination:
    server: https://kubernetes.default.svc
    namespace: keploy
  syncPolicy:
    automated:
      prune: true
      selfHeal: true
    syncOptions:
      - CreateNamespace=true
Replace:
<YOUR_CLUSTER_NAME>—the name you entered in the Keploy UI<YOUR_INGRESS_HOST>—the hostname that resolves to your cluster (e.g. your VM IP or a DNS name):30080—the NodePort from the Contour patch. For cloud clusters (EKS/GKE/AKS) using a LoadBalancer, use:443instead
Apply it:
kubectl apply -f keploy-k8s-proxy.yaml
Verify ArgoCD Deployment
# Check ArgoCD sees the app
kubectl get applications -n argocd

# Check HTTPProxy status
kubectl get httpproxy -A
# Should show status: valid

# Check k8s-proxy is running
kubectl get pods -n keploy

# Test connectivity through Contour
curl -sk https://<YOUR_INGRESS_HOST>:30080/healthz
# → {"status":"ok"}
✅ Open the Keploy UI → Clusters → your cluster should show as Connected. You can now record and replay traffic on any deployment.
Deploy Your Application with ArgoCD
Your application needs no changes for Keploy. Deploy it as you normally would with ArgoCD—either from Helm charts or raw K8s manifests:
apiVersion: argoproj.io/v1alpha1
kind: Application
metadata:
  name: my-app
  namespace: argocd
spec:
  project: default
  source:
    repoURL: https://github.com/your-org/your-repo.git
    targetRevision: main
    path: k8s/
  destination:
    server: https://kubernetes.default.svc
    namespace: staging
  syncPolicy:
    automated:
      prune: true
      selfHeal: true
    syncOptions:
      - CreateNamespace=true
Once deployed, your application appears in the Keploy UI under your cluster's Deployments tab. Click Record to start capturing live traffic.
Deploy with Flux CD
Flux watches your Git repository and automatically applies changes to the cluster. Adding Keploy requires a HelmRelease for the k8s-proxy Helm chart.
Bootstrap Flux
Skip this if Flux is already installed on your cluster.
Bootstrap Flux with your GitHub repository:
flux bootstrap github \
  --owner=<YOUR_GITHUB_USERNAME> \
  --repository=<YOUR_REPO_NAME> \
  --branch=main \
  --path=clusters/staging \
  --personal
This installs Flux on your cluster and creates the clusters/staging directory in your Git repo where you'll add Keploy manifests.
Verify Flux is running:
flux check
Add the Keploy Helm Repository Source
Create clusters/staging/keploy-source.yaml in your Git repo:
apiVersion: source.toolkit.fluxcd.io/v1
kind: HelmRepository
metadata:
  name: keploy
  namespace: flux-system
spec:
  interval: 1h
  type: oci
  url: oci://docker.io/keploy
Create the HelmRelease for k8s-proxy
Create clusters/staging/keploy-k8s-proxy.yaml in your Git repo:
apiVersion: helm.toolkit.fluxcd.io/v2
kind: HelmRelease
metadata:
  name: k8s-proxy
  namespace: keploy
spec:
  interval: 5m
  chart:
    spec:
      chart: k8s-proxy-chart
      version: "3.3.10"
      sourceRef:
        kind: HelmRepository
        name: keploy
        namespace: flux-system
  install:
    createNamespace: true
  values:
    replicaCount: 1
    environment: "staging"
    selfHosted: false
    fullnameOverride: "k8s-proxy"

    keploy:
      existingSecret: "keploy-credentials"
      existingSecretKey: "access-key"
      clusterName: "<YOUR_CLUSTER_NAME>"
      apiServerUrl: "https://api.keploy.io"
      ingressUrl: "https://<YOUR_INGRESS_HOST>:30080"

    service:
      type: ClusterIP

    mongodb:
      enabled: false
    minio:
      enabled: false
Replace:
<YOUR_CLUSTER_NAME>—the name you entered in the Keploy UI<YOUR_INGRESS_HOST>—the hostname that resolves to your cluster:30080—the NodePort from the Contour patch. For cloud clusters (EKS/GKE/AKS) using a LoadBalancer, use:443instead
Create the HTTPProxy for TLS Passthrough
Create clusters/staging/k8s-proxy-httpproxy.yaml in your Git repo:
apiVersion: projectcontour.io/v1
kind: HTTPProxy
metadata:
  name: k8s-proxy-ingress
  namespace: keploy
spec:
  virtualhost:
    fqdn: <YOUR_INGRESS_HOST>
    tls:
      passthrough: true
  tcpproxy:
    services:
      - name: k8s-proxy
        port: 8080
Replace <YOUR_INGRESS_HOST> with the same hostname used in keploy.ingressUrl.
[!NOTE] TLS passthrough is required because the
k8s-proxyserves HTTPS natively. Envoy forwards the encrypted connection directly to thek8s-proxywithout terminating TLS. See the TLS passthrough explanation above.
Push and Let Flux Reconcile
Commit and push all three files:
git add clusters/staging/keploy-source.yaml \
        clusters/staging/keploy-k8s-proxy.yaml \
        clusters/staging/k8s-proxy-httpproxy.yaml
git commit -m "Add Keploy k8s-proxy deployment"
git push
Flux detects the changes and applies them automatically. Check the status:
# Force immediate reconciliation (optional)
flux reconcile source git flux-system

# Check HelmRelease status
flux get helmreleases -n keploy

# Check HTTPProxy
kubectl get httpproxy -A
Verify Flux Deployment
# Check k8s-proxy is running
kubectl get pods -n keploy

# Check HTTPProxy status (should show "valid")
kubectl get httpproxy -A

# Test connectivity through Contour
curl -sk https://<YOUR_INGRESS_HOST>:30080/healthz
# → {"status":"ok"}
✅ Open the Keploy UI → Clusters → your cluster should show as Connected. You can now record and replay traffic on any deployment.
Related
- Kubernetes Local Setup (Kind) — spin up a local Kind cluster.
- Install Keploy — install Keploy and sign in.
- Deploy Keploy with ArgoCD — GitOps deployment on the cluster.